Very beautiful DIY bracelets. DIY bracelets quickly and easily
Every girl loves jewelry very much, and if they are created with their own hands, then their value is indescribable. Thanks to several basic bracelet-making techniques, which you will learn below, you will be able to create a unique piece of jewelry in just a few minutes, and the result will cause admiring glances. In addition, any thing that you make with your own hands and with love can be given to a loved one.
Simple bracelet
To make an original bracelet with your own hands you need very little:
Any beads you like. The size can be the same or different as desired.

Silk or satin ribbon.
Scissors.
Fire (candle, matches, lighter).
We take a ribbon of the required size, cut it and carefully singe the ends of the ribbon to prevent the ribbon from unraveling.
Then we string the selected beads onto the ribbon and tighten the knots tightly on both sides. If your beads are of different sizes, then it is better to alternate them after one or two. We continue to put beads on the ribbon until they run out and you have a gorgeous bracelet of the required size.
By experimenting with different shapes and colors of both beads and ribbons, you can create many bracelets using the same technique, but radically different from each other.
Thread bracelet
Another way to make an original bracelet, for which you need to take:
Any ribbon or rope, you can use threads for knitting.

Connecting ring.
Sewing needle.
Scissors.
The first thing you need to do is cut the selected material into 5 parts. Two are 75 centimeters, two are 50, and one is 25 centimeters.
The parts, which are 50 centimeters long, must be folded in half and inserted into the connector from different sides, and then tied tightly with a knot.
Fold part of the cord, the length of which is 75 centimeters, in half and mark the middle. We place the marked part under one of the threaded cords, tie a knot and begin to weave a bracelet. It is necessary to continue weaving until the desired length is woven. It is important to tighten the knots very tightly.

To finish the weaving, you need to thread one end of the cord through a hand needle and thread it through the four weavings (knots) made. If this is quite difficult to do, you can use pliers. Next, you should pull out the needle, thread the second edge of the cord through it and do the same thing. The cord can be cut, leaving small tails.
The same needs to be done on the second part of the bracelet. After all the manipulations, you need to make a circle and lightly secure the ends of the cord together.
A part of the cord, the length of which is 25 centimeters, will be needed at the final stage. From it you need to weave knots on the back of the bracelet, as was done in the previous steps.
After you have weaved a little, you need to release the ends of the cord that were temporarily connected and secure them, the ends must be cut off.
Stylish beaded bracelet
Beads are back in fashion, so we bring to your attention a way to make stylish jewelry from threads and beads. If you slightly modernize it, you can use ribbons and beads. Here everything depends only on your imagination.
To make it you will need:
Beads or seed beads.
Threads.
Scissors.
Threads that are used for embroidery - floss - are well suited for this method. You need to take two threads of the required length, fold them together, bend them in half and tie a knot at the top so that you are left with a loop. There are four ends of the thread coming out of the knot; one of them needs to be cut off closer to the knot.
From the remaining three threads you can start weaving with a regular braid. Continue weaving until you have weaved a few centimeters.
Next, we begin to put one bead on the side threads and continue weaving using the braid method. When the desired length is reached, you need to secure the ends of the bracelet and make a clasp.
Useful video: Simple bracelets made of MK beads
Original and stylish bracelets that are easy to implement, will highlight your individuality or will be beautiful
It goes back centuries, and today weaving products from these small glass or plastic beads is one of the most popular forms of needlework. The best part is that you don’t have to spend a huge amount of time on this activity. You won’t need a lot of money to buy materials and accessories. And the main thing is that almost anyone can do beadwork.
What can be made from beads?
Despite its apparent simplicity, beads are one of those rare materials when working with which you can give complete freedom to your imagination. With its help you can create magnificent panels, embroider, make both flat and three-dimensional toys, flowers and trees. However, costume jewelry is especially loved by most craftswomen, and many beginners, looking at the work of their more experienced colleagues, ask the question: “How to weave bracelets from beads?” Practice has proven that this is not so difficult. And even someone who has never dealt with beads before can weave the simplest jewelry. How? Let's find out!
Variety of shapes and types - weave your own bracelet!
Any beaded jewelry that is made with your own hands is unique. And, as a rule, there is not a single one similar. This is not surprising, because despite the fact that they are woven according to the same principles and patterns, you can weave a variety of simple beaded bracelets, each of which will be combined with a carefully selected outfit for any occasion. Beginners are advised to start with simple patterns.
When weaving a bracelet, you are not limited in the choice of material. You can choose small or large beads, of any shape you like: standard round, square, oval, triangular and many others. You can not limit yourself to beads only, but also buy short sticks, called beads, or long ones - bugles. To create more complex products, craftswomen purchase large beads, sequins, cabochons - specially processed precious and semi-precious stones, which are widely used to make jewelry.
The choice of the shape of the bracelet is also yours: you can make a thin chain of beads or weave a wide bracelet from beads. It all depends on your preferences and on what product you ultimately want to see on your hand.
Weaving can be different: both openwork and solid, with various inclusions. Your imagination is not limited by anything except possibilities, knowledge, abilities and skills, and, of course, materials.
You don’t have to take one color at all if you are planning to make beaded bracelets with your own hands. Weaving patterns, which can be found in books on beading, completely free up your hands. Do you want a bracelet with a pattern? Nothing could be easier! With your name or the name of the person to whom you want to present your creation? No problem! Do you want to wear a bracelet on your arm with some inspirational saying? Please! Use your imagination and go ahead!
Tools required for work
What should those who decide to learn how to weave bead bracelets stock up on?
First, of course, you need the beads themselves. Experienced craftswomen recommend purchasing material specifically for each individual product. In this case, you will know exactly how many beads and what color you need, and therefore you will not add too much. Beginners are advised to take a little more material, with a reserve.
Secondly, you need to buy the thinnest fishing line you can find. Some weaving patterns involve stringing beads onto a strong thread. However, it should be remembered that the thread may rot and break over time. Then the decoration you made will be destroyed.
Thirdly, no less important is where the beads will be located during work. It is not very convenient to take it out of the bag, so you should find some convenient container where you can pour it. A good and simplest option is a plastic lid. You can also buy special containers for storing and working with beads in textile stores.
Fourthly, if you decide to work with thread, you will need a very thin and short needle. When working with fishing line, it is usually not used, since the fishing line itself is very rigid, and there is no particular need for a needle.
Fifthly, most products will require clasps, which can also be purchased at a specialty store, but some bracelets do not provide them.
Of course, any craftswoman cannot do her work without scissors. This is not surprising: you never know what needs to be cut or trimmed while working.
And finally, those who want to learn how to weave beaded bracelets cannot do without free time. It doesn’t have to be a lot; you can devote an hour or two to this exciting activity. You should also be patient and practice perseverance, without which you will never get the bracelet of your dreams.
The simplest bracelet
This simple bracelet is woven using a pattern called a “cross”. It is ideal for beginners; it is easy to master one of the techniques on how to make a bead bracelet with your own hands. Here you can use either one color or two.
In order to make such a bracelet, you should:
- Take a fishing line or thread with two needles, string 4 beads on its middle.
- Pass one end of the fishing line (thread) through the last bead towards its other end, tighten it to form a cross.
- Next, you should collect one bead on each end of the fishing line (thread), pass the third bead through both ends and tighten.

The result should be the chain you see below. You can make a simple, but very nice bracelet from it, if you collect two more beads, pass both ends through the first bead of the chain, and then, after tightening and securing the fishing line or thread, cut it.

Bracelet with flowers
This type of bracelet will also be suitable for beginners. Making it will be another good training for anyone who has started learning how to make a beaded bracelet. You will need beads of two colors. One (for example, red) will be the petals, the second (for example, yellow) will be the core of the flower. At your request, the flowers can be multi-colored.
To make it you need:
- Tie a knot, securing the end of the fishing line, leaving a small tip to secure the ends of the bracelet.
- Collect five red beads and one yellow.
- Pass the needle through the first bead.
- Pick up three more red beads, insert the needle into the nearest red bead and tighten.

The result of these manipulations should be a flower. To make a bracelet, make the required number of such flowers, secure the ends of the thread and cut.
Tourniquet
Those who have already mastered the simplest technologies of how to weave beaded bracelets will find it interesting to weave a rope bracelet that stretches as if it were made with an elastic band. To make it you will need a large amount of beads, since it is woven in a circle. To make it easier to master the technique, let's try to weave a single-color rope.
To do this you need:
- Fasten the end of the thread, leaving a small piece of it.
- Take 7 beads and close them into a ring, threading the thread through the first one.
- String one bead and thread the thread into the third bead.
- Take one bead again and pass the thread through the fifth bead.
- Continue weaving, putting on one bead at a time and passing the thread through the bead located one after the other. The weaving will go in a spiral.

Having weaved a rope of the required length, tie the ends together. Or sew a lock to one edge and a clasp to the other.

Name bracelets
A beaded bracelet with a name will be a wonderful gift for a loved one. To make it you will need beads of several colors. The product itself is woven using a “brick” pattern, also called “mosaic”. If you don’t know how to weave a beaded bracelet using a similar technique, and you’re afraid that you won’t succeed, don’t worry: even beginners can make such a bracelet. In a similar way, you can make a product of any thickness and with any pattern, but the bracelet itself will turn out durable, similar to a strap.
To make it you need to do the following:
Draw a diagram of the future bracelet on a sheet of checkered paper, paint over the beads that will be the name. Also, if you want to make other similar bead bracelets, weaving patterns can be found in special publications. For example, we decided to make a bracelet 10 beads wide. To do this you need:
- Fasten the end of the thread and put 10 beads on it.
- From the last bead, return to the previous one through the top so that the line points down.
- Thread the thread back into the last bead through the bottom.
- Continue weaving in this manner: take one bead, thread the tenth bead through the top, and the eleventh (last) through the bottom. And so on.

- Remember to follow the pattern and weave in the right color beads to get the right name or word.

As you can see, learning how to weave a beaded bracelet is not that difficult. The proposed patterns are simple and ideal for starting to master the art of beading. Let making beautiful jewelry with your own hands not be a problem for you. I wish you creative success!
Evgenia Smirnova
To send light into the depths of the human heart - this is the purpose of the artist
Content
How to make a bracelet from beads? Weaving all kinds of beautiful jewelry is a fascinating, interesting activity that has won over many craftswomen thanks to the unique opportunity to realize their creative potential. Using the master classes and video lessons for beginners in this article, you will learn several options for creating original, stylish, bright jewelry for the wrist.
Step-by-step instructions and patterns for weaving a beaded bracelet
A bracelet is one of the most popular women's jewelry, which the fair sex enjoys experimenting with. Despite the fashion and current trends that glossy publications dictate to us, hand-made products have always been highly valued. Beaded bracelets are inexpensive accessories, but they are not inferior in beauty to modern jewelry. Do not mistakenly believe that such jewelry is only suitable for children and teenagers. Real needlewomen are capable of creating such masterpieces that at first glance it is difficult to understand what material was used.
If you want to learn the skill of creating beaded bracelets, then the master classes and video lessons below will help you. With their help, you will master basic weaving techniques that will allow you to create a masterpiece: it may even be the lightest version of intertwined bottoms with beads, but it looks gentle, weightless, and is suitable for any occasion, even for an evening out.

Before starting work, you should stock up on enough materials so as not to be distracted from the process. Choose high-quality Czech or Japanese beads, where each bead is the same size, because the final appearance of the product depends on this. The Chinese material is uneven, so the bracelet will look ugly and untidy. If you have no experience in weaving at all, you can practice on cheap beads, making a rough version of the decoration, and for the final one, purchase good material.
It is better to immediately choose different colors, shapes and sizes of beads and bugles. This is necessary if during the process you need to add any elements to the product, you want to modify the design, bring in your own developments, which will give the product an original style. In addition, you need to stock up on smooth, strong, carefully twisted threads that are slightly slippery to the touch (nylon, lavsan, polyester). Don’t forget about fishing line, special thin needles, clasps, carabiners for thin and thick bracelets.
Weaving a simple bracelet for beginners

For beginners, weaving bracelets with beads may seem like a complicated, time-consuming task. However, you should not rush to conclusions, because you need to start with the easiest schemes, as in this master class. Gradually you will master this skill and be able to share your experience with like-minded people. The presented pattern is called a monastic or cross pattern, which anyone can easily master. Prepare a needle, multi-colored or plain beads, fishing line, thread or monofilament. Step-by-step instructions on how to weave baubles from threads and beads.

- We collect four beads, close them in a ring, inserting the needle into the first, second and third. A cross has formed.
- We string three more, insert the needle into the fourth of the previous link. This is how the next cross is formed.

- We bring the needle to the top of the link.
- We weave until we get the desired size.

- It turns out to be a chain of crosses, but it looks uneven. To fix this, we go back along the chain to the beginning.

- Next, insert the needle into the side bead of the first link.

- We dial three, insert the needle into the side of the first link, forming a cross.
- We bring the needle into the upper bead of the last cross.
- We dial two, insert them into the side of the second link and the top of the previous one, as in the photo.

- We bring the needle through the side and top of the newly formed cross, the side of the third link.
- We continue to weave to the required length. We return along the second row to its beginning to align the weaving. We fasten the clasp.

How to weave a bracelet with a name

This method of weaving bracelets is very popular due to its simplicity and the ability to create a fabric with different inscriptions and pictures. Different-sized beads are not used here, but the flat classic texture is compensated by the ability to create unique patterns. This dense beaded ribbon emphasizes the elegance of the wrist and is suitable for women. In addition to the name, the product may contain animal figures, plant or ethnic ornaments, and signs. You can purchase a loom or make it yourself. Step-by-step instructions:


- We wind the threads on the machine, of which there should be one more than in the diagram.
- We thread the needle and tie it to the first one on the machine.

- String the required number of beads.
- We insert the needle under the threads so that each bead falls between the threads of the machine.

- We stretch the needle over the threads of the machine with beads, tighten. It was the second row.
- We continue to weave according to the pattern with your name.
We weave an openwork bracelet from beads and beads

Fans of beadwork should not stop at basic patterns. There are many interesting, more complex patterns that you can use to make an openwork bracelet. In the given lesson, large beads are intertwined with small beads and here you can also play with a variety of options: choose pearls, smooth large ones, faceted ones, on which rays of light will play beautifully. The main thing is to choose colors harmoniously: contrasting or two similar shades. To work, you may need a lock, pearl beads, beads, bicone, needle, nylon thread. Step by step instructions:
- We will work with a thread in two folds for reliability, so that the product does not tear. First, we attach the lock to the loop with a sewing knot. We string two large ones as a base. We collect 6 beads, a bicone, again 6 beads.
- We pass the needle through two large ones and tighten them.

- We do the same on the other side.
- We collect one large, six small, bicone, six small. We pass the needle through the previous one and the newly threaded one.

- We do the same on the other side.
- We continue to weave to the desired size, at the end we attach the second part of the lock.

Volumetric beaded bracelet

Looking at exquisite jewelry for a woman’s wrist, it is sometimes difficult to guess that these products were made by hand. A voluminous bracelet looks complicated only at first glance, but in fact the manufacturing technique is very simple, as you will see for yourself. An accessory with a harmonious color transition is suitable for an evening out. For work you will need: round nose pliers, pliers, beads, jewelry cable, caps for beads, end caps, crimps. Step by step instructions:
- Cut off 20 cm of the cable. We string a small crimp, retreat 6 cm from the edge. Clamp it with pliers. We string the blue color along the length required for the bracelet. We string a small crimp onto the second edge and clamp it.
- In a similar way we string 4 more pieces of other shades.

- We fold the edges together at one end and thread them through the hole of the cap, moving it towards the beads. Next, we put on the end cap, a large crimp, which we slide into the groove of the end cap, and clamp it with pliers. We trim off the excess edges and close the end cap.
- We process the second edge in this way.

- We collect two more blanks.

Handmade work has always been highly valued. Making a bracelet with your own hands is not at all difficult. Materials for making bracelets may vary. This includes wire, leather, and cords. Various beads: glass, metal, wood, natural stone.
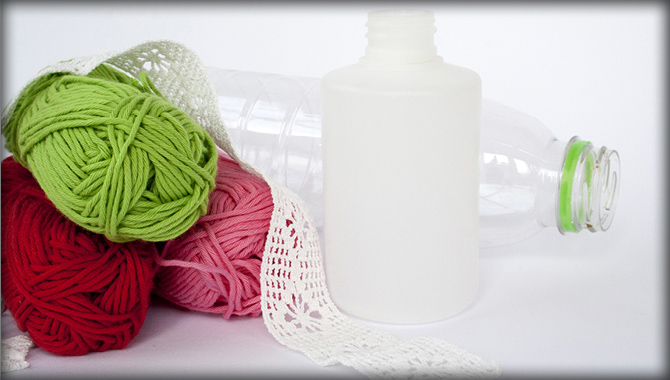
The bracelet can be woven from beads, made from polymer clay, wood, and even from paper and a plastic bottle (by cutting strips from the bottle and braiding them with cord, thread or fabric). There are plenty of options.
In order to make a bracelet with your own hands, you will need accessories, tools and your own imagination, or ready-made ideas.
As for the tools, you can limit yourself to only scissors and a sewing needle, if making a bracelet does not require working with wire. Otherwise, you will need wire cutters and pliers to cut the wire and bend it. The wire will need to be bent into small curls. You can't do this with regular pliers. You need narrow-nose pliers, as in the photo (right).

In stores you can find a lot of different accessories (wooden and plastic blanks, chains, beads, rings, clasps, etc.), which allows you to make a bracelet with your own hands that is in no way inferior to a purchased one.
Several ideas for DIY bracelets
It is not necessary to buy special materials for the bracelet. It can be made from available materials. Here's an example: button bracelet.

- scissors
- rubber
- buttons

Measure the required length of the elastic according to the thickness of your wrist and plus a few centimeters for the seam. Cut with scissors. Place the ends of the elastic on top of each other and sew tightly with thread.

Now sew the buttons to the elastic in the usual way, placing them as you wish. You can add other elements to the buttons.

This bracelet is made from buttons. Unusual and original.

Example of how to do it cord and chain bracelet.

- elastic cord
- chain
- clamps
- pliers
- sewing threads
Cut two pieces of elastic cord of the same length the width of your wrist, taking into account the length of the chain. Separate the required number of links from the chain.

Fold one cord in half and thread it through the end link of the chain. Then thread the ends of the cord into the resulting loop and tighten.
Also thread the second cord through the other side of the chain.
Fold the ends of the cords overlapping each other, coat them with glue and wrap them with threads.
Lubricate the inside of the clamp with glue and place it on the connected ends of the cords. Squeeze the clamp with pliers. The clamp should close from the inside of the bracelet.
You can make several of these bracelets from cords of different colors and wear them together.


Here, the elements that are woven into the middle of the bracelet play an important role. Gold-colored metal rings look beautiful and stylish. Bracelets with elements of different colored stones will look feminine. You can weave several bracelets and wear them together, as they turn out thin and elegant.
- 4 meters of cord for a shamballa bracelet (or waxed cord)
- ring (or other decorative element)
- scissors
- duct tape

Cut 2 pieces of 50 centimeters from the cord. Fold one of them in half, thread it through the ring, then thread the ends of the cord into the resulting loop and tighten. Do the same with the second lace on the other side of the ring.

Cut 2 cords of 1 meter each. For convenience, secure the top cord with adhesive tape. Let's start weaving a bracelet. Place a 1 meter long cord under the one attached to one side of the ring. Its edges should be approximately the same. Pass the right end over the cord that is braided. Place the left end of the cord on top of the right. Next, take the left half of the cord, pass it under the braided cord and bring it into the loop formed by the right cord. Pull both cords. This is how a macrame knot is woven.

Move it close to the ring and continue weaving such knots.

But start the next knot from the left end of the cord, then again from the right and so alternate until you have weaved the desired length.


Now you need to carefully secure the ends of the cords. To do this, thread the end of the needle and insert it under the weave.


In order to pull out the needle, it is more convenient to use pliers. Also “hide” the other end. Trim off the excess. Can be secured with transparent glue. This side of the bracelet will be the wrong side.

Using the same method, braid the cord on the other side of the ring, making the same number of knots as the first time. Also secure the ends.
Now you need to make an adjustable “clasp”. To do this, fold the cords of the two halves of the bracelet together.

For convenience, they can be tied at the edges with pieces of lace. Take the remaining cord and braid the ends of the bracelet with 5-6 knots.

Using a needle, secure the edges of the cord and trim off the excess. Do this from the wrong side.

Tie knots on the cords, retreating the desired distance and trim off the excess edges.

Place the bracelet on your hand and pull the ends.
You can weave macrame with the same knots wide bracelet. To do this, you will need a fairly long thick cord and a snap clasp.

Fold the cord in half and thread it through one half of the clasp. We thread the ends of the cord into the resulting loop and tighten it. We thread the ends of the cord into the second half of the clasp, measure the required length along the width of the wrist and wrap the ends of the clasp again. We bring the ends to the first half of the clasp, draw them into the clasp (make sure that all the cords are the same length) and now begin to weave macramé knots right at the base of the clasp.

We weave to the end, trim off the excess, leaving the ends of the cord about half a centimeter. We bring them one by one to the fire to melt them. Be careful. They will melt and can be secured in this way, carefully pressing them against the weaving so that it is as neat and unnoticeable as possible.


To do copper wire bracelet, wrap it around your wrist and cut it with wire cutters so that one end of the wire extends slightly over the other.

Use pliers to bend one end of the wire into a circle. String the beads onto the wire, arranging them as your imagination dictates. Bend the other end of the wire as well. The bracelet is ready. Give it a round shape around the wrist.

Can be done single ring bracelet.

Unbend the ring, put three small beads on it and bend the ring. Then straighten the second ring, also string three beads, connect them to the first ring and bend them. Do this until you get the desired length according to the width of your wrist. Attach a lock to the last ring.

Another interesting idea for a DIY bracelet. People around you may not even guess what it is made of. When you open cans of Coca-Cola, beer, etc., there are metal "keys" left behind. We will use them to make a bracelet.

Cut two pieces of leather or suede lace 60 centimeters each (you can take a narrow satin ribbon), put them together and tie a knot.

Pass one cord into the top hole of the “key” from the jar, and the second cord into the bottom hole. Leave about 5 centimeters from the tied knot to the first element. Place the second “key” under the first one so that the holes overlap. Thread the upper cord into its upper hole. Bottom - to bottom. Place the third “key” on the second one so that it is located close to the first one. Pass the upper cord over the first and third “key” into the upper hole of the second. The lower cord also goes into the lower hole of the second “key”.

Then, under the third, place the fourth “key” close to the second, pass the upper cord from below into the upper hole, the lower one into the lower one. Apply the fifth to the third “key” on top of the fourth and also connect with a cord. Do this until you get the desired length. Wrap the cords around the edge of the last element and tie a knot, leaving 5 centimeters. Trim off the excess ends. Here is the bracelet that is tied on the hand with a double knot:

Popular memory wire bracelets.

Making such a bracelet with your own hands is very easy.

Measure the required number of turns on the wire and cut off the unnecessary ones with wire cutters. Bend the end of the wire with pliers. String the beads. Bend the other end of the wire.

That's it, your bracelet is ready.

Here's an example of how to do it chain bracelet. Measure the desired length of chain. Remove extra links. Attach the toggle clasp. To do this, straighten the outermost link, put the fastener ring on it and bend it back. Various elements can be attached to the chain links. For example, these are butterflies. The desired link is also unbent, an element is put on it, and the link is bent.

It will look feminine leather bracelet with flowers. To make it, you can use an old belt, cutting out a part without scuffs of the required length according to your wrist, plus a few centimeters for the clasp, for which buttons are used. For colors, use leather of the same color. Cut out petals from it. Gather the flowers using a thread and needle and sew or glue them to the base of the bracelet.

You can make a bracelet from beads, gluing pins into them on both sides and connecting the pins with single rings. At one end of the bracelet, a ring is attached to a pin, and a clasp is attached to it. At the other end, only a ring is attached to the pin, onto which the bracelet will be fastened. You can use “caps” on both sides of each bead.

As you can see, making a bracelet with your own hands is easy and fun.
Navigation:
Continuing the theme of summer crafts, let's talk about how to make jewelry with your own hands. Bright bracelets, fashionable beads, unusual rings and other decorations for summer outfits will be interesting for girls to make with their own hands. Of course, mothers will help them in this exciting creative activity.
It's very easy to make wooden bracelets ice cream sticks or medical spatulas. To do this, you must first soak them in water for 24 hours so that they become flexible. To speed up this process, it is sometimes advised to “cook” them for 15 minutes, but after this the sticks may darken.

Now you need to take them out of the water and very carefully place them in a glass or cup of a suitable diameter so that the sticks take their shape. Leave them in this position to dry. Before removing the sticks from the cups, make sure they are completely dry.

These are the blanks for bracelets you should get.

All that remains is to paint the bracelets with your own paints, decorate them with fabric, paper appliqué using the decoupage technique, beads, buttons, etc.

Important! It’s better to make a bracelet with a slightly smaller diameter than you need, because... When decorating a bracelet, in particular, when treating it with paint and glue, it may straighten a little and become larger.
Paper bracelet using origami technique
It’s easy to make a bracelet with your own hands using the origami technique from candy wrappers. Detailed master class on making an origami bracelet. If you don’t have the opportunity to collect so many candy wrappers, you can make an origami bracelet from colored paper.


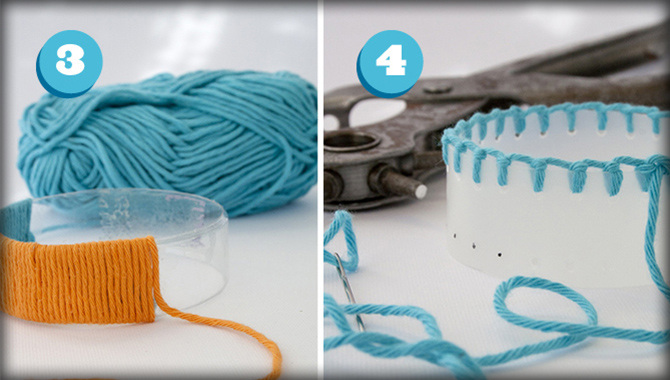
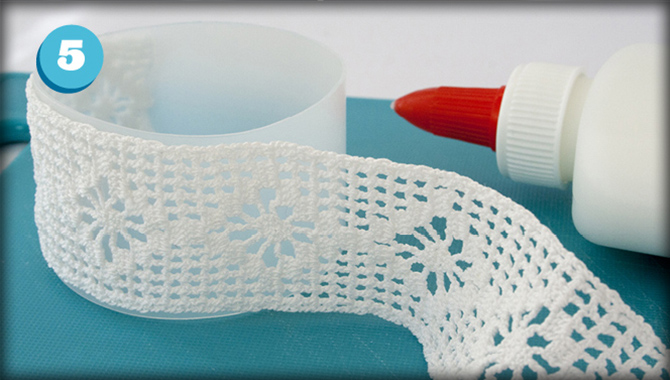
We will talk about how you can make fashionable bracelets from plastic bottles. Let us remind you about this craft again.


To make these bright bracelets from floss threads, you will need:
- leather cord
- floss threads of different colors
- beautiful button
- scissors


The easiest way to make an elegant bead bracelet is to buy an inexpensive bracelet and some cute beads from the jewelry department, and then “tie” the beads to the bracelet with colored yarn or thread.

Making such jewelry with your own hands is quick, simple and inexpensive, so you can afford to have bracelets of different colors to suit different outfits. This is what the finished product looks like on hand.

You can use a homemade bracelet instead of a store-bought bracelet.
Or you can “tie” store-bought beads to a leather cord. This bracelet made of beads looks very stylish. It can be wrapped around your wrist several times.

We looked at easy-to-make DIY bracelets that parents can make even with preschool-aged children. Now let's move on to more complex master classes on how to make a bracelet.
Beaded bracelets
Now we will teach you how to weave bracelets from beads and beads in the simplest way, accessible even to those just starting to master the science of beading.
Do you know how to braid a regular braid? If the answer is yes, then you can completely cope with the task of making such a bracelet from small beads (seed beads) and waxed cord. You will just need to sequentially weave the beads into the braid, which is woven from the cord.

In the same way, you can weave a bracelet from thick rope and hexagonal nuts.

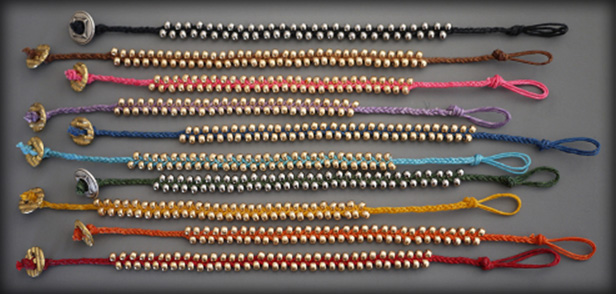
One of the most beautiful and stylish, in our opinion, bead bracelets, which even beginners in beadwork can make.


To make such a bracelet with your own hands, we need:
- any beads small size (4-6 mm). The number of beads depends on how long you want the bracelet. Decide in advance whether it will wrap around your wrist once or several times.
- leather cord
- durable threads suitable color. The threads do not have to match the leather cord; they can be of a contrasting color. A prerequisite: the thread must be of such thickness that, folded in half twice, it can pass through the hole in the bead.
- beautiful button for clasp
- needle, scissors, clip for attaching the bracelet during weaving
Work plan:
1. Measure the desired length of leather cord. Keep in mind that the cord folds in half and that you need to leave extra length for the fastener.
2. Measure the thread of the required length, thread it through a needle, and tie a knot. The thread must be double.
3. Fold the leather cord in half, attach the thread to it with the knot facing up, with the needle hanging at the bottom. Leave a small distance for the clasp loop and make a knot by tying the lace and thread together. Before making a knot, make sure the fastening button fits through the loop.

4. Attach the string with clips to a piece of cardboard on both sides for ease of use. There is no need to attach a thread. Now we proceed directly to weaving the bracelet.

5. First we will make a few stitches without adding beads. Pull the thread OVER the right end of the lace, now back UNDER it, then OVER the left end of the lace and back UNDER it. The stitch is shaped like 8. Do this 5-6 times.
6. Now let's start adding beads between the two ends of the lace. When the thread comes FROM UNDER the left end of the cord, add a bead. Now pass the thread OVER and back UNDER the right end, again through the bead, then OVER and back UNDER the left end of the cord. Now add another bead and so on.


7. Tie a button at the end for a fastener. The bracelet is ready.
Video lessons
Video tutorial No. 1
Video lesson No. 2
Video lesson No. 3
Video lesson No. 4
New articles
- Anastasia greeting cards for Nastya's birthday Happy birthday cards for Nastya girl
- What to do if the baby does not latch on to the breast?
- Weaving a rug using the ancient method
- Numerology: Karmic relationships by date of birth of partners Karmic marriage how to find out by dates of birth
- All international holidays and their dates
- Newborn baby: development in the first month of life, baby behavior and care from birth What a child can do at 1 month of life
- How to remove the musty smell of clothes and why does it occur?
- Openwork pillows made of square motifs
- Happy birthday to mom and daughter Happy birthday to you and your daughter
- What should a child be able to do at three months?
Popular articles
- Wristwatches Applicable types of power sources
- Wall newspaper for Victory Day
- High ponytail: how to make it beautiful for yourself
- How to be the perfect girl How to be better than other girls
- Isothread for beginners schemes with numbers flowers step by step
- Development of tactile perception in preschool children with mental retardation. Emotional consequences of reduced sensory sensitivity.
- Here is the order of work
- Crochet Easter chickens
- How to carefully wash thick or light curtains in a washing machine
- What to give a summer resident: practical and functional gifts for gardeners A gift for a gardener for the New Year