How to make a simple applique. Making fun paper applications with your kids
Motifs for appliques can be bought in a store, created on your own, or cut out part of the pattern from fabric.
How to make a motive
Draw the motif directly onto the reverse side of the fabric in a mirror image using a fabric marker (). Place a line along the outline of the motif.Or draw the motif on paper and transfer its outline and internal details directly to the front using a disappearing marker.
Tip: to teach your child to sew, start with appliqué. Let him draw it with his own hands, and then practice making stitches, you can use it as a basis.

How to stitch an applique
To prevent the applique fabric from fraying, iron a spacer to it from the wrong side, for example, interlining H 180. Baste the applique fabric to the product from the front side to a pre-marked place. Place a fine zigzag stitch along the outline of the motif. From the right side, cut the fabric with sharp scissors () applique close to the zigzag stitch.
Then stitch the edge of the motif again with a dense zigzag stitch. If you want the edge of the motif to look fuller, pass the thread through the finishing stitch.

If you do not want to stitch off the edge of the motif, you can outline it with a special outline paint for silk-screen printing. This will not only give relief to the edge of the motif, but will also protect it from falling off.
Important: if several motifs are sewn on top of each other, then you need to start from the bottom, as, for example, in.

Online motives
Drawings for appliqué motifs are easy to find on the Internet and can also be downloaded from our website. And these are not only hearts and stars, but also lovely butterflies in a variety of wardrobe details - skirts, short overalls, scarves. Moreover, such appliqués do not have to be sewn along the outer contour; you can sew only the body, and grab the wings in several places with hidden stitches by hand. The combination of flat and volumetric large flowers looks avant-garde and non-standard - you can make them following the description in. You will find picturesque and bright applications of maple leaves and other plant motifs in the Art Nouveau style in the master class on organza applications. They will decorate not only clothes, but also many home accessories.
For children's clothing on our website there is an applique of a cunning fox and a funny crab.

Applique as part of a fabric pattern
If you want to use part of a pattern of some fabric as a motif for appliqué, cut out the motif with a large brim and iron a non-woven interfacing to it from the wrong side. Baste the motif to the selected location on your product or sew it with a zigzag seam. Cut the fabric that extends beyond the edge of the motif close to the zigzag stitch. Then stitch the edge of the motif again using a zigzag stitch, if desired, passing a thread through the seam.Advice: if the fabric does not fray, then you can do without stitching along the edges, as in.

Tulle appliques
Graceful translucent appliques are obtained using tulle. For a tulle appliqué, draw the motif on the front side of the piece and baste the tulle on the back side. Sew the contours of the motif from the front side with a dense zigzag stitch, while laying a thread along the edge of the motif so that it acquires volume. Cut the fabric inside the motif close to the zigzag stitch. Do not cut through the tulle.
Appliqués are made from other transparent fabrics in a similar way, for example, as in.

Lace applique
It is done quite simply. Sew the motif cut from lace fabric onto the fabric from the front side using a dense zigzag stitch. Cut the fabric underneath the motif close to the stitching.
A lace applique can also be sewn on by hand with hidden stitches, for example, as was done by , who used woolen lace-braid to trim a coat: on the sleeves, back, and lower part of the skirt. Zlata cut out 2 different lace motifs and arranged them on the finished coat.

Applications with unusual effects
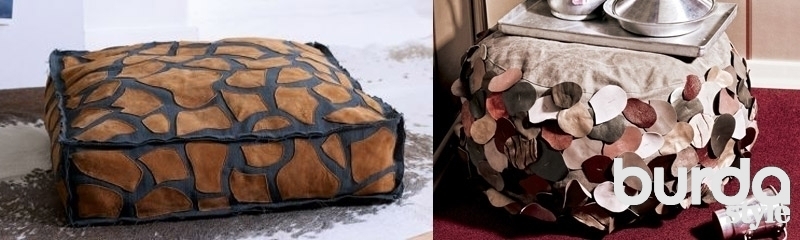
If you like interesting, unique designs, then use non-trivial materials for appliques: fur, fabrics with a mirror coating, metallic fabrics, with mesh embroidery, crocheted, as well as leather and suede.In a tutorial on sewing a rectangular floor pillow, soft brown suede appliqués are sewn in the shape of a zebra skin pattern. Such a floor pillow will immediately give the interior a noble, exotic touch. And ovals cut from the remains of leather are sewn onto the fabric not along the contour, as described, but in the middle, imitating the vein of a leaf. From the outside, this ottoman appears to be strewn with fallen autumn leaves.
Applications made from colored paper have long been a traditional creative activity for children.
It allows you to develop skills in handling scissors, improve the work of children's hands and make the baby more careful. Every child will be able to make appliqués from colored paper with their own hands if they are given a feasible task.
So, the most affordable options for colored paper applique for children 4-5 years old can be:

Volumetric applications made of colored paper
Ladybugs. Cut out two red circles and a black semi-oval. Black dots are placed on the circles, after which one circle is glued exactly above the black semi-oval, and the second is bent in half and glued to the first circle. We complement the bug with toy eyes and antennae.
 Materials for the “Ladybug” applique
 We complement the bug with toy eyes and antennae.
 Application "Ladybug"
 Look at the video on how to make a ladybug applique using a different technique:
Application made from pieces of colored paper
Chanterelle. Cut out a triangle from a paper plate, and use a stapler to attach two triangles of orange cardboard to its round edge. Then cover the plate with pieces of orange thin colored paper.

Fill out the entire piece of paper.

Triangles are ears and circles are eyes
All that remains is to attach the round eyes - and the fox is ready!

Ice cream. We draw or cut out ice cream cups from colored paper in advance and glue round cupcake molds to them, like creme brulee balls. With these molds you can make other applications of dishes if you use them as plates.
 Application "Ice cream"
 Application made from colored paper using a template
Bunny. We cut out the ears, head and triangular nose of the bunny in advance according to the template, as well as a bush of grass behind which it will hide.

We assemble the picture on a sheet of white paper, glue all the details and animate the bunny with toy eyes.
 Application "Bunny"
 Polar bear. Using a template, we cut out a round body, a head with ears, a muzzle and paws of a bear from white paper.

Let's complete the necessary details. We cover a sheet of white cardboard with blue watercolor, creating a background.

Against this background, we assemble our bear and complement it with toy eyes.
 Application "Polar Bear"
 Multilayer applications made of colored paper
As an applique made of colored paper for children 5-6 years old, you can use more complex, multi-layered paintings containing small details. Preschoolers are quite capable of creating characters such as:
Fish. We cut out a triangular fragment from a disposable plate, cover the remaining part with “scales” - semi-oval pieces of colored paper of different colors, which need to be applied, slightly overlapping each other. We attach the tail and fins with a stapler, and glue on the eye. Ready!

Here is another fabulous fish with colored scales.

Dragonfly. From thin paper we cut out the body of a dragonfly with a head and eight multi-colored wings.

Glue it all to a white sheet, complement the image with mustaches and toy eyes.
 Application "Dragonfly"
 Application made of colored paper and disposable plate
Chicks in the nest. Glue half of a disposable paper plate to a sheet of cardboard. From blue paper we cut out three oval figures of chicks.

We cover the figures with lumps of crumpled thin blue paper, and the nest with decorative shavings.

All that remains is to glue the eyes and beaks of the chicks - and the applique is ready!
 Craft “Chicks in the nest”
 In the “autumn tree” applique, a disposable plate serves as the background.
 Application "autumn tree"
 Applications made of colored paper using a complex pattern
Girl in the rain. This application is based on working with complex templates, according to which you need to cut out an umbrella, boots, head, dress, hair and hands of a girl.
 What needs to be cut out for the “Girl in the Rain” craft
 We assemble the picture on a sheet of blue cardboard, gluing the parts one by one.
 Application “Girl in the rain”
 Combined applique made of colored paper
Chicken with an umbrella. This application also involves working with templates, but if it is difficult for children to cope with such a task, teachers or parents can prepare templates in advance.
 Materials for crafts “Chicken”
 We decorate the umbrella with pieces of translucent colored paper, which will make the image more interesting.

All that remains is to collect the picture.
 Application “Chicken with an umbrella”
 Volumetric applique made from pieces of colored paper
Flower. Cut out the outlines of a flower from a disposable plate or sheet of cardboard.

Cut small pieces of colored paper and roll them into lumps. One by one we glue the lumps onto the glue.

Carefully fill the entire space of the flower.
 Application made of colored paper “Flower”
 Another craft option is “sunflower”. Draw the outline of a sunflower on a piece of paper. Cut pieces of yellow and green paper.

Glue a black circle in the center. We begin to decorate the craft with pieces of paper. Before gluing the paper, crumple it a little - this will give the craft additional volume.

Sunflower applique made of colored paper.
 Sunflower applique made of colored paper
 Rainbow. It is made in much the same way as a flower: the child crumples colored paper and carefully places it in rows, observing the sequence of colors in the rainbow.
 Application "Rainbow"
 Using the 3D appliqué technique from colored paper, an autumn tree turns out to be very beautiful.

You can make a heart applique from pieces of red and pink paper. We use a heart made of cardboard as the basis.

We crumple the pieces a little and glue them to the base. The craft will look interesting if you alternate red and pink lumps.

Excellent appliques are obtained using the cutting technique. Small pieces of paper are glued tightly to one another using a thin stick.

This is the kind of airplane that can be folded from pieces of paper using the cutting technique.

Instead of glue, small pieces of paper can be fixed to a plasticine base.

Flat applications from pieces of paper
The herringbone applique from colored paper is made using a very interesting technique. Pieces of thin tissue paper are glued onto triangular bases. In this case, the pieces can seal the edges of the Christmas trees and stick to one another. Only after this the triangular base is glued onto the pre-painted background.
 Christmas tree applique made of colored paper
 Straw man. The application is made using the mosaic technique. Glue the hat and head of the stuffed animal cut out according to the template to the sheet, and draw the contours of the body.
 Materials for the “Straw Scarecrow” craft
 The child’s task is to fill the body with pieces of colored paper, gluing them next to each other. We lay out the stuffed animal’s hair and beard using the same yellow pieces.

Sunset. We lay out sand and purple sunset with pieces of yellow color.


A small palm tree will complement the landscape.
 Application "Sea" made of paper
 Applique with quilling elements “heart”
Applications with elements of quilling or paper rolling look very impressive. In order to make an applique we will need colored paper, a pencil, scissors and glue.
Cutting paper curls
Glue the paper curls onto a pre-prepared base - a paper heart.

Decorate the curls with rolled green paper. The curls begin to resemble graceful roses framed by petals. We create an interesting applique using the paper rolling technique.
Application “Vase with flowers”You can make a very impressive “Summer Meadow” applique postcard from colored corrugated paper and wire. The technique for making it is very unusual. We wrap corrugated paper several times around an easily bendable rod or wire. Fix the end of the paper with glue.

Squeeze the paper onto the wire. Cut off the excess wire and tuck the ends. We should get colored thick sausages.
 "Sausages" made of corrugated paper
 From these “sausages” we lay out an applique on paper.

You can make a very beautiful wall panel with yellow flowers from colored corrugated paper.
Applique on a paper plate “bed with carrots”
Very beautiful applications are obtained if they are based on a background painted in watercolors.
 Application and drawing “spring”
 Using different techniques and combining ideas in your own way, you can create unique paintings that will become a real manifestation of children's talent.
Application is an interesting and accessible form of creativity for adults and children. It's just cutting, overlaying and gluing parts onto a specific background. It's quite easy to do. Using appliqué, paintings, compositions, and ornaments are created. It is performed on fabric or paper, other surfaces in the form of pots, boxes and other items for decoration.
The pieces are placed on a specific surface. The materials used are colored paper, cardboard, shells, beads, dried leaves and flowers, straws, birch bark, and fabric. Fragments of the applique are glued or sewn.
White and colored cardboard, paper with different textures, and plain fabric are used as a background. It depends on the materials used to make the applique. The size is selected individually, taking into account the composition of the application and its theme.
There are several types of applications:
- subject;
- decorative;
- plot;
- single color;
- multicolor.
Application, like, is widespread in everyday life. It can decorate clothes and household items and hide defects on them. It is used in the manufacture of paintings and panels.
The application arose a long time ago. Our ancestors decorated their clothes and shoes, dishes, household and interior items with it. First, the products were chipped with through points. Then, when animal skins were sewn together as clothing, they began to be decorated.
To decorate the products, they used pieces of wool, fur and leather of different shapes and colors, and then attached them to clothes. This is how the application was born. People used their fellow tribesmen, incidents from life and hunting as the basis for the appliqué. For their products they chose images of various objects, including flowers, animals, plants, fairy-tale and mythical creatures.
With the development of society, materials for application were improved. Later, various threads, fabric, pebbles, coins, and beads began to be used with everyday materials. With the advent of paper, a new type of applique arose.
Cutting out flat silhouettes has gained popularity among different segments of the population. More and more people were captivated by paper paintings. Illustrations from human life, hunting, and battles appeared on them. Specially trained craftsmen tried to perform them at the highest artistic level.
But ordinary people also loved to carve. This is what residents of Ukraine and Belarus do. There are no sketches in their works. Products are cut with scissors without preliminary marking.
The process of creating an application, regardless of the materials used, is always the same and includes the following sequence of actions:
- Make a sketch of the work.
- Determine the size and shape of the application.
- Select materials for work.
- Cut out the details.
- Choose a background.
- Apply parts of the applique to the background.
- Glue the fragments.
- Place under weight and dry.
You can use clippings from newspapers and magazines as appliqué fragments. To make paper appliques, stationery glue and PVA are used. For fabric appliques, gluing and sewing are used.
If parts are sewn on, they do so using machine stitches, tape, bias tape and laces. If the products will not be washed, then gluing is used. For these purposes, paste and synthetic glue are used. It is convenient to glue the product using plastic film. Place a piece of film under the cut out fragment and iron it with an iron.
Useful tips
Young children love new and interesting things.
You can interest them in unusual crafts made from simple and familiar things.
It is worth noting that creating applications contributes to the development of a child’s imagination. In addition, the baby develops motor skills and perseverance.
Try to make the child work independently, only helping to turn the whole process into an interesting game.
Paper application: "Still life"

You will need:
Regular (packaging) cardboard
Colored cardboard
Colored corrugated cardboard
Colored paper
Scissors
PVA glue
1. Prepare white corrugated cardboard and cut out an oval from it, approximately 30 x 45 cm in size. This oval will serve as a fruit dish.
2. Use regular cardboard to cut strips 2-3 cm wide and of different lengths.
3. Prepare orange cardboard and cut out 2 circles from it, these will be your oranges. Glue small pieces of thick cardboard on the opposite side of the oranges.
4. Take green paper and cut out 15-20 leaves from it. They can be of different sizes. You can use sheets of different shades of green.
5. Leaves should be glued to the top edge of the dish. Glue the oranges the same (see image).

6. Take yellow cardboard and cut out a pear from it. Cut out a circle from red paper.

7. To make the apples, take bright red cardstock and cut out fruit from it. Yellow crepe paper is suitable for bananas.

8. You should glue pieces of thick cardboard to the back of the fruit.
9. Now glue all the fruits to the dish.
10. Use red corrugated cardboard to cut out 4-5 cherries. You can cut out 4-5 plums from blue cardboard.
11. Prepare shiny green cardboard and cut out 10-12 circles of different diameters from it. These will be your grapes.

12. You can place the grapes on a plate close to each other so that you get a bunch of grapes. You can add colored paper leaves to the grapes.
13. Use yellow and brown paper to cut out the stems for the apples and pears. Glue these tails to the craft.
Applications for children: "Leaves"


Children's applications: "Animals from leaves"
In autumn, you can walk through the forest and collect fallen leaves, which have a very beautiful color. In addition, you can find chestnuts, acorns, branches and cones, which can also be used to create a beautiful applique.
You can make animals, bright landscapes, or simply beautiful patterns from leaves.

1. First, the leaves need to be washed and dried.

3. To glue the leaves to the paper, use regular PVA glue.
4. You can use scissors to trim or change the shape of the leaves.
* For more realistic animals in the applique, try preparing animal templates first.


Applications made of colored paper: "Butterflies"
This simple applique will look very nice around the house and your child will really enjoy making it because it is simple and fun.

You will need:
Unusual paper (you can just use colored or velvet paper)
White sheet as a base.
Pencil
Scissors
1. Trace the child’s hands on paper with a pencil.
2. Cut out the resulting palms from paper.
3. Now glue the paper palms to the base (see image).
4. Make the body and head of the butterfly. They can be drawn with paints, pencils or markers, or they can be cut out of colored paper. Draw the mustache.
5. Butterfly wings can be decorated. You can use plasticine, glitter, stickers and much more.
6. Leave the craft to dry, and in the meantime draw the butterfly's face.
7. Then the butterfly can be cut out according to the office. It can be hung above the baby's crib, decorated with walls or flowers.
DIY applications: "Lamb"
A child can make a funny lamb from ordinary paper napkins.

Its fur is made from small rolled paper balls.
Parts that are not completely glued, such as a cloud, grass and butterfly wings, as well as the face of a bull, can create a volume effect.
If a baby blows on the grass, its tips will sway, and if it blows on a butterfly, it will seem to begin to move its wings.
You will need:
Colored cardboard
Paper towels
Pencil
PVA glue
Colored paper
For the background, use colored cardboard.
1. First cut out the face and ears of the bull.

2. Glue the parts to colored cardboard, not forgetting to take into account the body, as well as the height of your future grass.
3. Prepare a paper towel. Tear it into small pieces, from which you then roll into balls.
* You can use napkins of different colors, then you will get a cheerful multi-colored lamb.
4. Draw the outline of the torso and head using a pencil.
5. Start gluing pieces of crumpled up paper towel to the body of the lamb.

6. Cut out grass from green paper and glue it to the base of the applique.
7. You can add a butterfly or other applique decorations. The butterfly can be cut out of colored paper.
Paper applications for children: "Chickens"

You will need:
White and yellow paper
Cardboard for base
Simple pencil
Markers
1. Prepare a white sheet of paper and draw an egg on it with a pencil.
2. Draw a curved line in the center of the drawn egg.
3. Cut out the egg and cut it into two parts along a curved line - the egg looks like it has split.
4. Prepare yellow paper, draw an egg on it and cut it out. From this oval we will make a hatched chicken.
5. Now the yellow oval needs to be glued to the cardboard (the basis of the entire application). Using a marker, draw eyes, beak, legs and wings on the oval to create a chicken.
6. Glue the bottom half of the white egg on top of the chicken, covering the bottom half. And stick the other half next to or on the head of the chicken.
Application for a child (3-4 years): “Towel for Grandma”

You will need:
Colored paper
Velvet paper
Crepe paper
Double-sided colored paper
Scissors
PVA glue
1. Let the child cut out all kinds of patterns from colored paper - circles, squares, stripes.
* You can draw the ornament in advance so that you know which parts to cut out. This way you teach your child to plan.
* Try to draw the patterns yourself and let your child cut them out. Or ask your child to repeat your patterns on a separate piece of paper.
2. Place all the patterns on a sheet of double-sided colored paper or cardboard so that you get an interesting design. This will give you an idea of what it will look like.
3. Make a fringe on opposite sides of the carpet.
4. It’s time to glue the pattern pieces for the rug, after which you can give the craft to your grandmother.
Volumetric paper applique: "Rowan sprig"

You will need:
Napkins (red, orange, green)
Cardboard or thick paper
Scissors
PVA glue
Drawing or print of rowan
1. Prepare a red or orange napkin. Tear or cut small squares or rectangles from it and roll them into small balls.
* You can ask your child what such a ball looks like, and then together remember all the familiar berries.
* Let the child roll up as many of these rowan berries as he wants.
2. To make leaves, you need a green napkin. Cut rowan leaves from such a napkin. One leaf consists of several layers of green tissue.
To make a leaf, you need to fold the napkin in half lengthwise, then twist one of the ends to make a twig.
3. After making several branches, you can glue the leaves.
*You can use several shades of green to make the applique more realistic.
Application "Chamomile flowers"

You will need:
Colored paper (white, yellow, green)
Colored cardboard (in this case blue)

For one flower:
1. Cut out one circle from yellow paper - this will be the middle of the flower.
2. Cut a strip of white paper 5 mm wide and 7-8 cm long.
2.1 Fold the strip into a loop and glue the ends.
* The petal can be any size.
2.2 You need to make a few more petals.
3. To assemble the flower, glue the petals onto the yellow circle (this must be done from the wrong side).
4. Glue all the flowers onto a sheet of colored cardboard. You can add a few green leaves from colored double-sided paper.
* You can make flowers of different sizes and from paper of different colors.
Application in kindergarten: "Lake"

You will need:
Colored paper
Cardboard (in this case blue)
Watermelon seeds
Plasticine (if desired)
PVA glue
Scissors.
1. Prepare blue cardboard and cut out a large oval from it, which will serve as the basis for the entire application.
2. Making water lilies.
Prepare double-sided colored paper. From it you can make water lilies, reeds and sedges.

2.1 First, draw water lily leaves on green paper and then cut them out.
2.2 To make three-dimensional flowers, use yellow double-sided paper, from which you need to cut out several small identical circles.
2.3 Now make a fold on each yellow circle - you will get a small cap.
2.4. Use glue to create inflorescences from blanks - just put one cap into another and glue them together.
3. Glue the leaf along with the flower to a large oval, which plays the role of a lake.
4. Making reeds.
Prepare green and brown paper.

4.1 Roll the green paper into a tube to make a stem (you can use a toothpick to wrap it around the paper for convenience).
4.2 You need to cut the paper from the bottom and bend it a little, so you can glue the stem to the base.
4.3 Now the top of the stem can be sealed with brown paper.
5. Making bushes.
Prepare rectangles from several shades of green paper. Cut these rectangles into noodles, make bushes out of them, and then glue them along the shores of the lake.
6. Making local inhabitants.
You can do this item if you want to further decorate your applique.

Try making a green island decorated with berries made from plasticine. Glue this island in the center of the composition.
* You can also make a rocky shore by gluing a few watermelon seeds to the base.
* To create the inhabitants of the lake, use colored paper from which you can cut out an oval and wings for a dragonfly.
* To give the dragonfly volume, try making a fold at the base of the wings.
* Glue the dragonfly onto one of the water lily leaves or just onto the base.
Fabric appliqués: decorating a bag
If you want to make a beautiful handbag for yourself or your daughter, then such a simple applique will suit you perfectly.
This method is quite simple, and the result will pleasantly surprise you.
Three-dimensional paper applique is a unique type of children's creativity, thanks to which you can glue three-dimensional figures of animals, robots, cartoon characters, houses and even letters of the alphabet. The templates and diagrams that are on our website will help you with this.
How to do it correctly?
Although the name “volumetric applique” sounds unusual, it is not difficult to do. To do this, just print ready-made templates or diagrams, cut them out and glue them along the fold lines. The applique templates are made in such a way that by bending and gluing them along the designated lines, you can get a three-dimensional toy.
Most templates are already presented in color, so you will need to print them on a color printer. However, there are also colorless diagrams on which only conditional lines are indicated. It is enough to apply glue to the side parts of the workpiece and fold it as required by the diagram. If you decide to paint such a blank, you need to do it in advance, since it will be difficult to paint the applique in volumetric form.
Here are some examples of such applications.
Templates
Pyramid
This is the simplest applique that a child can easily make.
- Print the template.
- Cut along the outline.
- If you want to make a colored pyramid, you need to color it before forming the pyramid or simply cut out a template from colored paper.
- Fold the parts of the workpiece intended for gluing.
- Cover them with glue and form a pyramid.
Magical forest
Colored toys
This application is a little more complicated, but its principle of operation is the same. There is no need to color it: you just need to print it on a color printer.
- Cut out the printed template.
- Fold the template along the fold lines.
- Lubricate the “wings” with glue and assemble SpongeBob.
- Check that the glued parts are held tightly.
poppy flower
Now let's try a more complex application - make a poppy flower.
- Print out the flower templates. If you decide to make a bouquet, you will need several blanks.
- Cut out the applique components.
- Place the flower corolla blanks on top of each other so that the petals of the top one are in the spaces between the petals of the bottom one.
- Glue the whisk together, giving it a three-dimensional shape.
- Glue the black center inside.
- Glue leaves on the outside of the flower at equal distances from each other.
- If you are making a bouquet, then each flower can be placed on a wire stem wrapped in colored paper. You can also stick flowers on a postcard or a pre-prepared base.
Such voluminous applications will look natural and simply magnificent.
Templates
You can make almost any flowers this way by printing out blanks from the website or preparing voluminous appliqués from multi-colored paper. Here, for example, is a lush carnation. However, unlike the poppy, this applique is more complex, since you will have to form the corolla of the flower from six parts.
Dog booth
Here is another more complex application. From three main parts you can put together a dog house.
- Print the templates and cut them out along the outline.
- Fold along the fold lines.
- Attach the walls to the base of the booth, forming a cube with two pentagonal walls.
- Glue the green roof on top.
The booth is ready. If you don't have a color printer at home, you can cut out parts from colored paper or simply color the blanks.
Corrugated paper
Corrugated paper is more suitable for creating voluminous appliqués. It is initially a little convex, and if you use this quality correctly, you can do interesting things.
Cornflowers
- Prepare the base for the applique. This can be cardboard or thick colored paper that is not saturated with glue.
- We apply the outlines of the drawing to the base in advance.
- From blue corrugated paper (you can take paper of any shade), cut out small squares measuring 1 sq. cm.
- Place a pencil in the center of each square and roll it slightly so that the squares take on a three-dimensional appearance.
- Without removing the pencil, apply glue to the end of the square and glue it.
- Fill the entire drawing with such squares.
This technique of applique from corrugated paper is called “trimming”. The good thing about it is that the flaws are almost invisible. It is simple enough that even kids can do it.
Hedgehogs
These voluminous appliqués made from colored corrugated paper are simple, but look simply wonderful.
- Prepare the base. It could be a candy box, colored paper, a postcard, etc.
- Fold a sheet of corrugated paper 4 or 5 times.
- Draw 2 circles. To make them even, you can use a compass, cup or glass.
- Cut out the circles. One hedgehog requires 10-15 circles.
- Glue the circles together, applying glue only in the center. The edges should remain free.
- Make frequent cuts and fluff out the ends.
- Cut out a triangular hedgehog muzzle from cardboard and glue it to the body.
- Place the hedgehogs on the base.
- Eyes, mouth and nose can be drawn with a black felt-tip pen or cut out of black paper and glued.
- In the same way, you can make flowers and grass for a clearing from corrugated paper by folding the paper and making cuts on it.
Here's what kind of hedgehogs you can get.
How to make a 3D postcard from paper?
Applications from ordinary colored or corrugated paper can be made at home, in a kindergarten or an aesthetic center. They are extremely useful for children, as they develop a sense of color shades, artistic taste, spatial thinking and a sense of composition. Cutting and gluing will have a beneficial effect on children's fine motor skills and speech development.
Show your imagination with your children!
New articles
- Training at the school for foster parents remotely and on weekends for adoption and acceptance of a child into a new family
- Mask with activated carbon and milk
- What causes stomach pain during pregnancy?
- Making fun paper applications with your kids
- Children's aggression: advice from a psychologist
- Knitting toys Legs - orange thread
- New Year's stencils for cutting out paper Openwork Santa Claus
- How to professionally blow dry short hair at home
- How to make animals from beads
- Origami paper balls for the New Year Flower paper ball
Popular articles
- Air Beads Materials and Tools
- How to knit baby booties?
- Can a pregnant woman sleep on her back?
- Is it possible to eat chalk during pregnancy?
- Strawberry allergy, treatment
- Why you shouldn’t hit children Which parenting model to choose
- DIY paper lunar rover
- Why do babies need complementary foods?
- I'm alone on New Year's Day. New Year alone. What to do. Psychological tips for defeating loneliness
- Hair styler - where to buy, reviews