Openwork sandbox for son or daughter. Knitted sandbox
24.09.2015
You always want to dress up your baby in bright and elegant clothes, especially if they are made with love, by mother’s caring hands. So, such a sandbox with a “bear” pattern can be knitted yourself, and creating it is not so difficult. Materials for sandbox (3-6 months):
- 3 skeins (not full) of Yarn Art “Jeans” yarn (2 turquoise and one white);
- knitting needles size 2.5 mm;
- 7 buttons;
- scissors;
- needle (preferably with a wide eye);
- hook.
We start knitting sandbox from panties. To do this, we knit 4-6 rows with an elastic band from 42 pre-cast loops (photo 1).

Then we will use the so-called stockinette stitch, making 2 rows and evenly adding 12 loops to them (photo 2).

In the 5th row we bind off 3 loops closer to the edge. In the next row, we will make 3 yarn overs at this place. This will create a hole for the button clasp. Of course, you can do without a clasp between the legs, but those who have small children will certainly appreciate something like this model, because the clasp greatly simplifies the process of dressing. In addition, this fastener allows you to change your baby's diaper in a matter of minutes.

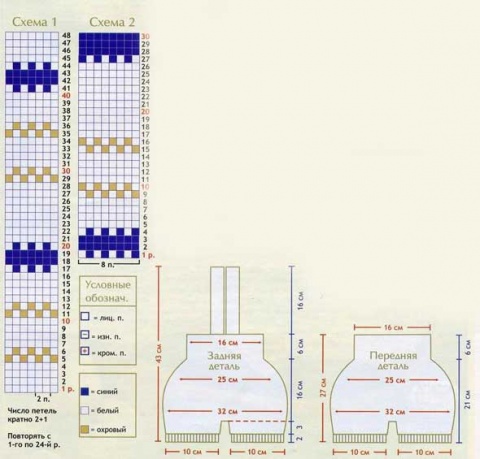
After this, you can again switch to the color taken as a basis and to the front surface. Don't forget to make holes for the fastener at equal distances. So we knit 4 more rows, adding 2 loops in each. And we reach 68 loops. Then you can start knitting the pattern (pattern 1).

So we knit 6 more rows (photo 4, 5).
After this, we begin to knit the second leg, mirroring the first. We do this with another set of knitting needles, or with the same one, without removing the first pant leg from the fishing line.
After both legs are ready, carefully transfer all the loops onto one fishing line. Like this: (photo 6).

The lower part (pants) is ready, and now you can safely start knitting the front and back.
We will make the front and back separately from each other, after which we will simply sew them on the sides. First we knit the front, consisting of 50 loops. We do it as follows: we knit 8 rows with snow-white yarn (photo 9).

After this, in the chosen turquoise color we knit 2 rows in garter stitch (if desired, you can do without this strip). Then use white yarn for another 6 rows and begin knitting the “bear” pattern: (Diagram 2).

In the 48th row, you can start knitting the armhole, carefully closing 2 loops at the edges (photo 10).

And after 4 rows you need to close 6 central loops for the neck. Next, we continue to decrease stitches for the neckline and armhole in each front row until there are 11 stitches left on the knitting needles. This resulted in 6 decreases for the armhole and 4 for the neckline. We knit another 14 rows and close the loops (photo 11, 12).


Now we knit our back (54 loops). In turquoise we knit 8 rows in stockinette stitch, then 2 rows in white using garter stitch. After this, you need to knit 36 rows with the front fabric (photo 13), and then you can start decreasing for the armhole.

You will need to perform 7 decreases (one on each front row). In the 55th row from the start of making the back, you need to close the central 10 loops. After this, in each front row, decrease one loop on each side, so that you end up with 12 loops (this is done for straps). Then knit 12 more loops, make a hole on each strap (photo 14, 15), then knit 6 more rows, make a hole again and knit 6 more rows with stockinette stitch (photo 16).


After which you can close the loops (photo 17). Finished back: (photo 18).


The sandbox is almost ready. All that remains is to tie the gusset (optional) so that the baby's bottom in the diaper is not tight. So, cast on 22 loops and knit 2 rows in stockinette stitch. Then we begin to knit in short rows, retreating from the edge by 4 (and then 5, 6, and so on) loops until we reach 10 loops. Then we knit 2 more rows, knitting all the loops of the row, after which we close the loops and sew the gusset to the sandbox (photo 19).
Beautiful, elegant, but at the same time practical and functional things for babies are a real find for mothers. In this one you can go to the clinic to see a doctor, go for a walk, and play at home. The sandbox is just a prime example of such a wardrobe item. It looks very aesthetically pleasing, is easy to use and does not restrict the child’s movements. Unfortunately, such a thing is not cheap in stores. And small children get dirty very often, so it’s better to have several of these clothes in reserve. It is not always possible to buy them right away. Then you should turn to a more budget-friendly option - knitting or sewing a sandbox for a girl or a boy yourself.
Fashion guide
When babies grow up and begin to move actively, problems with clothing arise. T-shirts, blouses, shirts constantly come out of trousers and panties. Debris and small parts of toys can get into underwear, injuring the baby’s delicate skin. In addition, due to drafts walking across the floor, the child can catch a cold and get sick. Taking this moment into account, such an element of clothing as a bodysuit was invented. It consists of panties and a T-shirt joined together.
The bodysuit made caring for the little ones much easier. Thanks to them:
- Children always have a neat appearance;
- babies do not risk hypothermia;
- when changing a diaper there is no need to undress the child completely;
- do not restrict the movements of babies.

Of course, such useful properties of this modern innovation could not go unnoticed. Therefore, the bodysuit formed the basis for a number of other models of children's clothing, such as the sandbox or slips.
By and large, a sandpiper is a jumpsuit consisting of a T-shirt and shorts connected together. In the girl's version, instead of short pants there can be a skirt.

The advantages of a sandbox over separate clothes are obvious. They are based on the same advantages that bodysuits have.
Let's start knitting on our own
Crocheting a cute little jumpsuit for a girl will not be difficult at all. Even inexperienced novice craftswomen can master the process of making this product.
To work, you will need soft threads of a delicate color that do not cause allergies. Remember that for kids you can choose colors not only by gender, but also neutral ones - lemon, light green, lilac. They are suitable for both boys and girls.

For a milky air sandpiper you will need:
- 100 grams of milky bamboo or cotton threads with a density of 250m/100g;
- two fancy buttons;
- hook No. 2.5.
This model is intended for a baby of six to nine months. The work is performed using the following scheme:

- We begin work by making panties. First, one koloshina is knitted in the round, then another. Each requires 54 air loops. Next, they are connected to each other using two loops, which are added additionally. We also knit 20 rows in a circle.
- At the height of the product in 27 rows we form the front and back. To do this, leave 4 unknitted loops on each side for the armholes. We knit the front and back elements separately.
- Starting from the 30th row, on the front part for the cutout we leave 20 loops in the center. We form the harnesses of the product by knitting another 10 rows.
- We knit the back in the same way.
- We make a sandbox. To do this, we tie all the edges of the product with a double crochet.
- Sew buttons onto the straps. Using air loops we form a fastener for them.
- Steam the finished sandbox.
The next bright jumpsuit is also easy to knit after studying the description of the work.


An unusual cute sandbox in the shape of a frog will decorate any little one.


And another clothing option that will suit kids of both sexes if knitted with yarn in neutral shades.


For those craftswomen who are more confident in holding knitting needles rather than a crochet hook, using the following pattern it will be easy to knit a sandbox with their own hands.
Such a thing can be decorated with a small applique, patch or ribbons. The main thing is not to forget to securely fasten the decoration.
The baby, dressed in a delicate pink jumpsuit, will cause affection to any passerby on the street.


It will not be difficult for the most skilled craftswomen to knit an elegant sandbox with knitting needles with an ornament made from cars. This item can be worn when going out and visiting.


A description and diagram of a simpler version of the sandbox, but no less beautiful and festive, is presented below.

Video on the topic of the article
A selection of videos will help you get inspired to create a cute wardrobe item for your baby, learn the secrets of the craft, and get answers to questions about knitting a sandbox. She will not only give you practical advice, but will also take you into the fabulous world of needlework.
The sandbox is rightfully considered one of the most convenient things for young children. This lightweight cropped jumpsuit is easy to put on and take off, and it does not restrict your baby's movements at all, allowing him to move freely. We suggest knitting a very stylish sandbox for a girl using knitting needles or crochet according to the step-by-step instructions below.
Knitting a sandbox for a girl with diagrams and descriptions
To knit a gentle and pleasant sandpiper with knitting needles we will need:
- cotton yarn with the addition of a small amount of pink viscose, 100 g - 425 m;
- some similar fine white yarn for finishing;
- knitting needles No. 2.
Knitting is done using stockinette stitch and openwork pattern.
Scheme of openwork pattern.1st row: 2 knit stitches, yarn over, 2 knit stitches together, 4 knit stitches (repeat n times), plus two edge loops.
3rd and 5th row: facial surface.
7th row: 5 knit stitches, yarn over, 2 knit stitches together, 4 knit stitches (repeat n times), plus two edge loops.
9th and 11th row: facial surface.
All purl rows are knitted with purl loops.
Operating procedure.For convenience, we will knit two sandbox pieces on one knitting needle at the same time, so that we don’t have to count the rows later. We cast on 60 loops per piece and knit the first 4 rows with stockinette stitch. Starting from the 5th row, we switch to an openwork pattern, knitting loops according to the above pattern. After 12 rows, we make increases in the front rows: first, on both sides of each part we add 3 loops once, then on one side of the part we add 9 loops to form strips, on the other side - 3 loops for uniform expansion.
In the next row we connect both parts into one (you should get 162 loops) and knit the fabric as follows: 3 hollow cord loops, 5 placket loops, 1 purl loop, openwork pattern to the next placket, 1 purl loop, 5 placket loops, 3 hollow loops lace. At the same time we knit the buttonholes on the trims.
After 68 rows, we begin to reduce the fabric without touching the strips. To do this, in one row we alternately knit 2 knit stitches and 2 knit stitches together.
We knit 20 rows like this, after which we divide the fabric into 3 parts as follows: 36 loops, 54 loops, 36 loops. It is convenient to knit all the parts on one knitting needle using 3 different balls. To form the armhole cutout, decrease 1 stitch in each front row 3 times. Next we knit 12 rows.

We form the neckline, for which we decrease 9-3-2-1-1-1 loops on the shelves in each front row, respectively. After 8-10 rows we close the loops of all parts. We sew the shoulder seams and make a crotch seam, if desired, we tie the edges of the product with white yarn, and sew on buttons. Before wearing, be sure to wash and carefully steam the product.
How to crochet a sandbox correctly in a master class

To crochet a simple, bright sandbox we will need:
- cotton yarn with the addition of bamboo in matching colors, 100 g – 375 m;
- hook No. 2.5.
To knit this model, you should choose patterns of simple patterns of shells, knitted with double crochets, and arches made of air loops.

We crochet a chain of air loops of the required length and knit a circular yoke in accordance with the given diagram. The length of the inner circumference of the knitted yoke should be approximately 38-40 cm.
We tie the finished yoke along the outside with one row of double crochets. We form strips along the sides with several rows of single crochets, and on the right strip we knit holes for buttons.
We tie the yoke with double crochets with threads of a different color, connecting the knitting into a circle. By knitting chains of air loops of the required length and fixing them on a knitted fabric, we form armholes.
We knit the rest of the product in accordance with one of the following simple patterns at your discretion. Since yarn of different colors is used for the sandbox, it is advisable to choose a simple knitting pattern so as not to overload the product with unnecessary details. Too dense patterns should be avoided; the child’s body should breathe.

Let's start knitting the lower part of the sandbox. We mark the middle of the future gusset with a piece of thread in a contrasting color and knit each pant leg in turning rows. In all rows we make decreases in the inner part of each part in such a way as to preserve the pattern. Don't make your trouser legs too long.

We sew the legs together with a thread of the main color and tie them along the bottom edge with several rows of double crochets with a thread of a different color. Before wearing, be sure to wash the product and carefully steam it from the reverse side. The sandbox for the girl is ready!
Video on the topic of the article
We invite you to watch the video tutorials below in order to knit other original models of sandboxes for girls with your own hands.
White jacket with hood
Dimensions: 62 (68/74) 80
You will need: 250 (300) 350 g of white, 50 g of pink and green Aviso yarn (60% cotton, 40% polyacrylic, 68 m/50 g); 50 g each of white and pink yarn Phil "Eponge (44% polyacrylic, 35% polyamide, 15% cotton, 6% elastane, 130 m/50 g); knitting needles No. 3.5, No. 4.5 and No. 5; zipper length 25 (30) 30 cm.
Striped pattern: 10 (12) 16 r. persons iron white, 2 r. garter stitch green, 10 (12) 16 r. persons ironing pink, 2 r. white garter stitch, finish knit. satin stitch with green thread.
Knitting density, knits. satin stitch and striped pattern, knitting needles No. 5: 17 sts and 22 r. = 10 x 10 cm.
1.
2.
DESCRIPTION
Garter stitch: knit. and out. R. - persons P.
Facial surface: faces. R. - persons p., out. R. - purl P.
Striped pattern: 10 (12) 16 r. persons iron white, 2 r. garter stitch green, 10 (12) 16 r. persons ironing pink, 2 r. garter stitch white, finish knit. satin stitch with green thread.
Back: on knitting needles No. 4.5, using white Aviso thread, cast on 55 (61) 68 sts and knit 2 cm for the placket. satin stitch and 1 purl. R. persons Then knit between the edges. on knitting needles No. 5. satin stitch After 2 cm from the bar, close on both sides for bevels 1 x 1 p. and in every 12th (14th) 15th p. 2 x 1 p. After 15 (19) 21 cm from the bar, close on both sides for armholes 1 x 3 p. and in every 2nd r. 2 x 2 and 1 (1) 2 x 1 p. After 29 (35) 39 cm from the bar, close on both sides for shoulder bevels 1 x 5 (5) 6 p. and in the next 2 p. 1 x 4 (5) 5 p. Simultaneously with the beginning of the decreases for the shoulder bevels, close the middle 15 (19) 22 p. for the neckline and finish both sides separately. After 30 (36) 40 cm from the bar, all loops should be closed.
Right front: on knitting needles No. 4.5, using white Aviso thread, cast on 28 (31) 35 sts and knit 2 cm for the placket. satin stitch and 1 purl. R. persons Then knit between the edges. on knitting needles No. 5. satin stitch From the left edge, make a side bevel, an armhole and a shoulder bevel, as on the back. After 26 (31) 35 cm from the strap, close for the neckline from the right edge 1 x 4 (4) 5 p. and in every 2nd p. 1 (2) 3 x 2 p. and 2 (2) 1 x 1 p. At the height of the back, all loops must be closed.
Left front: knit symmetrically.
Sleeves: on knitting needles No. 4.5, cast on Aviso 33 (36) 39 sts with white thread and knit 2 cm. satin stitch and 1 purl. R. persons Then knit between the edges. on knitting needles No. 5 in a striped pattern. After 2 cm from the bar, add 1 x 1 p. on both sides for bevels, then in every 6th p. 2 x 1 p. and in every 4th r. 1 (3) 5 x 1 p. After 11.5 (14.5) 18 cm from the bar, close on both sides to roll up the sleeves 1 x 3 p. and in every 2nd p. 5 x 2 and 1 x 3 p. (3 x 2, 1 x 1, 3 x 2 and 1 x 3 p.) 2 x 3, 4 x 2 and 2 x 3 p. Through 17.5 (22.5) 26 cm from the bar, close off the remaining loops.
Hood: on knitting needles No. 4.5, cast on Aviso 68 (75) 75 stitches with white thread and knit 2 cm for the placket. satin stitch and 1 purl. R. persons Then knit between the edges. on knitting needles No. 5. satin stitch After 13.5 (15.5) 17.5 cm from the bar, close 1 x 1 st on both sides and in every 2nd p. 1 x 2 and 1 x 3 p. After 16 (18) 20 cm from the bar, close off the remaining loops.
Flower: for the core, on knitting needles No. 3.5, cast on 7 p. with white Phil`Eponge thread and knit 8 p. persons satin stitch Close the loops. Thread a thread through the edges and tighten it so that the part takes the shape of a ball. For the petals, use 3.5 knitting needles to cast on 12 sts of Phil`Eponge with pink thread and knit. satin stitch After 7 r. Tighten the loops with working thread. In total, knit 10 such parts for 5 petals. Fold 2 pieces of petals together and sew them, then arrange the petals in a circle and sew them together along the bottom 3 rows. Sew the core into the center of the ring with petals. Knit the second flower in the same way.
Assembly: sew shoulder seams and sleeve seams. Sew the back seam of the hood. Turn all the strips inside out. side and sew. Sew the hood into the neck. Sew on the zipper. Sew one flower to the zipper. Weave a short cord from green threads and sew a second flower to it. Sew a cord with a flower to the hood (see photo).
IN knitted sandbox your baby will be comfortable and comfortable even in the most intense heat; he will not be constrained in movement due to the elasticity of the knitted fabric.
Knit a sandpiper for a newborn - indeed, a great option for the summer, because the sandbox has only advantages.
A knitted sandbox for a baby is incredibly beautiful!
Knitting sandbox patterns which you will find in our selection today are suitable for children of both sexes.
Do you want to knit a sandbox for a girl, and a model that a boy likes? Feel free to change the color of the yarn to a girlish one!
You just need to carefully select the yarn for knitting, which should only be of natural composition. For example LILY, 100% mercerized cotton, 125 m, 50 g. This is a classic yarn made of mercerized cotton with a soft, unobtrusive shine, does not squint in the fabric, is not too soft but not coarse, and is of medium thickness. Works well with both knitting and crochet. The purpose of the yarn is spring and summer models for adults and children for the spring and summer period.
So, let's move on to the descriptions and find out how to knit a sandbox with knitting needles.
Knitted sandbox with knitting needles. Scheme
1. Knitted sandpiper with knitting needles, pattern published on Xobi.
2. Pink sandbox for a girl, knitted, diagram published on the Knitted Fairy Tale website.
3. Children's sandbox with knitting needles, diagram published on the website "Loop".
New articles
- About the fact that we must not forget About the fact that we must not forget the name
- Card index of games for the development of the emotional sphere of children
- The influence of the application on the development of the child
- The child has an imaginary friend
- Being a mother - poems Being a mother of boys
- New Year's stencil for a window made of paper
- Training for parents "Learning to communicate with children"
- What to wear with a Chanel style jacket Coco Chanel jackets for girls
- The last normal sultan on Earth (the richest dictator in the world) The guy admits that his family has a lot of influence on him
- “I woke up in the hospital”: stories of unsuccessful suicide
Popular articles
- Pharmacy face creams: for dry and sensitive skin – medicinal
- How to make a paper snowman
- DIY bracelets quickly and easily
- How to dye your hair yourself
- Knitted sandbox
- Autumn crafts from origami modules
- We crochet beautiful dresses for girls Prom dresses crochet MK
- Isothread: diagrams with numbers for children
- When does heartburn occur in early pregnancy?
- Sketches of tattoo n. Anime “Death Note. Anime "Death Note"