Large braid patterns with knitting needles. Knitting braids for beginners: description, patterns
08.08.2014
A collection of simple patterns with embossed diamonds and diamond knitting needles
Relief patterns with knitting needles are an alternation when knitting front and back loops, while the fabric turns out to be three-dimensional due to the combination of convex and concave sections, and also quite dense (without gaps). Therefore, such patterns are especially expressive. There are a great variety of relief patterns, they differ in small or large repeat. These patterns are ideal for plain cotton, cotton rayon, silk and linen blends. If the yarn is thick, then the pattern looks especially prominent, and if it is thin, then the result will be an exquisite, noble structure. Relief patterns are quite easy to knit, so they are recommended for beginner knitters, because... help them gain skill and experience. Confident knitters also do not ignore embossed patterns, because they are convenient for combining with openwork and give it a special elegance. To prevent the charm of relief patterns from disappearing, you should not iron or steam them, just moisten them and let them dry flat.
We bring to your attention a large collection of simple embossed patterns with diamonds and rhombuses for knitting with visual samples, diagrams, descriptions and symbols. Choose and create with pleasure!
Abbreviations:
n. - loop;
persons - facial;
purl - purl;
chrome - edge;
cross. - crossed.
Attention! In the diagrams, the back rows are shown as they look from the front side.
※ Pattern 81 “Pomegranate” (for 6 loops and 6 rows)

※ Pattern 80 “Simple relief” (for 14 loops and 12 rows)

※ Pattern 79 “Structural ornament” (for 11 loops and 30 rows)

※ Pattern 78 “Coffee beans” (for 18 loops and 36 rows)

※ Pattern 77 “Diamond cells” (for 6 loops and 16 rows)

※ Pattern 76 “Expressive diamonds” (for 16 loops and 18 rows)

※ Pattern 75 “Charm” (for 18 loops and 24 rows)

※ Pattern 74 “Giza Plateau” (for 16 stitches and 36 rows)

※ Pattern 73 “Rhombuses with insert” (for 18 loops and 22 rows)

※ Pattern 72 “Curly diamonds” (for 22 loops and 32 rows)

※ Pattern 71 “Simple diamonds” (for 10 loops and 20 rows)

※ Pattern 70 “Pastila” (for 12 loops and 12 rows)

※ Pattern 69 “Parquet” (for 8 loops and 16 rows)

※ Pattern 68 “Elongated diamonds” (for 8 loops and 10 rows)

The pattern is double-sided: it looks the same on the front and back sides.
For the sample, cast on the number of loops that are a multiple of 8 + 2 chrome.
1 row
2nd row: 1 chrome; * 3 p.; 4 persons; 1 purl; repeat from * to the end of the row; 1 chrome
3rd row: 1 chrome; * 2 persons; 4 purl; 2 persons; repeat from * to the end of the row; 1 chrome
4 row: 1 chrome; * 1 purl; 4 persons; 3 purl; repeat from * to the end of the row; 1 chrome
5 row
6 row: 1 chrome; * 4 purl; 4 persons; repeat from * to the end of the row; 1 chrome
7 row: 1 chrome; * 1 person; 4 purl; 3 persons; repeat from * to the end of the row; 1 chrome
8 row: 1 chrome; * P2; 4 persons; 2 purl; repeat from * to the end of the row; 1 chrome
9 row: 1 chrome; * 3 persons; 4 purl; 1 person; repeat from * to the end of the row; 1 chrome
10 row: 1 chrome; * 4 persons; 4 purl; repeat from * to the end of the row; 1 chrome
Repeat from the 1st to the 10th row.
※ Pattern 67 “Graphic rhombuses” (for 28 loops and 16 rows)

※ Pattern 66 “Rhombuses of triangles” (for 14 loops and 14 rows)

※ Pattern 65 “Rhombuses of triangles” (for 8 loops and 16 rows)

※ Pattern 64 “Strike-out diamonds” (for 14 loops and 32 rows)

※ Pattern 63 "Noble structure" (for 14 loops and 30 rows)

※ Pattern 62 “Beautiful relief” (for 12 loops and 32 rows)

※ Pattern 61 “Unusual structure” (for 10 loops and 20 rows)

※ Pattern 60 “Rhombus Chain” (8 loops and 20 rows)

※ Pattern 59 "Exquisite structure" (16 loops and 32 rows)

※ Pattern 58 “Moths” (for 12 loops and 24 rows)

※ Pattern 57 “Moths” (for 10 loops and 20 rows)

※ Pattern 56 "Rombita" (for 28 loops and 28 rows)

※ Pattern 55 “Tenderness” (for 22 loops and 36 rows)

※ Pattern 54 “Finishing diamond” (for 17 loops and 30 rows)

※ Pattern 53 “Pine cones” (for 12 loops and 32 rows) reverse side of the "Candles" pattern

※ Pattern 52 “Candles” (for 12 loops and 32 rows) reverse side of the "Pine cones" pattern

※ Pattern 51 "Bunches" (for 8 loops and 28 rows)

※ Pattern 50 “Diamond” (14 stitches and 28 rows)

※ Pattern 49 “Diamond” (10 stitches and 24 rows)

※ Pattern 48 “Rhombuses in a zigzag” (for 16 loops and 20 rows)

※ Pattern 47 “Bows in diamonds” (for 20 loops and 18 rows)

※ Pattern 46 "Original relief" (for 26 loops and 34 rows)

※ Pattern 45 “Crossroads” (for 12 loops and 24 rows)

※ Pattern 44 "Brocade" (20 loops and 14 rows)

※ Pattern 43 "Diamond mosaic" (for 12 loops and 28 rows)

※ Pattern 42 “Chess of rhombuses” (for 14 loops and 28 rows)

※ Pattern 41 “Combined structure” (16 loops and 32 rows)

※ Pattern 40 "Beaded diamonds" (for 12 loops and 32 rows)

※ Pattern 39 “Structural diamonds” (for 12 loops and 18 rows)

※ Pattern 38 “Decorative diamonds” (for 22 loops and 44 rows)

※ Pattern 37 “Pearl rhombuses on stockinette stitch” (for 10 loops and 10 rows)

※ Pattern 36 “Grape paradise” (for 10 loops and 24 rows)

※ Pattern 35 “Pearl diamonds” (for 10 loops and 20 rows)

※ Pattern 34 "Strips of pearl diamonds" (for 10 loops and 16 rows)

※ Pattern 33 “Traditional Diamonds” (20 stitches and 24 rows)

※ Pattern 32 “Triangles” (for 16 loops and 32 rows) reverse side of the Mirage pattern

※ Pattern 31 “Mirage” (for 16 loops and 32 rows) reverse side of the "Triangles" pattern

※ Pattern 30 “Striped Diamonds” (18 stitches and 36 rows)

※ Pattern 29 “Vertical of rhombuses and bows” (for 22 loops and 18 rows)

※ Pattern 28 “Horizontal of rhombuses and bows” (for 22 loops and 20 rows)

※ Pattern 27 “Stained glass” (for 14 loops and 14 rows)

※ Pattern 26 “Kaleidoscope” (for 12 loops and 12 rows)

※ Pattern 25 "Relief diamonds" (for 15 loops and 30 rows)

※ Pattern 24 "Rep diamonds" (for 6 loops and 12 rows)

※ Pattern 23 "Linear diamonds" (for 12 loops and 12 rows)

※ Pattern 22 "Rabitz mesh" (for 8 loops and 16 rows)

※ Pattern 21 “Mesh” (for 8 loops and 14 rows)

※ Pattern 20 "Armor mesh" (for 14 loops and 28 rows)

※ Pattern 19 “Caprice” (for 19 loops and 32 rows)

※ Pattern 18 “Diamonds” (for 18 loops and 36 rows)

In the wardrobe of any fashionista there will be a knitted product with a rope pattern. This pattern never goes out of fashion, and has always been considered the most popular. Using a knitting pattern, you can get a beautiful sweater, dress, cardigan and even hats and scarves.
This pattern is created by moving groups of loops left and right. Some of the loops are placed on an additional knitting needle, and then after knitting the same number of loops, they are returned to the main knitting needle. This is how symmetrical bundles are obtained. But you can knit asymmetrical ones. Then the number of loops in both halves of the braid should not be equal.
The product is voluminous and warm thanks to such an expressive pattern.
Special calculations when knitting strands with knitting needles are not required.
The plait pattern will decorate any element of your wardrobe. There are many variations of them. You can knit a simple single strand with knitting needles, or you can try a complex pattern. The strands can be thin and voluminous, embossed or graceful. For each product you can choose your own type of harness.

Before you learn how to knit a rope, consider the tool you can't do without.
- yarn. It can be any, but it is not advisable to use thin yarn for the strand pattern.
- knitting needles (straight or circular);
- additional knitting needle.
Experienced knitters have learned to cope without it, but if you are just learning, then you will be much more comfortable with an additional knitting needle.
When knitting a strand pattern with knitting needles, there are some subtleties that are best taken into account.
— the tension of the thread should not be strong so that the bundles do not become overtightened.
— the additional knitting needle should be one size smaller than the main pair of knitting needles. This will allow the drawing to be free.
- to get the desired direction of the pattern, watch the location of the additional knitting needle: the harness will be on the right if the knitting needle is at work, and vice versa.
- instead of an additional knitting needle, you can use a safety pin.
The plait pattern has always been universal, although many others have appeared. Therefore, this pattern also does not stand still. Many varieties of tourniquets have appeared. Consider how to knit beautiful ropes with knitting needles.
Start your acquaintance with plaits with a simple braid, or a double one.
To make the distance between the braids wider, you need to tie more purl loops between them.


How to knit a pattern with knitting needles:
cast on 14 stitches
Row 1: P3, K6, P3.
2.4 and all even ones - according to the picture.
Row 3: P3, P3 transferred to an additional needle before work, P3. transfer the loops from the additional needle to the main one, knitting it purlwise. The rest are according to the drawing.
5th row:: 3 p., 3 transferred to an additional needle at work, 3 p. transfer the loops from the additional needle to the main one, knitting it purlwise. The rest are according to the drawing.
These rows are repeated as needed.
You can move the loops through one even row, then the strands will be elongated.
The next type of braid pattern is the royal triple braid.


To get such a pattern, cast on the number of loops that are a multiple of 30 + 2 edge stitches.
Knitting begins with the front row.
All even numbers are knitted according to the pattern.
Slip 5 stitches onto the auxiliary needle, leaving them before work. 5 loops are knitted, we will return the loops from the additional knitting needle, knitting them later. 10 knit stitches, remove 5, leaving them at work, and knit the next ones with knit stitches, now you can return the removed ones and knit them with knit stitches too.
Knit subsequent odd rows in the amount of two with facial loops.
And the next odd ones according to the scheme:
K5, remove 5 for work, knit 5, return 5 loops, knitting. Remove 5 loops, leaving behind the work, knit 5, return the removed ones and knit them with knit stitches. 5 persons.
Then knit the even row according to the description, starting from the 2nd row.
The embossed tourniquet also has its popularity.
With this pattern of strands you can get a chic hat or jacket.


Consider how to knit such a pattern of strands with knitting needles according to the diagram and description.
Cast on loops in multiples of 11 + 2 edge loops and 2 loops for symmetry.
Rows 1, 3: purl 2, knit 9, purl 2.
Even rows according to the pattern.
5th row: purl 2, knit 3, knit 3, knit stitch, knit 3, purl 2.
Rows 7 and 9 are also knitted like the 5th.
Row 11: purl 2, knit 3, knit 3 moved before work, knit 3, return removed, knitting knit 2, purl 2.
Repeat from the 2nd row as needed.
If you want to get a tighter arrangement of braids, then repeat the weave after 1-2 even rows.
As you can see, there is enough variety of knitting patterns to suit every taste. Specifically for any of your products, you can find a decent option and get a luxurious new thing for your wardrobe.
Beginning craftswomen, when planning to knit something, usually choose simpler patterns. And this is right - having honed your skills on simple patterns, you can begin to work on more labor-intensive, but beautiful designs. From this kind of abundance we can distinguish simple “braids” or “harnesses”, which are basically the same thing. The only difference is in the knitting technique: braids are one overlap of certain loops, and plaits are a whole system of overlaps folded into one complete pattern. But since the technique for performing them is similar, they are therefore combined into one type. Both subspecies will be discussed later in the article.


"Braids"

Knitting with knitting needles is not a difficult task, it will just be a little awkward to do at first. To knit them, you will need additional knitting needles or pins - you will need to remove the loops on them before crossing them. The movement of the loops in the pattern can be to the right or to the left - it depends on the pattern that is knitted on the fabric. When using braids to decorate shelves, a certain symmetry in the intersection of loops should be observed.
Simple "braid"
 To knit a simple “braid” you will need to separate 8 loops on the main fabric - the number of loops can be changed, but you should take into account that the cross does not lead to the formation of a hole and the corresponding assembly of the fabric. To knit a sample, you will need to cast on 14 loops, 8 of which are the “braid” itself, 4 loops are needed to highlight it, and 2 are edge loops. Next, the sample is knitted in the following sequence:
1. First row: edge, 2 purl, 8 knit, 2 purl and edge.
2. Knit rows 2, 3 and 4 according to the pattern.
3. Fifth row: edge, 2 purl, remove 4 pieces onto a pin or auxiliary knitting needle, without knitting and holding before work, knit the next 4 loops, transfer the loops from the pin to the left knitting needle and knit, it turns out to be crossed to the left. Picking up stitches on a pin or auxiliary needle and leaving them behind the fabric leads to the formation of a crossing to the right side. Complete the row with two purls and an edge stitch.
4. From the 6th to the 12th row you should knit the way the knitting looks, and then cross the loops as in the fifth row.
The considered pattern is suitable for making any thing. You can make “braids” in a row on the canvas - it will look very beautiful. The same pattern looks good on hats, sweaters, vests, scarves and other things, both for children and adults.
Simple double braid
This pattern consists of two weaves, but they are not at all difficult to make. In it you can change the number of loops in the weaves, the distance between the “braids” and it is possible to “dilute” with other relief patterns. To complete the pattern, you need to cast on so many loops so that their sum is a multiple of 12, add three loops to them for symmetry and two edge loops. In the example discussed below, you should cast on 17 loops.  Knitting must be done in accordance with the following pattern:
1. Rows 1 and 5 are knitted in the sequence - edge, knit 3, purl 3, complete the strip with purl 3 and edge.
2. The second row and all the reverse rows are knitted according to the pattern.
3. In the third row, you need to cross to the left side, in the manner described below - remove the edge, make three purl, then three knit, slip the next three loops onto a pin, and purl the three following them, return the loops from the pin and make their faces. Finish the strip with three purls and an edge stitch.
4. In the 7th row you need to cross to the right side. Perform in sequence - edge stitch, 3 purl stitches, slip the next 3 pieces onto a pin, knit 3, return the loops from the pin and purl them, knit 3, purl 3 and edge stitch.
Starting from the 9th row, repeat the pattern from the beginning of the rapport.
Based on “harnesses” and “braids”, more complex patterns are created, for example, “braiding”. By gradually gaining experience, any craftswoman can master this. Making complex designs on products makes them stylish and unique, emphasizing their individuality and beauty.
"Tourniquets"
This pattern is the crossing of one or more loops against the background of the main fabric. “Braids” are made using the same principle, only in this case the number of loops is taken from 3 to 12. From this series there will also be “aranas”, which are made by interlacing cord compositions and are similar to the weave of baskets, braids and fabrics.
For inexperienced needlewomen, you can master the patterns of knitting “harnesses”, starting with the simplest ones.
Harness pattern - vertical stripes
 The presented pattern is easy to perform - only 4 loops are used and then crossed. The stripes are embossed and quite expressive, as a result of which they can be used in any product. The pattern is especially good when made from thick yarn.
To complete the example on knitting needles, you need to cast on a number of loops that are a multiple of 6 and add 2 loops to them so that the pattern is symmetrical, and two edge loops. For example, it will be 34 pieces. Next knit following the sequence:
1. First row: edge, knit 2, then repeat - purl 4, knit 2 - do this until the end, knit the edge purl.
2. Second row: purl 2, then cross two loops to the right, for which you knit the second loop, stretching it in front of the first, and then knit the first. Cross the next loops to the left: knit the second loop behind the first, and then knit the first. Finish the row with two purls and an edge stitch.
3. Third row: repeat the pattern starting from the first row.
It is necessary to take into account that the pattern itself is formed on the reverse side - watch the placement of the front and back sides when casting on loops and subsequent knitting.
"Harness the Barrel"
 A simple pattern that does not require effort, suitable for creating any thing. To complete the pattern given in the example, you need to cast on a number of loops that is a multiple of 5, add one for the symmetry of the pattern and 3 edge stitches. Let it be 33 pieces, which are knitted in the following sequence:
1. Knit rows 1, 5, 7, 9 in the sequence - edge, purl, then repeat - knit 4, purl, final edge.
2. Even stripes are knitted the way the knitting looks.
3. Third row: edge, purl and rapport - cross 4 loops to the left, remove the first loop on a pin, holding it before work, then knit 3 front loops and only then one removed from the pin. Finish the purl and edge row.
4. Knit the pattern up to the tenth row, taking into account the instructions presented above, from the 11th row, perform the pattern from the beginning.
There are a lot of types of braids and harnesses - those presented in the article are the simplest. To create knitting patterns with braids and plaits, you can learn more in the video knitting lessons. A video and a selection of schemes for realizing your fantasy are presented later in the article.
Goats and plaits turn out to be not so difficult to perform, but rather labor-intensive in counting loops and making overlaps - this is difficult for beginners to do. For dexterity, it is advisable to use simple braids, but in the future you can take on more complex variations. 
Aran knitting is another knitting style that came to us from the cold north. It was given to the world by Irish fishermen, and now, for many decades in a row, these patterns have not gone out of fashion. Aranas are easily recognized by the intricate Celtic patterns that form braids. They are popular among both clothing collections for women and men. Aranas are knitted on hats, scarves, sweaters, cardigans, and for the last few years girls have been wearing arans in the cold season, even as a manicure pattern. But let's return to Aran knitting.
Aranas with knitting needles - diagrams with descriptions

The Celtic pattern that we want to knit is formed by interlacing braids and crossing loops. There are countless varieties of arans. Let's try to analyze in more detail in this article the knitting of arans with knitting needles - diagrams with descriptions will help us with this.
Simple patterns
Young needlewomen can knit a beautiful pullover with a simple aran pattern. This piece of clothing will be an atmospheric and versatile addition to your look during the cold season, and will look perfect with skirts, trousers, jeans, coats or leather jackets.
The only problem in the matter of knitting arans with knitting needles is only the agony of choosing the most beautiful ornament. We'll make it easier by selecting a few for you and showing you how to knit simple aranas.
Knitted patterns: patterns and descriptions
Popular articles:
Scythe

The diagram shows both front and back rows. The front rows, that is, the odd rows, are read from right to left, the purl rows, that is, the even rows, are read from left to right.
The width of our braid is 12 loops. Repeat in height from rows 1 to 8.
Diagram and designations:

Patterned braid

The aran pattern with a patterned braid is read according to the same rules as the simple braid pattern. The width of the pattern is 9 loops, repeat in height from the 1st to the 6th row.

Celtic rhombus

A beautiful aran, the knitting pattern of which is a little more complicated than the previous two. However, it will be a great accent to a warm jumper or scarf.
The width of the diamond pattern is 36 loops. The diagram shows only front rows; for purl rows, knit according to the pattern. Repeat from rows 1 to 38.


Beautiful openwork
You can decorate women's and men's sweaters with more complex patterns. Openwork arans with knitting needles give the sweater models a special fairy-tale style. In addition, for more experienced housewives, openwork arans will be much more interesting to knit. Let's start learning the technique of knitting more intricate patterns.
Openwork braids
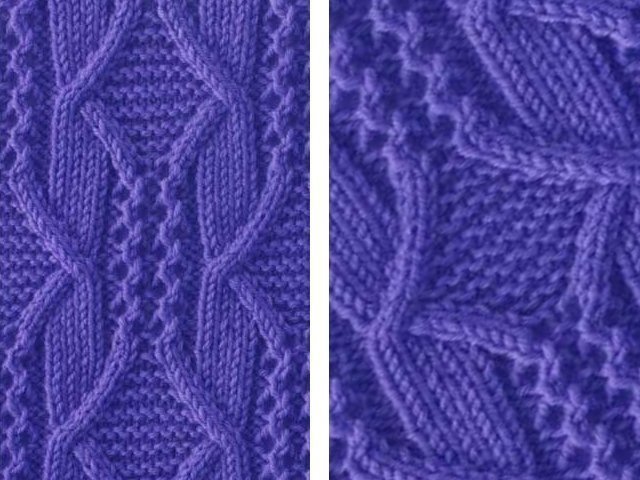
The pattern shows knit and purl rows. Pattern repeat: 26 loops wide and 36 rows high.

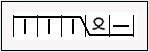
Designations:
- Knit two knit stitches together with a slant to the right (insert the knitting needle into the 2nd loop and the 1st loop, starting from the second and knit them together).
- Cape.
![]() - cross 4 loops to the left (slip the 2nd loops onto an auxiliary needle and leave before work
, knit 2 loops, then 2nd loops with aux. knitting needles).
- cross 4 loops to the left (slip the 2nd loops onto an auxiliary needle and leave before work
, knit 2 loops, then 2nd loops with aux. knitting needles).
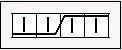 - cross 4 loops to the right (slip the 2nd loops onto an auxiliary needle and leave at work
, knit the 2nd loops, then knit the 2nd loops with aux. knit the knitting needles).
- cross 4 loops to the right (slip the 2nd loops onto an auxiliary needle and leave at work
, knit the 2nd loops, then knit the 2nd loops with aux. knit the knitting needles).
at work , knit the 2nd loops, then knit a loop with an auxiliary stitch. knit the needles purl).
before work , purl 1 loop, then 2nd loops with aux. knitting needles).
— cross 3 loops to the right (slip 1 loop onto an auxiliary needle and leave at work , knit the 2nd loops, then knit a loop with an auxiliary stitch. knit knitting needles).
— cross 3 loops to the left (slip the 2nd loops onto an auxiliary needle and leave before work , knit 1 loop, then 2nd loops with aux. knitting needles).
Openwork diamonds

You need to start knitting diamonds with knitting needles from the loops before the repeat, repeat the repeat loops the required number of times, and end with the loops after the repeat.
The height of the repeat is from rows 1 to 15. The diagram does not indicate edge loops.

Designations:
- Purl loop.
- 2 knits together behind the front wall.
— Broaching - knit two knit stitches together with a slant to the left (slip the first loop as in knitting, knit the second loop and pull the removed loop through it).
— Remove 2 loops without knitting, knit 1, pull the knit stitch through the removed loops.
Eastern Spit

The diagram shows the front and back rows. The width of the braid is 35 loops, repeat in height from the 1st to the 44th row.

Designations:
- Purl (purl in the front rows, knit in the purl rows).
— Front (in front rows - front, in back rows - purl).
— Knit two knit stitches together with a slant to the right (insert the knitting needle into the 2nd loop and the 1st loop, starting from the second and knit them together.)
— Knit two knit stitches together with a slant to the left (slip the first loop as in knitting, knit the 2nd loop and pull the removed loop through it).
- Cape.
- Facial crossed. In purl rows, knit as a purl crossed.
- 4 loops along with a tilt to the right.
- 4 loops along with a tilt to the left.
 before work
 at work
, knit the next 3 loops, then 3 loops with aux. knitting needles).
at work
, knit the next 3 loops, then 3 loops with aux. knitting needles).
 - Cross 5 loops to the left (slip 3 loops onto an auxiliary needle and leave before work, knit 2 loops, then knit 3 loops on an auxiliary needle).
 - Knit 5 cross to the right (leave 2 loops on the auxiliary needle while working, knit 3 knit stitches, then knit 2 loops on the auxiliary needle.
 - cross 6 loops to the left (leave 3 loops on the auxiliary needle before work
, purl the next 3 loops, then 3 loops with aux. knit the knitting needles like this: knit 1. crossed, 1 purl, 1 knit crossed).
- cross 6 loops to the left (leave 3 loops on the auxiliary needle before work
, purl the next 3 loops, then 3 loops with aux. knit the knitting needles like this: knit 1. crossed, 1 purl, 1 knit crossed).
 - cross 6 loops to the right (leave 3 loops on the auxiliary needle at work
, knit the next 3 loops like this: k1. crossed, 1 purl, 1 knit crossed, then 3 loops with aux. knitting needles purl).
- cross 6 loops to the right (leave 3 loops on the auxiliary needle at work
, knit the next 3 loops like this: k1. crossed, 1 purl, 1 knit crossed, then 3 loops with aux. knitting needles purl).
 - cross 6 loops to the right (leave 3 loops on the auxiliary needle at work
, knit the next 3 loops, then knit 3 loops with aux. knit the knitting needles like this: knit 1. crossed, 1 purl, 1 knit crossed).
- cross 6 loops to the right (leave 3 loops on the auxiliary needle at work
, knit the next 3 loops, then knit 3 loops with aux. knit the knitting needles like this: knit 1. crossed, 1 purl, 1 knit crossed).
 — cross 6 loops to the left (leave 3 loops on an auxiliary needle before work
, knit the next 3 loops like this: k1. crossed, 1 purl, 1 knit crossed, then 3 loops with aux. knit the knitting needles).
— cross 6 loops to the left (leave 3 loops on an auxiliary needle before work
, knit the next 3 loops like this: k1. crossed, 1 purl, 1 knit crossed, then 3 loops with aux. knit the knitting needles).
 - Cross knit 5 to the right (leave 2 loops on the auxiliary needle while working, knit 3 knit stitches, then knit 2 loops with the auxiliary needle like this: 1 knit crossed, 1 purl).
 - cross 5 loops to the left (slip 3 loops onto an auxiliary needle and leave before work, knit the next 2 loops like this: 1 purl, 1 knit crossed, then 3 knit loops with an auxiliary needle).
For a sweater
These fabulous patterns are sure to make you want to own a beautiful aran sweater. The weaves on a knitted jumper will lift your spirits in bad times and will definitely attract everyone's attention, because a sweater with arans never goes out of style. Therefore, you should definitely learn how to knit an Arana sweater using knitting needles with descriptions and diagrams.
Irish mating

Pattern diagram:
- Rapport: 24 loops + 2 edge loops.
- In purl rows, knit according to the pattern.
- Repeat the rapport in height from rows 1 to 16.

Autumn braids

The diagram shows both front and back rows. Pattern repeat is 22 loops wide and 40 rows high.

- front (in front rows - front, in back rows - purl).
- yarnover
- Knit two knit stitches together with a slant to the right (insert the knitting needle into the 2nd loop and the 1st loop, starting from the second and knit them together).
— Knit two knit stitches together with a slant to the left (slip the first loop as in knitting, knit the 2nd loop and pull the removed loop through it).
- Knit 3 loops together with a knit stitch to the left (slip the first loop without knitting, knit the next 2 together behind the front walls, and pull the resulting loop through the removed one). ![]() - cross 4 loops to the left (slip 2 loops onto an auxiliary needle and leave them before work, knit 2 loops, then knit 2 loops with an auxiliary needle). - Cross 4 loops to the right (slip 2 loops onto an auxiliary needle and leave them at work, knit the 2nd loops, then knit 2 loops with an auxiliary needle).
- cross 4 loops to the left (slip 2 loops onto an auxiliary needle and leave them before work, knit 2 loops, then knit 2 loops with an auxiliary needle). - Cross 4 loops to the right (slip 2 loops onto an auxiliary needle and leave them at work, knit the 2nd loops, then knit 2 loops with an auxiliary needle).  - cross 4 loops to the left (slip 2 loops onto an auxiliary needle and leave them before work, purl the next 2 loops, then knit the 2nd loops with an auxiliary needle).
 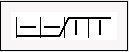 - Cross 4 loops to the right (slip 2 loops onto an auxiliary needle and leave them at work, knit the 2nd loops, then purl 2 loops with an auxiliary needle).
  - cross 5 loops to the right (slip 3 loops onto an auxiliary needle and leave AT THE work, knit 2 knit stitches from the left knitting needle, then knit from the auxiliary knitting needle: purl 1, knit 2).
  - Cross 5 loops to the right (slip 3 loops onto an auxiliary knitting needle and leave them BEHIND the work, knit 2 knit stitches from the left knitting needle, then knit 3 knit stitches from the auxiliary knitting needle).
Christmas mood

The motif of the pattern consists of 19 loops in width and 16 rows in height, only the front rows are shown in the diagram; in the back rows you need to knit according to the pattern.
The exception is purl row 16, which is highlighted in pink in the pattern.

- facial.
- purl.
- bump (from the 1st loop, knit: 1 knit, 1 yarn over, 1 knit, twist, knit 3 knits, turn, 3 purl, pass 2 just knitted loops simultaneously over the last one).
- knit two knit stitches together with a slant to the right (Insert the knitting needle into the 2nd loop and the 1st loop, starting from the second and knit them together).
- knit two knit stitches together with a slant to the left (slip the first loop as in knitting, knit the 2nd loop and pull the removed loop through it).
- yarnover
-3 loops cross to the right (slip 1 loop onto the auxiliary needle and leave it at work, knit the 2nd loops, then knit the loop with the auxiliary needle).
- Cross 3 loops to the left (slip the 2nd loops onto an auxiliary needle and leave it before work, knit 1 loop, then knit the 2nd loops with an auxiliary needle). - cross 5 knit stitches to the right (remove 3 loops onto an auxiliary needle and leave them at work, knit 2 knit stitches, transfer them with an auxiliary needle to the last left loop, knit it with a knit stitch, then knit the 2 remaining loops with an auxiliary needle).
For the hat
An aran hat is a warming accessory that is perfect for women, men and children. Ornaments for hats can be very different - from simple to intricate. Let's try to look at several patterns for knitting arans for hats.
Hat with ears

Knitting pattern for a hat with ears:

Designations:
- 3 loops in the front row.
- facial.
- 2 loops in the front row with a tilt to the left.
- 2 loops in the front row with a tilt to the right.
- purl.
- yarnover To avoid holes, it was made crossed.
Hat with arans

For the pattern, take 3 repeats in width, and until the final decrease in height.
The diagram shows both front and back rows. We read knit stitches from left to right, purl stitches from right to left. Pattern repeat 10 loops, height from 1st to 40th row.
Decreases of loops begin from row 31, then you can make nooses, at your discretion.
Scheme:

Designations:
- no loop.
— cross 2 loops to the left (slip 1 loop onto an auxiliary needle and leave it before work, purl the 2nd loop, then knit 1 loop with an auxiliary needle).
- Cross 3 loops to the right (slip 1 loop onto an auxiliary needle and leave it at work, knit the 2nd loops, then purl the loop with the auxiliary needle).
- cross 3 loops to the left (slip the 2nd loops onto an auxiliary needle and leave it before work, purl 1 loop, then knit the 2nd loops with an auxiliary needle). - Cross 6 loops to the right (leave 3 loops on the auxiliary needle while working, knit the next 3 loops, then knit 3 loops with the auxiliary needle).  - Cross 4 loops to the right (slip 2 loops onto an auxiliary needle and leave them at work, knit the next 2 loops, then knit the loops with an auxiliary needle as follows: 1 knit, 1 purl).
 ![]() - cross 4 loops to the left (slip 2 loops onto an auxiliary needle and leave them before work, knit the next 2 loops like this: 1 purl, 1 knit, then knit the loops with the auxiliary needle).
- cross 4 loops to the left (slip 2 loops onto an auxiliary needle and leave them before work, knit the next 2 loops like this: 1 purl, 1 knit, then knit the loops with the auxiliary needle).  - cross 4 loops to the right (slip 2 loops onto an auxiliary needle and leave them at work, knit the next 2 loops, then knit the loops with an auxiliary needle as follows: 2 purl together) from 4 loops we get 3. (these are the first decreases in the hat).
  - cross 4 loops to the left (slip 2 loops onto the auxiliary needle and leave before work, knit the next 2 loops like this: 2 purl together, then knit the loops with the auxiliary needles) from 4 loops we get 3. (these are the first decreases in hat).
- Purl 2 together.
- knit two knit stitches together.
Patterned cap

Rapport 4 loops wide. The height of the motif is from the 5th to the 18th row. The diagram shows the front and back rows.
From the 18th row, it is better to knit the front loops crossed in the front rows and purl crossed in the purl rows.
Scheme:

Circuit designations:
- purl (purl - in front rows, front - in purl rows).
- front (front - in the front rows, purl - in the back rows).
- Cross 2 loops to the right (slip 1 loop onto an auxiliary needle and leave it at work, knit the 2nd loop, then knit 1 loop with an auxiliary needle).
- cross 2 loops to the left (slip 1 loop onto an auxiliary needle and leave it before work, knit the 2nd loop, then knit 1 loop with an auxiliary needle.
— cross 2 loops to the left (slip 1 loop onto an auxiliary needle and leave it before work, purl the 2nd loop, then knit 1 loop with an auxiliary needle).
- Cross 2 loops to the right (slip 1 loop onto an auxiliary needle and leave it at work, knit the 2nd loop, then purl 1 loop with an auxiliary needle).
Every craftswoman is simply obliged to know how to tie braids. After all, these are very beautiful patterns; they can decorate many knitted items. For beginner knitters, some patterns may seem difficult. We advise you to try to knit a braid pattern using the knitting patterns and descriptions of which are presented in this article and see for yourself that everything complex actually begins with something simple. Follow the instructions in the diagrams and you will succeed!
Abbreviations used in descriptions:
- pattern repeat - P;
- front rows - LR;
- purl rows - IR.
"Gertrude"
In this criss-cross pattern, the braids are decorated with bridges. This braid looks especially good on voluminous items.
The number of points must be a multiple of 24 + 15 points + 2 cr. The pattern should be knitted according to the pattern.
The diagram shows only LR, in IR we knit all stitches according to the drawing. We start LR with 1 cr., then repeat P the required number of times, ending with 15 p. to the arrow and 1cr.
Vertical P consists of 1p. 16 rub.
"David"
Knitted with diverging and converging braids, a pattern for medium and thicker yarn.
The given diagrams show how to knit such a pattern in two versions: a braid pattern for forward/reverse and for circular knitting.
For forward/reverse braid knitting, the number of stitches must be a multiple of 24 + 2 stitches + 2 cr. We start and finish the row - 1cr.
For circular knitting pattern, the number of stitches is a multiple of 24.
"Robin"
Combined embossed braids and plaits look great not only on clothes, but also on pillows and blankets.
The given diagrams show how to knit such a pattern in two versions: for forward/reverse knitting and for circular knitting.
For forward/reverse braid knitting, the number of stitches should be a multiple of 12 + 7 stitches + 2 cr. We start and finish the row - 1cr.
For circular knitting pattern, the number of stitches is a multiple of 12.
Combined braid pattern
An interesting combination of weaves of different widths gives the knitted pattern additional charm.
We knit using knitting needles according to the pattern that shows only the LR. For IR loops we knit according to the visible pattern.
Horizontal R consists of 12 p., Vertical R - with 1 p. 18 rub.
Braid pattern with paths
The presence of vertical paths from facial loops visually “stretches” the overall pattern. The combination knitted using this algorithm is suitable for adult and children's patterns made from medium-thick yarn.
We knit according to the pattern that shows only LR. For IR loops we knit according to the visible pattern.
Horizontal R consists of 18 p., Vertical R - with 1 p. for 32 rubles.
Braids with leaf patterns
A charming composition of braids and small leaves looks great on jumpers and cardigans.
Knit the braid pattern with leaves using knitting needles according to the pattern that shows only LR.IR, we carry it out according to the drawing. A green cell in the diagram means there is no loop.
The horizontal and vertical P of the pattern are equal to 23p, respectively. and 27r.
Curly braid
The figured braid is knitted with simple crosses of 4 loops. How to knit such weaves is described in detail in the instructions below the diagram.
On сх. Only LR are shown. We carry out IR according to risk.
Horizontal P is equal to 14p.+2p.+2cr. We do it vertically once with 1p. 18 rubles each, then knit, repeating from the 3rd row.
Openwork braid pattern with knitting needles
This braid looks best when made with thick, medium-thick yarn. This is a wonderful pattern for women's summer blouses and tops.
On сх. Only LR are shown. We carry out IR according to risk. We knit the yarn overs in the IR purlwise. P.
Horizontal P is equal to 16p.+3p.+2cr. We start knitting from the loops in front of the P. The vertical P is equal to 1p. 26 rub.
Braids on the reverse surface
The intricate weave gives the product knitted with this pattern elegance and originality.
On сх. Only LR are shown. IR is carried out according to the drawing.
Horizontal P in diagram. indicated by arrows, vertical P is equal to 40r.
“Braid and mesh” pattern with knitting needles
Detailed patterns and descriptions explain how to knit this interesting pattern. Contrary to popular belief that braids are a pattern for thick, warm clothes, try knitting a summer blouse with such braids with a mesh.
The braid checkerboard holds the fabric well, preventing the knitted product from stretching and losing its shape. Braids and mesh are knitted in a number of stitches that is a multiple of 22 + 1 stitch + 2 stitches. On сх. Only LR are shown. We carry out IR according to risk.
Vertical R – 28 rub.
Braids “Shell”
Knitting patterns that are monotonous and rustic at first glance often look completely different in the finished product. This option is exactly that. Try using it on a women's pullover and you will be pleasantly surprised by the result.
How to tie such braids - see the diagram. It has LR and IR.
P contains 12p.+2cr.+7p. for symmetry of the drawing. In height we repeat from 1p. 8 rubles each
Wide openwork braid
This knitted pattern of a wide openwork braid and narrow side braids is perfect for youth jumper models.
A detailed knitting pattern for beginners shows LR. How to knit the wrong side - look at the visible drawing. We knit yarn overs in IR using purl stitches.
Horizontal (marked with a bracket in the diagram) and vertical P are respectively equal to 26p. and 20r.
Such braids look good on children's things and small interior items. The braids hold the shape of the fabric, preventing it from stretching.
On сх. LR, IR are shown, we knit according to the drawing.
Braids with shadow
This pattern is a continuous interweaving of loops. They are all knitted.
On сх. Only LR are depicted. Purl The side is knitted purl. P.
Horizontal P consists of 15p. For knitting you will need additional. spoke. If desired, moving the loops can be done with a crochet hook.
Thick braids
A beautiful convex braid pattern is suitable for knitting bulky items.
Description:
- 1p. (LR): 6p., *2p., 10p.* – from * to * repeat to the extreme 8p., 2p., 6p.;
- 2 rub. and all IR: 8l., *10i., 2l.* – from * to * repeat to the extreme 6p., 6l.;
- 3p.: like 1p.;
- 5p.: 6l., *2i., remove 5p. for extra sp. at work, 5l., 5l. with additional knitting needles, 2i., 10l.* - from * to * repeat to the extreme 8p., 2i., 6l.;
- 7r., 9r.: like 1r.;
- 11r.: same as 5r.;
- 13r., 14r.: like 1r.;
- 17p.: 6p., *2p., 10p., 2p., remove 5p. for extra sp. at work, 5l., 5l. with additional knitting needles * - from * to * repeat to the extreme 8p., 2i., 6p.;
- from 19 rub. for 21 rub.: as 1 rub.;
- 23r.: like 17r.;
- 24 rub. (IR): like 2p.
Chain of braids
The pattern is simple to make and universally applicable.
A detailed diagram shows the LR. How to knit the wrong side - look at the visible drawing. We knit yarn overs in IR using purl stitches.
P is equal to 5p.+2p. for symmetry + 2cr.
Braids with elongated loops
This very delicate pattern can be used when knitting women's blouses, jumpers, and hats. For beginner knitters, the pattern may seem a little complicated.
Horizontal P is equal to 18p.+2cr. On сх. LR and IR are depicted. LR should be read from right to left, IR - vice versa. We perform it once with 1 ruble. 12 rubles each, then repeat from 3 rubles. 12 rub.
Explanations for the diagram:
- 1r.: 1i., 3l., 1l. from 3n., 8l., 1l. with 3n., 3l., 1i.;
- 2p.: 1l., 3i., 1p. pull out (drop the yarn overs, transfer to the right sp., without knitting, thread before work), 8i., 1p. pull out (repeated), 3i., 1l.;
- 3r.: 1i., 2l., 1l. from 3n., cross the elongated st. to the left from 4l. (remove the stretched one, knit 4 knits, then knit the stretched one), cross the stretched one to the right with 4 knits, 1 knit. with 3n., 2l., 1i.;
- 4r. and further: we read similarly according to the diagram.
Small paired braids
A neat pattern for knitting with threads of medium thickness. Ideal for children's items.
Knitting patterns for braids are designed for forward/reverse knitting and for circular knitting. LR and IR are shown.
Horizontal R is 7p.+3p. for symmetry + 2cr. Repeat vertically from 1p. 6 rubles each
Braids with extended transitions
A simple pattern on the back of the ch. will decorate any thing. Looks good on interior items, such as pillows.
You should dial 18p.+3p. symmetry + 2cr. Repeat in height from 1p. 12 rub.
Miniature braids
A very elegant pattern that requires some patience to complete. It is better to use yarn that is not very thick, otherwise the braids will look ugly.
The diagram shows LR and IR.
The initial set is 10p.+2cr. In height we perform from 1p. 16 rub.
Braids - buds
An interesting solution to the classic pattern is suitable for knitting various things for adults.
How to knit LR is shown in the diagram; in IR we determine it by drawing.
The initial set is 19p.+1p.+2cr. In height we perform from 1p. 14 rub.
Braids with fine lace
The fabric knitted with this pattern holds its shape firmly and does not stretch. The pattern can be used in various models of clothing and when knitting interior items.
The diagram shows LR and IR.
The initial set is 16p.+8p.+2cr. Repeat in height from 1p. 12 rub.
New articles
- We sew a beach bag with our own hands. What fabric to sew a beach mat from?
- What to wear this winter: fashionable looks for cold seasons
- Knitting braids for beginners: description, patterns
- Presentation on the topic: "New Year in different countries"
- Crochet flowers: patterns and descriptions for free
- Super crocheted tunics for summer
- How to care for a pregnant cat
- What degree of maturity and thickness should the placenta have? Does ultrasound determine pathologies such as placenta previa and abruption?
- Paper crafts for children
- DIY crafts from improvised materials at home Interesting crafts with a 5-year-old child
Popular articles
- A four-strand braid is a beauty for a girl!
- Eyebrow tattooing with shading
- How to learn to trust your husband: a guide for anxious wives
- New Year's paper templates for windows Santa Claus template for drawing
- How to quickly and correctly remove wen on the face yourself
- What to give to a secret friend What to write to a secret friend
- How to identify giftedness in a child and develop it How to raise a system prodigy from an early age
- Logic problems for older preschool children
- There is contact: the best duets of TOP15MOSCOW presenters Leonid Margolin and Mikhail Belyanin
- Spectacular gift idea in a basket for the New Year How to assemble a New Year's basket with your own hands