Instructions for a manual sewing machine in Russian. How to use an electric sewing machine? Learning to sew on a sewing machine
Colorful fabrics, threads, scissors and needles – is this your ideal world? Have you recently acquired a branded sewing machine or are you planning to do so in the near future? Then you have come to the right place, because here you can find and study online or download absolutely any user manual into the memory of your personal computer.
Manuals will help you get acquainted with the functional and technical characteristics of vacuum cleaners from various manufacturers and, in the end, make the right choice.
Why you should download the user manual from our official website
It is worth giving preference to explanatory documentation posted on our website, if only because:
- you can download it completely free of charge at any time of the day;
- with its help you can learn to fully reveal the “advantages” of sewing machines;
- it is distinguished by its simplicity of presentation and accessibility.
How to download the user manual
To download the manual in Russian, you need:
- Open the instructions section;
- Select the category “Sewing machines”;
- Choose a brand: Minerva, Toyota, Janome, etc.
- Find the right model;
- Save the document that appears on the screen.

Let's move on to the tension regulator, which is a small wheel with a set of numbers. Thanks to this device, you can control the tension of the thread during operation. If the tension is strong, the needle will deviate slightly to the side. If the tension is insufficient, the thread will gather and tangle on the reverse side of the fabric being processed.

Let's start looking for the needle holder screw that securely holds the needle during operation. Usually it is located under the sleeve of the machine.
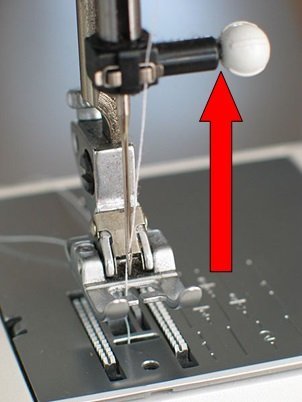
Next, you should find a foot that looks like small skis. Thanks to the foot, the fabric is securely attached to the machine and moves in a given direction.  Using a special lever located behind or to the right of the needle, you can raise and lower the presser foot onto the fabric.
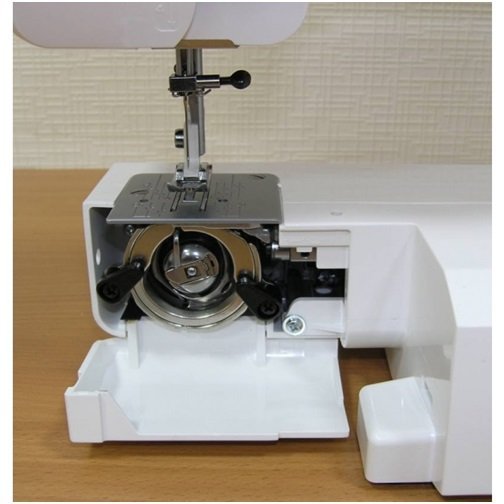
At the bottom of the sewing machine there is a small bobbin that feeds the second thread to the needle. You can find it under the metal plate under the needle. The bobbin is released using a lever or button. It is needed to thread the second thread.
So we figured out the simple structure of a sewing machine. Now you need to learn in detail how to properly use a sewing machine.
Setting up the sewing machine before starting work
The machine must be placed on a flat, stable surface so that the needle is on your left side. First, you'll need to check a few basic settings. No network connection required yet.
- Insert the needle into the machine: The flat side of the needle should face backwards and has a groove on the front to hold the thread while sewing. Insert the needle into the machine and tighten the special screw to hold it in place.
- Installing the coil. All machines use upper and lower thread. The threads in the spool must be placed on the upper spool seat, then the thread passes through the thread guide to the foot and is finally inserted into the needle. The lower thread must be placed inside the bobbin at the bottom of the machine: the thread is wound from the main spool using a thread take-up onto the bobbin. To wind the thread, you need to start the winding mechanism; when the process is completed, it will automatically turn off. The bobbin, ready for use, should be placed in the space under the needle, and the tip of the thread should be left outside.

- Connect the pedal and place it in a location convenient for you.
- Now you can turn on the device and try to make a few lines.
Learning to sew on a sewing machine
Before you start sewing on a new machine for the first time, you need to adjust the speed and learn how to start and stop the device.
- First you need to put the electric machine to idle.
- Try to set the device in motion by lightly pressing the ballast pedal with your foot.
- Increase the sewing speed by pressing the pedal harder.
- If you remove your foot from the pedal, the machine will stop working.
It is best to repeat the above steps 2-3 more times.
Now you can start working directly.
- We prepare the fabric: fold it in half, stitch it on our hands, and then use chalk to draw various broken and curved lines.
- We put the machine in the workplace and refuel it.
- Sew the fabric along the marked lines.
If you succeeded, congratulations! Now you can try to sew something more serious.
In order for equipment to serve properly for many years, it needs to be looked after and used correctly. Here are the basic rules for caring for an electric sewing machine:
- The machine should be stored in a cool, dry place. Dampness spoils the mechanism.
- Hide the device from dust, which causes the oil to harden and run poorly.
- If the machine has not been used for a long time, it must be thoroughly cleaned of dust and dirt, and then the rubbing parts must be treated with oil.
- After a long period of “downtime”, you must definitely change the needle with a new one, as it may become rusty and begin to tear the thread.
Video instruction
Using the machine is easy if you follow the instructions and our recommendations. To more accurately understand the threading process, watch the video instructions.
What you will learn from the video:
- Removing the bobbin case from under the bottom panel of the machine for threading.
- Winding thread onto a bobbin.
- Installing the bobbin into the bobbin case.
- Installing the bobbin case into the bottom of the sewing machine.
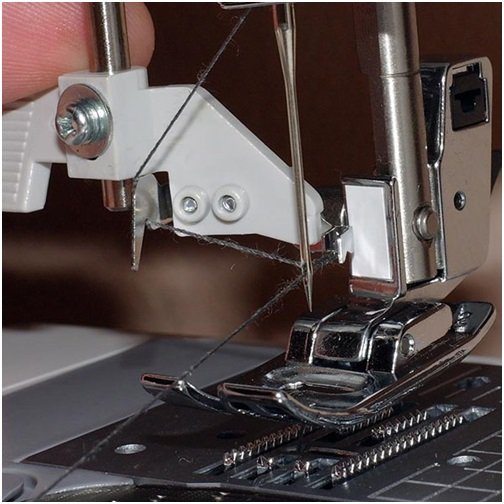
- Threading the upper thread through the first thread guide, thread tensioner, second thread guide to the needle.
- Pulling out the lower thread and preparing for work.
In contact with
She stepped on the hem of a skirt with her heel, her husband tore his trousers at a friend’s wedding, and a child’s dress tore at the seams before a performance. What to do? A mini manual sewing machine is your irreplaceable savior in such a situation.
Content
Mini sewing machine: how to use it correctly? Are there any differences from the usual
The mini sewing machine is designed for minor repairs of clothes, curtains, tablecloths, bed linen, etc. It can be used effectively in road as well as domestic conditions in the absence of a stationary sewing machine. But what about a house without a machine for repairing and sewing things up? If you don’t know how to sew at all, or you don’t have enough money or space for a stationary model, then a small sewing machine will be a worthy substitute for a needle and thread and a good helper in everyday life.Advantages of mini sewing machines:
- mobility - such models weigh from 100 to 300 grams, are small in size and will definitely fit in an ordinary women's handbag. You can take them with you on a visit, trip or business trip
- ease of use – the design of the machines is very simple. Just insert the thread into the needle and you can start sewing. Simple even for a child
- versatility - can sew fabrics of different thicknesses (from chintz or cotton, to denim or leather in several layers)
- variety of stitches - such devices perform up to 70% of the types of seams of conventional models of stitching machines. They can sew with a straight stitch, slip stitch, buttonhole stitch, simple decorative patterns and chain stitch finishing.
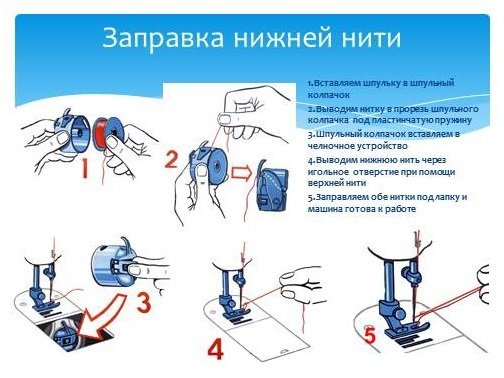
How to thread a mini sewing machine

Unlike conventional machines, the stitcher only works with one thread. You won’t have to worry about threading the upper and then the lower thread, using bobbins, checking the thickness of the thread, etc.
Any sewing thread is suitable for the stitcher. To fill them correctly, you need to strictly follow the instructions.
Advice! If the instructions upon purchase were in a foreign language or were written in a complex manner, remember and make a note of the location of the already threaded thread in your new model. You can easily repeat it.An example of the threading sequence for the Handy Stitch machine can be seen in the figure.
Depending on the thickness of the fabric, you should select a needle of the right size and not insert it deeply into the needle groove.
A special screw or switch can be used to adjust the length of the stitches or their shape. For example, stitching, zigzag, buttonhole stitch, etc.
This is, perhaps, all the difficulties of refueling. Next, by pressing the handle (like a stapler), you can sew together the parts of your product.
Rating of the best and inexpensive mini sewing machines

Nowadays you can find a huge number of mini sewing machines from various manufacturers in online stores. Which one to choose? Let's look further...
Zimber mini cars
Characteristics:- weight does not exceed 305g.
- maximum stitch length is 4 mm
- the model is capable of performing 8 different operations
- body made of plastic
- equipped with an electric motor that runs on AA batteries (four pieces) or a battery (500mAh). The battery is charged from the mains via an adapter. The device can also be operated directly from the network.
- The delivery set includes 3 spools of thread, a thread threader and instructions in Russian
Handy Stitch mini machine
Characteristics:- weight - 305g.
- works with AA batteries. You need 4 of them
- complete with 3 bobbins with thread, two needles, thread puller
- body made of plastic
Mini Jaguar cars
Jaguar has long been known among customers for its lightweight, but practical and functional models of stationary sewing machines. The smallest model is the Jaguar 281.Features of the Jaguar 281 car model
- The body is made of plastic, the functional parts are metal
- Lightweight, compact model. Doesn't take up much space in the house
- Powered by an electric motor
- Adjustable stitch length from 0 to 4 mm
- Performs a simple line stitch and various types of zigzag
- The kit includes additional needles, hooks, bobbins, needles
If you do not need to take the device with you on vacation, and you plan to use it at home, then this model is “on top.”
At the moment, the Jaguar 281 mini-car is not produced, but it can be successfully bought on the used equipment market for about 4 thousand rubles.
Mini cars from aliexpress
The cheapest way to purchase a small modern sewing machine is on the Aliexpress site. The minimum price for such products starts from $2:- DIY brand cars from $2
- 2017 mini models - about 7 - 9 $
- stationary mini sewing machines Dual from $18
- embroidery machines – from $21, equipped with overlocker
Advice! Mini hand sewing machines will not replace your stationary sewing machines. They can only help you quickly repair parts, perform minor clothing repairs, and bring undoubted convenience on the road. It is impossible to compare their work with the work of stationary machines; these are completely different devices.
The user must study the basic principles of operation of a sewing machine before mastering the basics of tailoring. Depending on the type and features of the device, some details of use may differ. A manual sewing machine is a machine that has been around for many years, but not everyone knows how to use it correctly.
Preparing a sewing machine for work consists of several stages:
- study the instructions for the device;
- needle installation;
- threading;
- selecting the desired sewing mode.
Even in the process of choosing a suitable device, it is worth asking whether there are instructions for the sewing machine model you like in Russian. The presence of such a document in the kit is especially important for those who have never dealt with such devices. This also applies to purchasing a used car through message boards. As a last resort, before purchasing you should take care to search for instructions on the Internet.
Of course, if you purchase a model of an old-style manual sewing machine, for example, “ Podolsk" or "Singer"", it is unlikely that you will be able to get original rules of use for it. Sometimes this is not required, since such devices are easy to set up and operate. It is easy to refill and maintain. Such devices are reliable, which is why they are still valued. Another advantage of old hand sewing machines is Possibility of sewing thick fabrics- this is beyond the capabilities of most modern household models.
Needle installation
Only after studying the safety rules when working on a sewing machine can you begin to use it directly. The first thing to do is to install the needle correctly. This applies to all models, be it manual or foot operated.
The thickness of the needle is selected depending on the material that will be used for sewing. It is best to purchase a set of needles along with your sewing machine - this will allow you to work with fabrics of different types and thicknesses.

Sometimes such sets provide comments on needle numbers and what fabrics they are suitable for.
To install the needle, you must perform the following steps.
- Put needle holder to the highest position by turning the flywheel.
- The sewing machine needle has a special structure, after studying which you can easily install it correctly. The flat side of the flask is inserted outward, and the long groove is inserted inward (to the base of the sleeve).
- The needle is inserted all the way into the holder provided for it and secured with a screw.
Correct needle placement is very important. Otherwise, loops will not be created during operation, which will lead to omissions.
How to thread a sewing machine
Refilling modern devices is easy: as a rule, all steps are shown in the instructions. schematic drawings. The body of modern devices has digital markings or arrows to help with threading. But if the document and drawings are missing, then you will have to cope on your own.

Upper threading instructions
You should always start from the top. Having grabbed the end of the thread, it is threaded through a small window on the back panel of the device, taken to the tension regulator, threaded through the corresponding loops and brought out onto the needle.
If threading is incorrect, there is a risk of thread chafing during sewing or malfunction of the unit.
Also carried out in accordance with certain rules. Regardless of the type and model, threading the hook (installing the bobbin) is done in such a way that the thread comes out clockwise. When threading, you should pay special attention to the thickness of the thread (its number) - it should be the same. The rules for operating a sewing machine require that you wind the thread onto the bobbin from the same spool that will be installed for the upper thread.

Instructions for threading the bobbin thread
How to thread a sewing machine
To pull out the bobbin thread:
- take the end of the upper thread (without pulling it), which is already inserted into the needle;
- lower the needle into the needle plate using the handwheel;
- the needle will grab the shuttle thread, all that remains is to pull it out.
Mode selection
Before work, you should study the location of the mode switches, thread tension, and reverse. Modern models provide a graphic representation of the types of stitches on the device body (straight stitch, zigzag, overcasting, etc.); on older machines, the choice of stitches is not so large. For reverse(to secure the thread at the end of work) all models provide a small lever.
After all the preparatory measures, the material is placed under the foot, which is then lowered onto it, and you can start sewing directly.
Mini sewing machines
The modern market for sewing equipment is quite diverse. Today, manufacturers produce miniature manual sewing machines that fit in the hand. Their main advantages:
- compact dimensions;
- absence of complex threading mechanisms;
- ease of operation;
- stitch length can be adjusted.


The features and rules for using a compact manual sewing machine are very simple. Simply insert one thread, select the stitch length, and you can start sewing right away. They can be easily take with you on the road. They are suitable for making urgent clothing repairs or adjusting the length of curtains without removing them from the curtain.
General rules for operating hand sewing machines
Operating a manual sewing machine must be carried out in strict compliance with safety regulations.
- It is permissible to rotate the flywheel in only one direction - to myself. Rotating in the opposite direction will cause the bobbin thread to become tangled.
- When the machine is not being used, the clamping foot must be in the raised position.
- You cannot work on a machine without fabric. This will cause the lower teeth of the foot to become dull.
- During operation, tensioning of the material is not allowed; you only need to adjust its direction. The machine does all the movement itself.
- During work shuttle cover on the body must be closed.
- While working, do not bring your fingers close to the needle or try to adjust the thread of a working device.
- Do not sew on pins holding the thread together - this will cause the needle to break.
Learning how to operate a sewing machine is not difficult. The main thing is to act according to the instructions and strictly follow safety precautions.
Sewing machines can seem intimidatingly complicated to those who don't know how to use them. Whatever the case may be, don't let the fear of unknown operations and skills required to use a sewing machine stop you from creating textile wonders! Use this step-by-step guide to set up and operate your sewing machine so you can get started making things with your own hands.
Steps
Sewing machine parts
-
Place the sewing machine on a stable table, work area, desk, or sewing machine stand in front of you.
Sit on a chair that is at an appropriate height relative to the table you are using. The sewing machine should be positioned so that its needle is on the left and the rest on the right, relative to you. You'll have to check a few settings first and become a little familiar with the sewing machine, so don't plug it in at this point. Insert the needle securely.
The needle has a flat side, so it can only be inserted one way: the flat side must be facing backwards. On the other side, there is a groove at the bottom of the needle, usually located opposite the flat side of the needle. This groove always faces the direction the thread passes (the thread passes through this groove as the needle stitches up and down the fabric). Insert the needle as described and tighten the screw holding it securely. Install the coil.
- Sewing machines use two sources of thread - upper and lower threads. The lower one is on the reel. To wind the spool of thread, place the spool on the upper spool pin, which is where the thread is wound. Follow the directions and wind the thread from the thread spool, passing it through the thread take-up, onto the bobbin. Turn on the thread winder and wait until it stops when the bobbin is completely wound.
-
When the bobbin is ready, place it in the designated place, under the needle, at the bottom of the sewing machine. Leave the end of the thread outside to insert it into the needle. Thread the sewing machine.
The spool of thread located on the top of the sewing machine must be untwisted and attached to the needle. To achieve this, take the end of the thread and pull it through the thread take-up on top of the sewing machine, and then lower the thread down to the presser foot. There should be little numbers and arrows on your sewing machine to show you the order of the thread. Run the scissors under the foot to release the ends of both threads. You should have two tips - one from the thread passing through the needle, and the second from the thread coming from the bottom spool.
Plug the sewing machine into the outlet and turn it on. Many sewing machines have a built-in light that will help you determine if the machine is running and has power. The power button is often located on the right or back of the sewing machine, if there is one at all. Some models of sewing machines do not have such a button and turn on as soon as they are plugged into a power outlet.
- Also connect a foot pedal to the sewing machine. Place the pedal in a comfortable position under your foot.
EXPERT ADVICE

Pattern designer
Daniela Gutierrez-Diaz is a professional pattern maker and fashion designer at DGpatterns. Creates modern and unique silhouettes suitable for everyday life. Her successful blog, On the Cutting Floor, contains sewing tips and a variety of patterns in PDF format.
Pattern designer
Keep your sewing machine clean. Daniela Gutierrez-Diaz, a professional pattern maker and fashion designer, advises: “Take your sewing machine to a specialized sewing machine service center from time to time. so that it can be cleaned there. It is advisable to do this regularly, especially if you use your sewing machine all the time».
Sewing with a sewing machine
Select a straight stitch, medium size. Check your manual to see how to do this on your model of sewing machine. On this model, the stitches are set by turning the lower knob on the right side of the machine until it clicks into place. Always set or change the stitch pattern with the needle raised, removing the fabric as it may move the needle.
- The straight stitch is the most popular stitch in sewing. The next most popular stitch is the zigzag stitch, which is used to finish the edges of the fabric and prevent it from unraveling and fraying.
- If you lightly tug on the fabric that is pressed down with the presser foot, you will realize that it is being held quite firmly. When you stitch, the sewing machine uses a protractor to move the fabric at the correct speed. Therefore, there is no need to pull the fabric through the sewing machine manually; in fact, if you pull the fabric, it can cause the needle to bend or ruin your project. You can adjust the speed and stitch size using the buttons on the machine.
-
Keep the ends of both threads loose. For the first few stitches, you will need to hold the ends of both threads to prevent them from getting tangled in the fabric. Once you have stitched a bit, you can release the ends of the threads and use both hands to control the fabric and the sewing machine.
Press the pedal with your foot. The pedal is responsible for controlling the sewing speed. It's like the gas pedal in a car - the harder you press, the faster the sewing machine will run. At first, press the pedal very slowly and just enough to start the sewing machine.
- Your sewing machine may have a button that you press with your knee instead of a pedal. In this case, use your knee to press it.
- You can use the top wheel on the right side of the sewing machine to make it stitch, or you can move the needle by hand.
- The sewing machine will automatically guide the fabric away from you. You can guide the fabric under the needle in a straight line or at different angles. Practice stitching straight and wavy. The only difference is how you bring the fabric to the needle.
- Do not push or pull on the fabric that is under the needle. This may cause the fabric to stretch or the needle to break, or the stitch may become caught in the bobbin. If you feel like your sewing machine is not working fast enough, press the pedal harder, adjust the stitch length, or (if necessary) buy a faster sewing machine.
-
Find the reverse button or lever and try it out. It allows you to change the direction in which you sew, so the fabric flows towards you instead of away from you. Typically this button or lever is held on by a spring, so you will have to hold it to continue stitching in the reverse direction.
Use the hand wheel to raise the needle to its extreme point. Then raise your paw. The fabric should now be easy to remove. If the thread pulls back when you try to remove the fabric, check the needle position.
Cut the thread. Many sewing machines have a notch on the pin that holds the presser foot. You can cut the threads by holding them with both hands and running them along the notch. If there is no notch or you want to cut the threads more accurately, then use scissors. Leave the ends of the threads in order to continue sewing the next seam.
-
Practice sewing seams. Pin two pieces of fabric, right sides together, right at the edge. The seam will be 1.3 cm to 1.5 cm from the edge. You can stitch the fabric in one layer (and may want to do this to reinforce the edge), but since the purpose of most sewing machine work is to join two pieces of fabric together, you will need to get used to sewing multiple layers of material and using pins .
- The fabric is pinned right sides together so that the seam remains on the wrong side. The front side is the side that will be outer after sewing is finished. On dyed fabric, the brighter side is usually the right side. Some fabrics may not have a facing.
- Attach pins perpendicular to the line along which the seam will run. You can sew directly over the pins and later easily remove them from the fabric, but doing so may damage the sewing machine, the fabric, or the pins. It is safest to remove the pins as soon as the needle reaches them, since if the needle accidentally hits a pin, it will break and the needle will bend. However, prevent the needle from hitting the heads of the pins.
- As you follow the fabric, pay attention to where the material moves. The seams can go in different directions, but most sewing projects are trimmed afterwards so that the seams run parallel to the edge. Also, pay attention to the direction of the pattern, if your fabric has one, and lay the fabric so that the pattern runs from top to bottom on the right side. For example, floral or animal prints, or stripes or other designs should go in the right direction.
Find the power button. It may sound stupid, but locating the power button is the most important step! It can be found in different places depending on the model of sewing machine you have, but most often you can find it on the right side of the sewing machine.
Find the reel seat. This is the small plastic or metal stick that sticks out from the top of the sewing machine and is designed to hold the spool of thread.
Find the thread guide. The thread guide guides the thread from the spool mounted on the top of the machine to the bobbin winder. This is a geometric piece of metal that sticks out on the top left side of the sewing machine.
Find a bobbin winder. To the right of the reel seat there is another, even smaller, metal or plastic pin, next to which there is a small horizontal wheel. This is a winder reel and its limiter. They work together (together with the bobbin with thread) and are designed to wind the thread onto the bobbin before sewing.
Look at the buttons that allow you to adjust the stitches. They can be in different places depending on the model of sewing machine you have, but they usually look like buttons with little pictures on them and are located on the front of the sewing machine. These buttons allow you to change the type of stitches you can use, the length of the stitches, as well as their direction (forward and backward). Check the instructions for your sewing machine model to find out what each button does.
Determine the location of the thread take-up. When you are ready to thread your sewing machine, start pulling the thread from the spool at the top, through the thread guide, and then into the thread take-up. This is a lever (with two grooves cut out) located on the front left side of the sewing machine. Usually next to it you can see printed numbers and arrows, explaining how it is necessary and in what order to thread the thread into the sewing machine.
Find the tension regulator. The tension dial is a small wheel with numbers located next to the thread take-up. It controls the thread tension while sewing; if the tension is too high, the needle will bend to the right. If the tension is not sufficient, the thread will tangle on the back of the fabric you are sewing.
Find the needle clamp screw. This is a metal tool that holds the needle while sewing. It is located under the sleeve of the sewing machine and is shaped very similar to a large fingernail. It attaches to the right side of the needle.
Find the paw. This is the metal part located under the needle holder and looks like tiny skis. When you lower the foot, it holds the fabric in place and guides it as you sew.
Find the presser foot lever and practice lowering and raising the presser foot. It should be behind or to the right of the needle holder and needle. To try the lever, lower it down and lift it up.
Find the needle plate. The needle plate is the silver pad located directly below the needle. Very simple, right?
Find the transporter. The feed dog is a small metal guide that is located on the needle plate, under the foot, and guides the fabric as you sew. Pay attention to the two metal rows under the foot - this is the conveyor.
Locate the coil limiter and releaser. The spool is a small bobbin of thread that is located at the bottom of the sewing machine and supplies the second thread to the needle, which is needed to create stitches on the inside. Under the metal plate is the spool stop, and there you will also find a button or lever that releases the spool. You will need it to secure the spool before you start sewing.
Setting up the sewing machine
Practice on bad material. Choose a plain fabric, not knit, for your first sewing experience. Do not use fabric that is too thick for your first attempts at using a sewing machine. Denim or flannel fabric is very difficult to work with due to their density.
Place the fabric under the needle. Sew, placing the stitched material to the left of the machine. If you place the fabric on the right side, it may cause uneven stitches.
Lower your foot. Find the lever on the back or side of the needle that allows you to lower and raise the presser foot.
New articles
- How to survive your husband's betrayal: useful advice from a psychologist
- How to use an electric sewing machine?
- Delicate manicure for a romantic look Delicate and feminine nail design
- How to beautifully refuse a guy’s offer to meet, date or intimacy, so that he doesn’t get offended. How to refuse a man’s offer to date
- Dress in Greek style: the fashionable secret of the classics
- When people hug each other
- Is it possible to draw on a pregnant belly?
- New Year's Eve How to get bonuses, emblems and inscriptions
- How to treat hangnails on fingers at home
- Fashionable men's shoes: photos, types of shoes, features of the latest collections What men's shoes are in fashion
Popular articles
- Peel three skins: how to use body exfoliants Body exfoliant: what is it
- How to clean a jacket and down jacket: ways to remove grease without washing How to wash stains on a white jacket
- Eco-leather material: can it be machine washed, how to remove stains and why you may need a hot bath How to wash a leather dress
- Why do freckles appear?
- Tinted shampoo for blondes against yellowness: review of products, reviews
- Why do Armenian men prefer Russian girls?
- Windbreaker pattern for a baby DIY windbreaker made from raincoat fabric for women
- Ganesha tattoo Ganesha tattoo
- What is positive thinking and how to develop it Ways to develop positive thinking
- Parents are role models for children