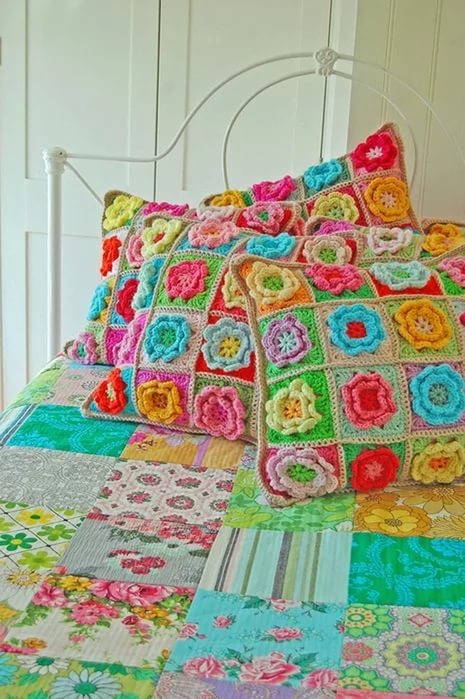
Crochet decorative pillow covers patterns. Openwork pillows made of square motifs
Very often there are pillows left over from old sofas that are a pity to throw away, but they don’t really suit the design of the room. These pillows can be decorated and transformed with a handmade cover. Today we will talk about how to crochet a beautiful pillow storage case yourself, easily and simply. Using a simple technique, we will not only decorate an old pillow, but also refresh the interior of the room.
Knowing how to crochet allows you to create truly amazing things.
Interesting video on the topic:
We begin to knit a pillow cover using a hook according to the diagrams
We will need: yarn of the required color, hook No. 3.
Let's look at some loops:
Double crochet stitch - knitted like a single crochet stitch, but from left to right.
Bump - knit 5 single crochets from the 1st loop closed together.
Working on the back and front parts
You need to cast on a chain of 69 air loops (the number of loops is adjusted according to the size of the pillow).
Knit, alternating rows of double crochets and single crochets.
Total height 40 cm.
Cast on 69 chain stitches and knit according to the pattern.
1st r. Double crochets are worked to the end of the row.
2nd r. Single crochets are knitted.
3rd r. Knitted similarly to the 1st.
4th r. Knit similarly to row 2. All even rows are knitted in this way.
7, 9, 11, 13 rows. Knit 7 double crochets, a “bump”, 53 double crochets, again a “bump” and then 7 double crochets.
15th r. Knit 7 double crochets, “bump”, 11 double crochets, then the combination: “bump”, 2 double crochets. Repeat the combination 9 times. After this we knit a “bump”, 11 double crochets, a “bump”, 7 double crochets.
All odd rows from 17 to 33. Knit 7 double crochets, “bump”, 11 double crochets, “bump”, 29 double crochets, “bump”, 11 double crochets, “bump”, 7 double crochets.
35th r. Knit similarly to the 15th row.
All odd rows 37 to 43 are knitted similarly to row 7.
45th r. Knit similarly to row 5.
Rows 47 and 49. Knitted with double crochets.
Fasten and break the thread.

Sew the front and back pieces together, leaving one side unsewn. We tie the edges of the product with a series of double crochets and “crawfish step”. The case is ready for use. By putting it on the pillow, you can sew up the open edge, but you can also sew on buttons and loops for easy removal and washing.
By knitting a pillow cover according to this pattern, you will get such a cute product as in the photo.

There are many ways to add touching coziness to your home - pay attention to - one of these options! Try it too!
For a detailed master class, watch the video.
We create a round-shaped case with diagrams and descriptions
To do this you will need: yarn of the desired color (or several colors), hook number 3.
The cover for a round pillow is knitted in two parts.
To get started, you need to attach any thin fabric to the pillow and trace it. Then cut out the resulting circle from the fabric. We will use it to guide the size of the pillow.
The photo shows an example of tying fabric for a pillow cover.

Here's another DIY useful for your home: - a fun knitted accent for your kitchen!
In the photo provided, you can see that a chain of air loops is knitted from white threads, and a three-dimensional pattern is knitted with yellow thread. Having knitted a certain length, you can sew it to the fabric so as not to make a mistake with the length.
For a three-dimensional pattern, you need to cast on 20 air loops from the base threads. From the threads that will be used for the voluminous pattern (yellow in the photo), knit the combination: 1 single crochet, skip 1 stitch, 5 double crochets, skip 1 loop. Repeat this combination to knit a pattern. The number of double crochets can also be adjusted.
When the first round is completed, without tearing off the thread, knit the second round. You need to apply the pattern in a spiral. By sewing the turns closer together, you get a more voluminous cover. An example in the photo below.

Knit the second side in the same way as the first side.
After finishing the knitting, the sides of the pillowcase should be carefully sewn to the pillow itself. Threads for sewing should be selected according to the color of the yarn itself. They will not be visible behind the pattern.
An example of the resulting round pillowcase can be seen in this photo.

Here are a few more options. So, for inspiration:


Thus, after studying the proposed patterns, you can knit a cover with your own hands very quickly. The accessory turns out to be original and will look beautiful in any interior. The case will look especially elegant, the master class of which is specially posted in a separate article at the link.
Be sure to watch this video:
Pillows have been around since time immemorial. At excavations of ancient Egyptian burials, pillows were found on which the pharaohs slept without fear of damaging their complex hairstyle; they were wooden tablets with images of gods on stands. In Japan, geishas slept on similar structures to protect their expensive hair styling. History knows porcelain, metal, stone pillows, as well as those decorated with precious metals and stones. At different times, pillows were made from leather, fabrics, stuffed with feathers, down and dry hay or straw, and decorated with multi-colored embroidery, lace and laces with tassels.
At all times, and even more so now, pillows serve not only for sleeping. They are used for decoration and creating a certain style in the interior, for comfortable sitting on hard chairs, tiny sachet pillows give a completely unique aroma to the atmosphere in the rooms, funny pillows in the form of funny cats, lambs and much more will make the atmosphere in the children's room bright and will be excellent toys for kids. And is it worth mentioning “heart” pillows as gifts for Valentine’s Day?!
Square and round, pillows in the form of cylinders and polygons, huge and very tiny, any of these products can be created with your own hands, crocheted, for example. At the same time, practical needlewomen often knit not the pillow itself, but a cover for it, which can be easily removed and washed without damaging the stuffing material.
One of the simplest crochet patterns is the granny square. At the same time, from such easy-to-execute motifs you can create very beautiful and surprisingly cozy decorative items. Another lovely thing about the granny square is that you can use a variety of leftover yarn. The result is an original, bright and cute pillow.
Granny square pillow.
Creating a pillow from such motifs is quite simple; the size of the square can be adjusted by decreasing or increasing the number of rows, and the use of multi-colored yarn will allow you to create a product that is ideal for a specific interior. Motifs can also be combined in different variations, which leaves even more room for creativity and imagination.
Connect a chain of 5 airs into a ring. loops
- First row. Knit 4 times, 3 tbsp. double crochet, alternating triples 1 air. loop. At the beginning of the row, replace the first st. with a double crochet for 3 air. lifting loops, complete row 3 connection. Art.
- Second row. At 1 air. knit a row loop (3 chain stitches, 2 double crochet stitches + 1 double crochet stitch + 3 double crochet stitches), *1 double crochet stitch. loop, in the next 1 air. knit a loop (3 double crochets + 1 double crochet + 3 double crochets) *, knit from * to * 2 more times. Finish 3 connections. Art.
- Third row. At 1 air. knit a loop (3 chain stitches, 2 double crochet stitches + 1 double crochet stitch + 3 double crochet stitches), *1 double crochet stitch. loop, in the next 1 air. knit a loop 3 tbsp. with double crochet, 1 air. loop, in the next 1 air. knit a loop (3 double crochets + 1 double crochet + 3 double crochets) *, knit from * to * 2 more times, 1 double crochet. loop, 3 tbsp. with a double crochet. loop of the row below, 1 air. loop, 3 connections Art.
- Continue knitting according to the pattern to the desired size.
Below are several photo examples of the layout of “granny squares”.


Elegant square pillow in vintage style.

This pillow is also knitted from motifs, but made from yarn of the same color will create a completely different atmosphere than a “granny square”.

Close a chain of 5 airs into a ring. loops
- First row. Tie 3 air into a ring. lifting loops, 15 tbsp. double crochet Finish 1 connection. column
- Second row. Knit 1 tbsp into each stitch of the row. double crochet + 1 air. a loop. In the first case, instead of 1 tbsp. with a crochet knit 3 air. lifting loops. Complete 1 connection. column.
- Third row. In Art. with the row below, knit 1 tbsp. with double crochet, in air. knit loops 2 tbsp. double crochet First Art. double crochet, replace with 3 chain stitches. lifting loops, complete 1 connection. column.
- Fourth row. 1 air lifting loop, *arch of 10 air. fasten the loops through 2 loops of the row below 1 st. single crochet, arch of 3 air. fasten the loops through 2 loops of the row below 1 st. single crochet, arch of 5 air. fasten loops through 2 loops 1 tbsp. single crochet, arch of 3 air. fasten loops through 2 loops 1 tbsp. without crochet *, knit from * to * 3 more times, finish 1 connection. column.
- Fifth row. In arches of 10 air. knit loops (5 double crochets + 3 double crochets + 5 double crochets), into arches of 3 double crochets. loops knit 1 tbsp. without crochet, in arches of 5 air. knit 7 stitches. double crochet Finish row 1 connection. column.
- Sixth row. 3 air lifting loops, *5 air. loops, in an arch of 3 air. knit loops (1 single crochet + 3 chain stitches + 1 single crochet), 5 chain stitches. loops, 1 tbsp. double crochet in st. single crochet row below, 3 air. loops, 1 tbsp. Single crochet in 4th of seven stitches. with double crochet, 3 air. loops, 1 tbsp. double crochet in st. single crochet row below *, knit from * to * 2 more times, 5 air. loops, in an arch of 3 air. knit loops (1 single crochet + 3 chain stitches + 1 single crochet), 5 chain stitches. loops, 1 tbsp. double crochet in st. single crochet row below, 3 air. loops, 1 tbsp. Single crochet in 4th of seven stitches. with double crochet, 3 air. loops, finish 1 connection. column.
- Seventh row. Knit st. double crochet loops of the bottom row. In the central loop of 4 corner arches of 3 air. knit stitches (1 double crochet stitch + 3 double crochet stitches + 1 double crochet stitch). Start row 3 air. lifting loops instead of 1 tbsp. with a double crochet, finish 1 connection. column.
- Eighth row. Knit st. Single crochet in each stitch.
Pillow with bumps in the shape of a cushion.

Made from contrasting multi-colored yarn, this pillow is sure to enliven the interior. Knitted from 3 parts, cylindrical and 2 circles. A zipper can be sewn in at the junction to facilitate the process of stuffing and washing.

Crochet using thick threads with crochet number 4 and larger. Before work, knit a small sample to calculate the loops.

- First row. 3 air lifting loops, 11 tbsp. double crochet Finish row 1 connection. column.
- Second row. Work 2 tbsp into each stitch of the row below. double crochet, replacing the first st. with a double crochet for 3 air. lifting loops, finish row 1 connection. column.
- Third row. Knit st. double crochet, knitting 2 tbsp in every second loop of the row. double crochet Start and end the row in the same way as the previous ones.
- Fourth row. Knit 2 tbsp. double crochet in every third stitch of the row below.
- Knit further according to the pattern. Knit the last eighth row without increasing stitches.
The cylindrical part is knitted in one rectangular fabric.

Dial a chain of air. loops
Knit 2 rows st. Single crochet in each stitch. Start rows 1 air. lifting loop. Then knit 1 row with “bumps” every 5 stitches, 3 rows of st. without a crochet and again 1 row with “bumps”, etc. to the required canvas size.
Knit the “bump” as follows. Knit 5 unfinished stitches. with a yarn over from one loop of the base (there are 6 loops on the hook), then knit all the loops into one.
Round flower pillow.

It will be necessary to knit 2 identical parts from rows 1 to 22, connect them and knit from rows 23 to 25. Crochet number 2. The diameter of the pillow is 49 cm.

Connect a chain of 14 air into a ring. loops
- First row. Knit 1 air into the ring. lifting loop (ignore), 24 tbsp. without a crochet. Finish with 1 connecting post.
- Second row. Knit 8 arches from 4 air. loops, securing from 1 tbsp. Single crochet in every third stitch of the row below.
- Third row. Knit 4 tbsp into each arch. double crochet, knit 3 chain stitches between the four stitches. loops, in the first case replace 1 tbsp. with a double crochet for 3 air. lifting loops. Finish row 2 connection. in columns. The knitting has shifted by 1 stitch.
- Fourth row. 3 air lifting loops, 2 tbsp. with a double crochet in 2 tbsp. double crochet row below, 3 tbsp. with a double crochet in 2 out of 3 air. arch hinges, *3 air. loops over 2 loops of the row below, 3 tbsp. with a double crochet of 3 tbsp. double crochet row below, 3 tbsp. with a double crochet in 2 out of 3 air. arch loops *, knit from * to *, finish with 3 air. loops, 1 connecting post.
- Knit further according to the pattern.
Star pillow.

You will need yarn of two contrasting colors. Knit the first 3 rows with white yarn, then alternate colors every 2 rows. Tie with red yarn and attach tassels to the ends of the “rays”. It is necessary to connect 2 parts.

Connect a chain of 6 air into a ring. loops
- First row. 3 air lifting loops, 1 tbsp. double crochet, *2 air. loops, 3 tbsp. with a double crochet in a ring *, knit from * to * 4 more times, 2 air. loops, 1 tbsp. with a double crochet in the ring, 1 connecting post in the third lifting loop.
- Second row. 3 air lifting loops, *in an arch of 2 air. knit loops (2 double crochet stitches + 3 double crochet stitches + 2 double crochet stitches), 1 tbsp. double crochet in the middle of three stitches. with the bottom row crochet *, knit from * to * 3 more times, in an arch of 2 air. knit loops (2 double crochet stitches + 3 double crochet stitches + 2 double crochet stitches), 1 connecting stitch in the third lifting loop.
- Third row. 1 air lifting loop, *1 air. loop, in an arch of 3 air. knit loops (4 double crochet stitches + 2 double crochet stitches + 4 double crochet stitches), 1 double crochet stitch. loop, 1 tbsp. single crochet in 1 tbsp. with the row below *, knit from * to * 4 more times, replacing 1 tbsp in the last case. single crochet on 1 connecting column.
- Knit further according to the pattern.
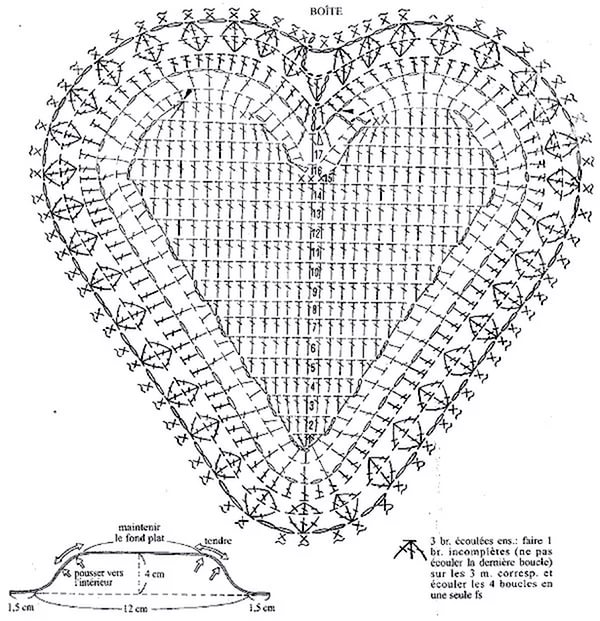
Heart pillow.

A charming pillow will not only decorate your home, but also an excellent romantic gift. Knit up and down from the original chain of air. loops It is necessary to connect 2 parts.

Dial a chain of 48 air. loops Mark the center with a contrasting thread for easy calculations when knitting.
- First row. 1 air lifting loop, 22 st. without double crochet, knit in 2 central loops (1 single crochet + 2 chain stitches + 1 single crochet), 22 tbsp. without double crochet, tie 3 tbsp into the outer loop of the chain. without crochet, knit on the reverse side of the original chain 22 tbsp. Single crochet, skip 2 loops, 22 tbsp. without double crochet, knit 2 more loops into the first loop of the chain (from which the lifting loop is knitted). Finish with 2 connecting posts.
- Second row. 1 lifting loop, 23 st. without double crochet, knit in 2 central loops (1 single crochet + 2 chain stitches + 1 single crochet), 23 tbsp. without double crochet, knit 2 tbsp into the 3 outer loops. without crochet, 21 tbsp. Single crochet, skip 2 stitches, 21 sts. without double crochet, knit 2 tbsp into the 3 outer loops. without a crochet. Finish with 2 connecting posts.
- Knit according to this analogy according to the pattern.
Pillow sachet “Heart”.

This tiny sachet pillow will be an excellent fragrant detail for your interior decor. You can fill it with Provençal herbs, breathe in, close your eyes, and find yourself in the very heart of France.
For two parts, knit 6 circles according to pattern 1, connect them as shown in the picture and tie with a lace frill according to pattern 2. 
Tie a chain of 4 chains into a ring. loops
- First row. 3 air lifting loops, 19 st. with a double crochet, finish 1 connection. column.
- Second row. Knit alternating 1 tbsp. double crochet and 1 air. loop, st. double crochet between st. with double crochets on the bottom row. First Art. double crochet, replace with 3 chain stitches. lifting loops. Finish 1 air. loop, 1 connection column.
- Third row. In every 1 air. knit a loop of the row in 2 tbsp. without a crochet. First Art. single crochet replace with 1 air. lifting loop, finish 1 connection. column.
- Fourth row. Between 2 tbsp. Single crochet, knit 1 tbsp. double crochet + 2 air. loops, first st. double crochet, replace with 3 chain stitches. lifting loops, finish row 2 air. loops, 1 connection column.
If you are interested in knitting, then you have probably not only been involved in making clothes, but also tried to make various interior items from threads to decorate your home.


This is very important, because charming things for the home created with your own hands have wonderful good energy and create an atmosphere of warmth and comfort. Regardless of the era or fashion, knitted pillows, where the covers are knitted by hand, are of great importance. They can have different purposes and shapes, be square and rectangular, round and oval. In addition, knitted pillowcases can be made in the original form of a cushion or pouf.
 If you have thick plush-like yarn in your arsenal of threads, you can knit an original pillow in the shape of lips.
To work, you will need three skeins of polyester yarn and number eight circular knitting needles. The size of the cover is sixty centimeters (cm) by forty, and the density of the fabric should be seven loops (P) and thirteen rows (R) in a square pattern of ten by ten cm. This original product gives the impression of a plush toy in the shape of lips in a bow, and is knitted quite easily . Both halves must be knitted exactly the same, in stocking stitch. At the same time, to achieve the desired shape of the fabric, it is necessary to periodically increase and decrease loops. The product can be an excellent gift for friends and family if you associate it with a suitable holiday, such as a birthday or New Year.
Principles and techniques of making covers

Before you start knitting, you need to measure the pillow you have chosen in order to knit the corresponding cover with knitting needles. Then, as usual, you need to knit a sample to determine the density of the fabric. In this case, knitting the sample must be done with the same knitting needles and relief that you have chosen for the main fabric. Using the same knitting needles and the same pattern, you then need to knit the cover itself. The pillowcase should have dimensions that are at least a centimeter larger than the pillow, otherwise it will shrink inside the cover and lose its shape. We start knitting with a set of P, and continue to knit the shape we need with the selected pattern. If you don't have enough yarn, knit the top half of the pillowcase, and cut the bottom half out of fabric of a suitable shade. Having finished knitting, fold both halves of the pillow face inward and sew them together, then turning them right side out. After this, you need to sew a zipper onto the open area of the cover:

If the selected relief allows, the product is knitted in one continuous strip. Having finished knitting, fold it in half, right side inward, and then sew it on the sides:

Knitting various pillow patterns
In this lesson we will look at knitting simple pillow patterns. Even an inexperienced needlewoman can easily make such knitted pillows with her own hands. If women like a modern style that implies minimalism in the home, then you will like these models. For such pillows, you can choose the most primitive reliefs and patterns and knit them with thick threads, which looks quite original. Pay attention to what stylish models are obtained with this combination:
 The blue pillow is knitted in garter stitch and decorated with large buttons. For the gray model, a woven relief was used, the diagram and description of which is here:
 The next pattern is the pine cone pattern you see on these pillows:
 The only difficulty is to arrange all the cones evenly, at the same distance from each other. The following pillows are knitted in the same way, but with different shades of yarn. Here, a triangular figure, knitted with a Pearl pattern, stands out in garter stitch. The decoration is a large bow made in garter stitch:
 Now let's move on to looking at more complex knitting patterns. Specimens for which the “Scythe” or “Arana” relief is chosen look great. In this case, you can get creative and knit braids with the simplest displaced P, or aranas, where the relief is more complex and intricate:
 A variety of braided braids look great with patterns like knit stitch, or other combinations of knit and purl stitches. The second group of models is made up exclusively of braids that are not diluted with other patterns:

Video: Cushion with a braid pattern
Openwork cushion covers
For a beautiful pillow with knitting needles with openwork, you just need to find a pattern you like, such as this one:

Often the openwork in the pillow is present only on the upper part of the cover. The bottom looks good when knitted in stockinette stitch. It’s easy to decorate this model by sewing matching beads or a thin satin ribbon to the pillowcase. The openwork relief looks very expressive if there is a pillowcase of a contrasting shade underneath. And here is a model with a heart-shaped openwork section, which is decorated with crocheted flowers and beads:
 The following pillow with an openwork pattern is intended for wedding rings:
 This wedding pillow model has an openwork knitted insert and is an important wedding accessory. For knitting you will need thin cotton yarn. The insert is knitted on thin, even needles No. 3.5. The pad is a square, the side of which is eighteen cm. The size of the openwork knitted insert is eleven by twenty-six cm. For knitting, you also need to stock up on a small pad of the same size and a light satin ribbon. The openwork insert pattern is knitted according to the pattern we give below:

Jacquard Cushion Covers
For lovers of jacquard patterns, we offer knitting pillows, decorated with colored patterns:

You just need to find a beautiful jacquard pattern and knit a pillowcase using it. Here, for example, is a very beautiful original diagram of a jacquard pattern that can be placed on a pillow:

Video: Knitted pillow with a floral pattern
A selection of patterns for knitting pillows and pillowcases


Crocheted pillows are not only attractive and individual, but also a lifesaver for already outdated and somewhat worn sofa pillows. If you are new to crochet, pillows are the best way to learn the technique. There is no need to make complex calculations here, since with a correctly selected knitting pattern there will be no problems with knitting. To show your imagination, you should present several options for pillows, each of which will appeal to both beginners and experienced knitters. The article will present in detail photos, diagrams and descriptions of several models.
We knit and care correctly
Since a crocheted pillow requires some care, the points for further use should be discussed.
- Firstly, yarn for pillows should be chosen according to the concept of their purpose. For children's options, it is better to choose cotton or special children's yarn, which often includes bamboo. For sofa cushions in the living room, it is better to take acrylic - it is easier to wash. If pillows are knitted for comfort and to warm the lower back, of course, the choice is in favor of a mixture of wool.
- Secondly, knitted pillows, due to their “naturalness,” will have to be washed more often, so it is recommended to knit products with a zipper along the seam. It turns out that for such a knitted pillow you will have to additionally sew a cover or pillowcase where the filling will be placed.
- Thirdly, crocheted sofa cushions should become a decorative element, so the color and shape are selected accordingly.
 Craftswomen prefer knitted cushion covers, which can be used to “update” previous sofa elements. This can happen when changing the interior design, when the sofa does not change to a new one, but the color already “falls out” from the overall picture. This crocheted pillowcase can be easily removed and washed when dirty. To do this, just sew a zipper along the seam. Wash the covers by hand or in the washing machine on a delicate wash program. Dry by spreading on a towel.
Napkin pillows
 If you have round-shaped sofa cushions, you can use the patterns of standard round-shaped napkins. Here, two napkins are also knitted, and when sewing, an additional zipper is used. You can resort to a complete transformation and additionally sew a “lining” onto the pillow, which will be in a contrasting color, which will give the product individuality, because the openwork will stand out against a plain background.
Some particularly enterprising craftswomen completely replace outdated products with new ones. They simply rip out old sofa cushions and use the filling further. They also knit pillows in the form of a napkin, combine them with a plain background and shape them using the same filler.
Below is a selection of such products with detailed patterns for knitting yourself. 


Curvy pillows


 When standard shapes get boring, it is recommended to knit curvy analogues. In order not to waste a lot of time on complex variations, it is enough to simply resort to simple geometric shapes. For example, you can knit a star or a hexagon. If you want and need to knit the cover along the seams, it is better to make fasteners with buttons - this will greatly simplify the process of sewing a zipper into the figured edge.
Next, we also offer a selection of figured pillows with knitting patterns. Some of them will allow you to knit a denser fabric, through which the background lining will not be visible. Others, on the contrary, offer an openwork figure, which is advantageous and softly suitable for a certain interior.
Motif pillows
Pillows made from motifs and the use of different colors are attractive and very interesting. They reflect the brightness of the character of the owners of the house, as well as their positive attitude. This combination can be used for knitting children's items. Pillows made from motifs in the same range or color look no less attractive - they will complement the existing interior style.
Granny square in pillows
 Crocheted pillows from “Grandma’s Square” are an excellent alternative to the famous blankets or carpets. There is nothing complicated about knitting here, and the advantage is the ability to get rid of numerous remnants of yarn. To knit a square, a standard pattern is used, and colors can be combined as desired. The following is a selection of similar pillows, based on which you can come up with your own option, taking into account the existing interior.


African flowers in pillows
 Similar to the granny square, there is an interesting African flower pattern. This motif also allows you to quickly get rid of leftover yarn and knit a colorful cover for an existing outdated pillow. Below is a selection of crocheted items, as well as a diagram for making your own masterpiece of motifs.
If you do not want to crochet colorful pillows with all the leftover yarn, you can use models where the products are crocheted using only certain colors that match the existing interior design in the room. Often these are sofa cushions in minimalist or high-tech styles, where only a contrasting combination of several colors is used, but comfort is created by adding textiles to the interior.


Lovers pillows
Craftswomen who love to crochet love to present their loved ones with interesting souvenirs for anniversaries and just a Valentine's Day. A useful gift is a pillow that is not only beautiful and soft, but also themed. There are two options here - a heart and the sensational female breast.
Pillows for the sofa in the shape of hearts

Sofa pillows in the shape of hearts are a simple, but very warm and important gift for your beloved. Hearts can also be different - in this case you will show that you put all the love and warmth from your heart into knitting a gift. In addition, knitted hearts are perfect for the interior of a children's room for girls. You can add various ribbons, rhinestones, beads and other girly charms to your work.


Crochet chest


As a gift for a man or best friend, you can crochet a chest, for which a detailed master class is offered.
- To begin, knit two pieces of light yarn in single crochets - this is the base of the pillow. The breasts will be knitted with the same yarn. Having knitted a base of a suitable size, sew it on three sides from the wrong side - you can use a needle or hook.


- Start knitting the chest. To begin, use a pink thread to pick up 3 air loops and close them into a ring.

- Knit the first row - knit 10 single crochets. Knit 2 more rows without increasing.
- Next, knit 3 more rows with single crochets, making increases in each previous stitch. Switch to a light thread.

- Using a light thread, continue knitting without increasing for the next 2 rows. Next, knit 5 rows, making increases in them through each single crochet.

- Knit another 7 rows without any additions. Cut the thread so that it is long enough to sew the chest to the base. Tie the other breast in the same way.

Sew the breasts to the base, having previously filled them with cotton wool or padding polyester. For originality, you can knit a bra - this way the pillow looks less provocative, but at the same time very cute.


 It sounds surprising, but such pillows are in demand not only because of their originality. The pillows are comfortable - your head fits neatly and firmly between your breasts. And what? – Not a bad alternative for men!
Pillow toys 
From crocheted chest pillows you can smoothly move on to toy shapes. Crochet toy pillows attract children and adults like them because of their convenience - they are both a comfortable thing on which you can simply relax, and at the same time an interesting toy. The choice of knitting of a certain shape should be based on the age and preferences of the child. If you want to knit a pillow for the interior, be guided by the general design concept and color inclusions.
Simple toys


 If you look at crocheted toys, you will find a very interesting detail - most of them are presented in the form of simple circles and oblong legs, the combination of which gives the finished result a toy embodiment. The following is a similar selection, based on which you can use simple knitting patterns and please your child with a new “acquisition”.
Turtle toy

Since crocheted toys are popular, we should present the simplest version of knitting, which is offered with a description and patterns - this is turtle knitting. Knitting a turtle yourself is carried out in the following sequence:

The following is a selection of crocheted turtles. Such products are convenient for further use for their intended purpose, so they are suitable for both children's rooms and sofa additions. 


snake pillow 
There is nothing better for children than a 2-in-1 product - both a toy and a pillow. One such innovative idea is a crocheted snake pillow - it is easy to knit from leftover yarn. Also, a snake toy is suitable for expressing your own imagination, because the use of shades of threads or patterns allows you to complement the children's room favorably. Knitting such a pillow occurs in the following sequence:
- Close the ring with 5 air loops.
- Knit the first row with single crochets in the amount of 10 pieces.
- Then, in the next 10-20 rows, make equal additions of columns - this depends on the size of the future snake, so adjust the work yourself. The additions are made evenly - in each row you should add from 7 to 13 columns.
- Having reached the desired head size, knit from 2 to 5 rows without increments.
- Next, make decreases, similar to the additions made earlier. Subtract only half of the added loops.
- Continue knitting to the required length of the snake without a tail.
- Having reached the desired length of the snake without a tail, start decreasing - in each row, decrease 3-6 loops.
- Having knitted up to 4-5 single crochets, finish knitting.
Thus, you have a complete selection of knitted pillows with patterns and descriptions. Now you can choose a more interesting option for yourself, as well as come up with something original of your own. Don’t be shy to show your imagination, because knitting is the best way to express your “I”.
Dimensions
Each case – 30 x 30 cmYou will need
For each cover, melange yarn (45% silk, 45% mohair, 10% wool; 100 m/50 g) - 50 g each in pastel colors (= color A), green-red (color B) and blue-turquoise (= color C); hook No. 4; for each case 2 buttons with a diameter of 28 mm.Patterns and schemes
Square
Start with a thread ring and knit according to. diagram 1-4th circular rows, with each circular row starting with the number of ch indicated on the diagram. and finish the connection. Art. or Art. s/n.If necessary, pass through the connection. Art. to the beginning of the next circular row.

Basic pattern
Knit st. s/n in circular rows, with each circular row starting with 3 vp. instead of 1st tbsp. s/n and finish 1 connection. Art. in the 3rd ch. rise.Knitting density
15th century s/n x 8 rub. = 10 x 10 cm, knitted with the main pattern;1 crocheted square = 10 x 10 cm.
Completing of the work
Two covers in patchwork style
For each cover, knit 6 squares from each thread of three colors, while performing only the 1st–4th circular rows.Sew the squares in any order into a rectangle of 6 rows of 3 squares, while constantly capturing only the back wall of the loop.
Now fold the first and last rows so that there are 3 x 3 squares on the front and back sides.
Sew the side seams and sew 6 cm on both sides at the cut.
For fasteners, make 2 chains of ch. 40 cm long. Pull these chains along the open edges through the corners of the squares and tie them with a bow.
Case with round motif
For the front side, start with a square of color A. To do this, knit the 1st–5th circular rows.Then knit with the main pattern as follows:
6th and 7th circular rows, thread color C: knit 1 tbsp in the corners. s/n, 3 v.p. and 1 tbsp. s/n = 8 additions in each circular row;
8-12th circular rows, thread color B: knit 2 tbsp in the corners. s/n, 3 v.p. and 2 tbsp. s/n = 16 additions in each circular row.
After 12 rounds there will be 45 stitches on each side. s/n.
Knit the back side in the same way, only up to the 6th circular row with thread of color A, then 7–11th circular rows with thread of color C and the last circular row with thread of color B.
At the same time, skip the middle 25 stitches for the cut in the 8th circular row on one side between the corners. s/n, tying 25 vp. In the next circular row v.p. tie st. again s/n.
Tie the upper edge of the cut (initial row of vp) with st. b/n, then tie the entire cut around the connection. st., while making 2 buttonholes evenly along the top edge.
To do this, skip, respectively, 4 p. and perform 8 v.p.
Connect the front and back sides, inserting the hook only into the back wall of the loop.
Sew buttons.
Photo: Diana Creative magazine No. 9/2015
New articles
- Openwork pillows made of square motifs
- Happy birthday to mom and daughter Happy birthday to you and your daughter
- What should a child be able to do at three months?
- Wristwatches Applicable types of power sources
- Wall newspaper for Victory Day
- High ponytail: how to make it beautiful for yourself
- How to be the perfect girl How to be better than other girls
- Isothread for beginners schemes with numbers flowers step by step
- Development of tactile perception in preschool children with mental retardation. Emotional consequences of reduced sensory sensitivity.
- Here is the order of work
Popular articles
- Crochet Easter chickens
- How to carefully wash thick or light curtains in a washing machine
- What to give a summer resident: practical and functional gifts for gardeners A gift for a gardener for the New Year
- What do kisses mean in different places, parts of the body: psychology and the meaning of a man’s kiss
- How to remove bangs beautifully: look at photos and choose options
- Women's long gloves - what are they called, how to choose and what to wear with them?
- Crafts for the garden: wonderful Ant
- A guy ruins his friend's tricks and it looks better than the tricks themselves
- Princess sparkle man
- What does the proverb “If you love to ride, love to carry a sled” mean?