Pillow "Rose" from Oksana Abramova from the Country of Masters. MK
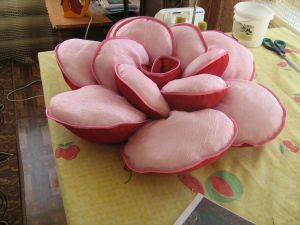
Nowadays, many people would like to have a wonderful rose-shaped pillow in their household. It’s not that difficult to do. The main thing is to have the appropriate motivation. Just look at the photo below. You'll probably want to get to work right away.


What do you need for work?
First of all, you will need a template for the pattern. Its standard size is 56 cm. You also need satin crepe (2 parts of different colors). Requires padding polyester and braid. Take a thick thread and a sewing needle. That's all, such a small kit will be quite enough.

Lay out the fabric in a couple of layers at once, with the front sides facing up (each with the wrong sides). Transfer the pattern of the petals (it is best to lay them out as shown in the photo, strictly along the width of the fabric).

Now cut out the petals. In your case you should get 5 small ones and 6 large ones. Look at the photo below.


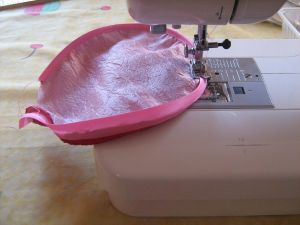
Start sewing the braid in this order: divide the braid in half at a glance, and also sew it with a simple stitch to the side that will later become the bottom part. Try not to stretch the braid, as it will give a visually wavy edge.


Turn the petal over and sew the braid using the so-called “zigzag”. The suture is placed and sewn slowly.
Now all the blanks for the bud are ready.

Stuff everything with padding polyester. Just tear it off in small pieces and put it into the workpiece. Finally, sew up the edge using a regular winding stitch.

Now you can start assembling. Small petals should be with small ones, and large ones with large ones. The end of the latter must connect to the first. The screeding of the circles should be uniform.

At the next stage, cut out the leaves (the fabric is folded as usual, with the front side inward, since they will need to be turned inside out). The shape turns out to be different, although the height is no less than 30 cm, the width should be around 16-18 cm. Place them on padding polyester, cut them out, and also stitch them directly with padding polyester. Turn it inside out. It is better to choose leaves of different colors. They just need to be combined. And the rest depends only on your imagination. .

From the edge of the leaves it is best to sew a zigzag seam with the largest step. In addition, the veins inside the leaf are sewn with an average step. Sew everything to the circle (as in the photo). Each piece must be assembled by hand, use strong thread, basting stitches, and work only in large steps.

At the final stage, the two parts are connected. A small circle with a large one. That's all, now this decorative pillow is ready. See what the product looks like.


A pillow in the shape of a delicate rose, which we will make with our own hands in a step-by-step selection with patterns and informative photos, at first glance may seem quite difficult. However, detailed videos will help you better navigate the sewing process, and the master class will completely dispel any uncertainty! Get to work!
How to sew a rose pillow with your own hands with patterns and photos: rose garden
There are several dozen, if not hundreds of species of roses in nature. Of course, a pillow in the shape of a rose cannot be classified as a type of vegetation, but even here the commendable variety pleases the eye.
In addition to being quite beautiful, such a pillow is also practical - after all, you will need old T-shirts to make it. They are cut into strips, which are then twisted into roses, each of which is then fixed and sewn to the base. In addition to T-shirts, old bed linen can be a suitable material - it is both soft and colorful. Quite painstaking work, but the result looks tempting.

The second version of the rose pillow is using an existing pillowcase and felt. The felt is cut into circles, each of which is then cut into a spiral, and twisted clockwise from the tip to the middle into a rose. Then the flowers are also sewn onto the pillowcase. Of course, this is not the fastest sewing option, but such a pillow looks quite elegant, and again, leftovers and multi-colored pieces of felt can be used.
For such a pillow you will also need a base and felt, as well as petal templates. Having cut out all the details, they are sewn onto the base, giving the product volume. It is convenient to work with felt - it is easy to cut, pierce with a needle, and its edges do not require additional processing, since they do not crumble.

Another option is perhaps the simplest to implement - it will require fabric 2-3 meters long and one and a half meters wide. Thin padding polyester is suitable as a filler. It needs to be placed between layers of fabric folded in half, and all three layers should be stitched together. Then twist this strip in a spiral from the tip to the middle and secure it.
Materials.The fabric you will use directly depends on the “type” of rose that you like. By and large, there are no restrictions, there are recommendations. If you are going to make a rose, each petal of which is itself a small pillow, you should not take a transparent fabric like chiffon, since the rose petals will contain filler - holofiber or padding polyester. The second piece of advice is that if you are not a very experienced seamstress, then it is better not to use difficult-to-process materials like satin, organza and silk. Despite the fact that they are very beautiful, working with them is not as easy as we would like. Mixed fabrics, crepe-satin, denim are the most optimal fabrics for such a product. Old cotton T-shirts can serve as training material if your sewing skills are limited or you are afraid of ruining good material.
To work you will need:
- Fabric in two colors per meter
- Filling – holofiber or padding polyester
- Finishing braid (braid or bias tape)
- Scissors, chalk, pins
- Petal patterns
- Sewing machine
You don’t need any patterns for sewing such a pillow, but a template for the petals and details will certainly come in handy.

Work process. First stage. Each petal is cut out in duplicate from different fabrics. Place the fabrics with right sides facing each other and trace according to the template. For a rose pillow you need 8 upper petals and 8 lower ones, 4 from each fabric. You will also need two strips of fabric 7 cm wide and 1 m long for the core.
Second phase. Fold each petal blank from layers of fabric. A braid is attached along the edge of the front side of the upper and lower petals of a smaller size.

After this, the petals with edging are carefully adjusted to their second halves. Turn the petals inside out, align and cut off excess threads. Bend each petal twice in height, and mark the middle - with a pencil or by making a cut.
Third stage. Stuff the finished parts with holofiber, the edge is sewn together with a simple stitch on a machine. Cut out a strip 7 cm wide per meter, stitch with piping, fill with holofiber and stitch. Don’t stuff the filler too tightly, it’s better to be looser, otherwise you won’t be able to roll the strip into a beautiful rosette. Roll this strip into a roll and secure with a hand stitch.
Fourth stage. Base. Cut out two circles, about 30 cm in diameter. Connect them with right sides facing each other, place them on padding polyester, and sew without closing the seam. Turn it right side out through the remaining hole and sew it up.
Mark the center on this circle, and secure the two lower petals at an equal distance from each other. Gather them into neat folds, secure with safety pins or stitches and sew on a machine.

Also attach two more petals and stitch. The upper petals are sewn in the same way, but in a checkerboard pattern relative to the bottom row. A rolled strip is sewn into the center. The pillow is ready.
Video materials for clarity
Today there are a huge number of varieties. Whatever craftswomen can do with their golden hands! And in this article we will look at the pattern of the “rose” pillow.
With your own hands, using our master class, you can create a very cute and stylish accessory to decorate your interior.
Which fabric to choose
The “rose” pillow, the master class of which will be discussed, requires a certain type and quality of fabric. It is better to choose a denser material. The so-called heavy fabric. If you use a light and thin canvas, it will be difficult to work, and you won’t get the desired effect. Since the flower itself is quite beautiful and interesting, it is better to choose a plain material so that attention is not distracted by the variegated fabric. Each flower piece has a back and a front, which can be made from different materials. Of course, for the front part you need to use a more beautiful and expensive material, and for the back part you can use a worse fabric.
What else will you need for work?
In addition to fabric, you will also need padding material. For example, batting or synthetic fluff. You will also need a sewing machine, iron and scissors. In some places you may need to do this, so make sure you have a needle and thread to match the color of the material. You will also need a plastic base for the center of the flower. For this purpose, you can easily use a coffee lid or cut a circle of the required diameter from a file folder. You will also need patterns. You can easily make a pattern for a “rose” pillow with your own hands. It's best if you use freezer paper. But if there is no such thing, then a regular one will do just fine.
DIY rose pillow. Patterns step by step
The flower requires only four different patterns. Two petal sizes and two leaf sizes.

Now let's talk about how to make a rose pillow with your own hands. The patterns, photos of which are presented in this article, must correspond proportionally to each other. It is very convenient to use freezer paper for them. Each pattern requires ten copies. What is good about freezer paper in this case? Well, first of all, you don't have to circle the same thing ten times. The hand-drawn pattern of the “rose” pillow is reproduced in the required quantity on paper and cut out. You simply lay out the parts with the waxed side facing the material and iron them. And then you cut around the workpiece, retreating to allowances. And secondly, the use of such patterns allows you to most accurately lay them out on the material and thereby use the fabric economically.
Cutting fabric
Before cutting out all the parts and attaching them, the canvas needs to be ironed and folded in half or two parts together face to face. To prevent the fabric from moving during the process and you end up with a cutting error, pin the material along the edge with pins.

In order to get a decorative “rose” pillow without errors or distortions, the pattern must be laid evenly and cut out accurately. If you use some old clothes for sewing, then you need to cut them open, remove all the threads, wash them and iron them well. And only then lay out the pattern pieces on the fabric.
Sew leaves
Before us is a completely cut decorative “rose” pillow. We don't need the pattern yet. And we begin sewing leaves. We should have five large leaves and five small ones. The parts need to be folded face to face and stitched. After this, you should trim off the excess allowance, cut off a corner and make notches in convex and curved places. We do not stuff leaves. Cutting the corner from the wrong side is done so that on the front side the corner has a neat, clear shape. When turning out the leaves, help yourself with a wooden stick. Just be careful not to damage the fabric or seams. After all the leaves are turned out, they must be ironed well. To give them a more interesting look, sew a stitch, departing from the edge about 0.5 cm. If your sewing machine allows it, then select a decorative stitch for this purpose.
Creating petals
How then do you make the “rose” pillow with your own hands, the patterns of which were discussed above? She can't do without petals. In our version there are only ten of them. Five big ones and five small ones. Each petal consists of three identical parts: the upper and lower parts are made of fabric, and the middle one, which is located between them, is made of batting. Although the petals, of course, can be sewn from two parts and filled with filler. In the latter case, each petal will be voluminous in itself, like a pillow.

Thinner petals, like leaves, are stitched along the edge to give a voluminous effect. Now you need to assemble two rings from the petals. One is made of large petals and the other is made of smaller petals. To do this, place two identical petals next to each other and pin them together with pins. If you are satisfied with their appearance, then set the machine to the longest “zigzag” and stitch in the place where they are most in contact with each other. Perform these actions until all five petals close into one circle.

Then do the same with the other five petals. If your petals are not flat, but voluminous, then they should be collected in a slightly different way. First, a base is created from two circles of matter with padding polyester or batting located between them. And then larger petals are pinned onto this circle and attached using a machine. After that, smaller petals are placed in the second tier, and the same is done with them. And in the original version, leaves are attached to the bottom of the large flower and between the petal rings. And now you need to give your hand-sewn rose pillow its finished look. The patterns that we learned to make in this article, we just need to add one more and make the middle of the flower.
Flower center
You probably noticed that the “rose” pillow pattern we made does not have a piece for the center of the flower. Now we will look at how to complete this middle in two ways. For flat and voluminous flowers. So, for a flat flower, it is proposed to make a wicker center. To do this, take a square-shaped piece of fabric and, on the reverse side, draw a network with small square cells on it. Now draw diagonals in the cells in a checkerboard pattern. In different rows, draw diagonals in different directions. Now all that remains is to connect the edges of each diagonal using a needle and thread.

On the front side the fabric will have the appearance of a basket weave. Now stretch it all onto a plastic piece and sew it in or just glue it into the middle of the flower. There is another option for the middle part. This piece is a long but narrow rectangle. You could even say - a streak. Two such strips of fabric should be cut. We stitch them together, turn them inside out and lightly fill them with padding. We need to stuff it so that this stuffing does not interfere with our folding of this strip.

Once the piece is completed, it needs to be rolled into a rose shape and secured by hand using a needle and thread. Now this center should be placed in the center of our pillow and sewn by hand.
OK it's all over Now. The wonderful “rose” pillow, the master class of which we reviewed, is ready to sit on your sofa and delight not only you, but also your guests with its appearance. It will be quite an attractive part of the interior. It's all because of the unusual pillow pattern. Creating a rose from fabric with your own hands is not very difficult. Experiment with color and shape, and then your pillow will fit perfectly into absolutely any
Decorative pillows play a significant role in interior design. The range of pillows is so wide that everyone will find their own type that will appeal to them. In this article we will talk about a rose-shaped pillow that you can make with your own hands. Such a pillow will not only add zest to your bedroom or living room, but will also speak about your gentle and romantic character. Such a pillow can be made from almost any material: from delicate expensive silk, transparent organs, warm felt, soft fleece and others. In this article you will learn how to make a “Rose” pillow with your own hands with patterns and photos of products.
Floral product
To conduct a master class, we will need:
- the material is of two varieties: light and thinner for the top layer, dark and dense for the bottom. You can use cotton or linen fabric. A product made from these fabrics will definitely not cause allergies, will retain its color for a long time and will not fade;
- padding polyester for filling;
- pink bias tape;
- sewing tools: sewing machine, pins, needle, thread, scissors;
- compass and cardboard for patterns.
Let's start work. We draw the necessary diagrams on cardboard: circles of different diameters - 35 cm, 25 cm and 19 cm.
Using these templates, we cut out elements from the material: with a diameter of 35 cm - 2 pieces from dark fabric, with a diameter of 25 cm and 19 cm - 6 pieces. from light and 6 pcs. made of dark fabric.

For the center of the flower, we cut out 2 rectangles from dark fabric, the length of which is 50 cm and the width of 10 cm, and on one side we make a semicircle along the entire length.
To make a petal, we need two elements of the same diameter, but different in color, fold them inside out to each other and sew bias tape to the edges using a machine, leaving 5-7 cm so that you can insert the padding polyester. We carry out such actions with all elements of the same parameters and a strip for the middle.
We fill it with padding polyester through the gap left and sew it up.
Pin all the petals to one side to give them shape.

We collect the flower itself. We sew a petal with a large diameter to the base (a circle with a diameter of 35 cm), while retreating 3-5 cm from the edge. We sew another petal, slightly overlapping the first, and so on for all six petals.

Using the same principle, we sew on smaller petals, placing them between two larger ones. We twist the strip that we prepared into a bud shape and sew it into the middle of the rose. Our beautiful flower is ready!
There is another pattern for a rose pillow. Let's see what kind of pillow it makes
We will need:
- pink and beige satin fabric;
- edging;
- padding polyester for filling;
- sewing supplies;
- templates

We cut out four elements of each template from the materials: beige - small in size, pink - larger in size, making the fold length of the upper petal approximately 19 cm, and the lower petal - 24 cm. We will also need to cut out two strips of different colors with a length of 1 m and a width of 7 cm. We attach an edging to the front side of the petals of smaller dimensions made of beige fabric along the entire perimeter. The cuts need to be combined.
Place a suitable element of pink material on top and stitch along the edge, aligning the cuts along the circumference. Turn it onto the face and correct any unevenness with scissors.

We combine the seams, find the centers of the elements and make notches on them. We fill the petals with padding polyester. We sew up the bottom of the elements, while making a counter fold on the top.
We sew together 2 rectangular parts together with the edging, turn them inside out, fill them with padding polyester and stitch them where the second cut is. Then we twist this blank into a bud and fasten it at the bottom with hand sewing.

We cut out two circles with a diameter of 32 cm and different materials. We fold them face to face and sew them to the padding polyester, leaving a gap to turn inside out, after which we stitch it.

To the base that we have obtained, stepping back a little from the center, we sew large petals, stepping back a little from the middle. This should result in uniform folds.

We attach the next two petals in the same way. On top of them we place four smaller petals and, not forgetting to make folds, sew them to the base.
Before the holidays, the torment begins with choosing gifts. And I really want to surprise and amaze! What to do? I present to you a very easy way to surprise, delight and bring a good mood! Sew a rose pillow like this and delight is guaranteed!


How to sew a "Rose" pillow
Make a pattern template (photo with dimensions for a 56 cm pillow). 
For one pillow you will need:
Satin crepe (2 different colors, 90 cm each).
Sintepon 3-3.5 m (I like “Alaska” better).
The braid is at least 2-2.5 cm wide, 15 meters (I use galloon).
Thick nylon threads and regular threads in the color of the fabric.
A needle for stitching, it is better to take a strong one with a large eye. 

Lay out the fabric in two layers at once, right sides up (both wrong sides facing inward). We transfer the pattern of the petals. We need to translate 6 large petals and 5 small ones. Cut it out. 
This is what we get. 

We begin to sew the braid in the following order: visually divide the braid in half and sew it with a regular stitch to the side of the fabric, which will then be the lower part of the petal. Try not to stretch the braid, as it will give the effect of a wavy edge. 

We turn the petal over and sew the braid using a zigzag stitch, carefully overlapping and covering the seam. 11 petal blanks for the bud are ready. 

We start stuffing with padding polyester. We finely tear the synthetic polyester and put it into the blanks.
We sew the edge with a regular basting stitch. 

We begin assembling circles (small petals with small ones, large ones with large ones). We apply the second petal to the middle of the first and stitch it with strong nylon threads with a basting stitch, so that later it can be easily pulled together, then the third to the middle of the second, and so on. We connect the end of the last petal with the beginning of the first. We tighten it so that the screed of the circles is uniform for both the large and small circles. 

This way. The next step is to cut out the leaves (this time we fold the fabric as usual, with the right side inward, because then we will turn them inside out). The shape can be different, but the height is at least 30 cm, and the width is at least 16-17 cm. We put them on the padding polyester, cut them out and stitch them together with the padding polyester. Turn it inside out. Your leaves can be of different colors (both the color of the lower fabric, and green and gold, it all depends on your imagination). 

Along the edges of the leaves we sew a zigzag stitch with the largest step, and with a medium step sew the veins inside the leaf. Sew to a large circle. We assemble all the parts manually using strong nylon thread using a basting stitch in not very large steps.
The most interesting moment of connecting the two circles has arrived. We sew with double nylon thread using a basting stitch, slightly higher (about 2-3 mm) than the gathering thread. Make sure that there is no visible connecting seam between the petals of the upper and lower circle. It is very important! The thread must be pulled very tightly! 

We cut out a strip (the middle of the rose) together with padding polyester, but here we will have padding polyester inside two layers of fabric, because we will sheathe it in the same way as the petals. This is what the finished middle of the rose looks like. 

We collect our workpiece into a so-called bundle. And we sew it with a basting stitch to the upper parts of the petals of the small circle (grabbing 1-1.5 cm above the assembly points). 

We cut out a circle in order to cover the back part along with the padding polyester, and tighten it a little in a circle. We stuff it with padding polyester. We sew with a basting stitch to the petals of the large circle just above the place of the tie by about 2 cm. This way we achieve the strength of attaching the petals to each other. 
Well, our beauty is ready! Well, isn't it beauty?
New articles
- Hanson Robotics humanoid robot reacts to human facial expressions Hanson robotics company
- Original, beautiful and funny congratulations to a woman on her anniversary
- Why do older people need communication?
- Pillow "Rose" from Oksana Abramova from the Country of Masters
- Master class "Toy made of felt "Fox"" Sew a fox from
- Tie: a stylish accessory or a symbol of slavery?
- Cosmic Reveal: Earth's Ascension Earth Guardian - Snake
- Congratulations on February 23 to dad in your own words
- Development of thinking in four- to five-year-old children
- Motivational guide "success calendar" children's week" Video: encouragement as a method of raising children
Popular articles
- Cool congratulations on your silver wedding
- Demonstration material in mathematics Visual material for preschoolers
- Pneumonia during and after stroke: causes, consequences, prevention
- Research project "how to measure your height" How to measure your height
- Will there be a second date?
- Oriental tattoo sketches Features of the execution technique
- Actual marital relations - law and concepts
- Chief Accountant Day (GlavAccountant Day) in Russia
- Faberge eggs: a gift and a work of art
- Soviet riddles for children: examples