A beautiful simple braid for long hair. The best braided hairstyles for long hair with step-by-step photos
Braids were an ancient way of styling hair, and to this day they have not lost their popularity. With the help of braids you can create a stylish look and add some zest to it. Weaving hairstyles for long hair can be done in various ways, with which you can style your hair effectively and fashionably. Let's take a look at what styling can be done with weaving elements.
Spikelet for long hair
Braiding done on long hair looks very beautiful. In addition, it can become both an everyday and festive styling option. It's easiest to make a simple three-strand braid, but the spikelet looks more interesting.
First you need to part your hair and divide it into three parts. Start braiding a classic braid from the top of your head. From one edge of the head, grab an additional strand and pull it to the nearest one. From the left side - to the left, and from the right - to the right. On the other hand, you also need to attract an additional strand. Weave similarly to the end of the head. Then you can leave the ponytail or continue making a simple three-strand braid.
The hair hardly comes out of the spikelet and looks neat and luxurious. It can be done from both sides, combining with ponytails. For a festive option, you can decorate your hairstyle with beautiful hairpins.
Crown around the head
A crown is an ideal styling option in the summer, thanks to which you can remove long curls from the neck area. Good for everyday wear or romantic dates. You can decorate your evening hairstyle with hairpins with artificial flowers.
Progress:

This hairstyle looks as if a braid is braided on the head, having neither beginning nor end.
Volume braids
A voluminous braid is a complex hairstyle option consisting of several small braids intertwined in an interesting way.
You can do it this way:

Braided bun
A bun on long hair is easily done with classic weaving. Its feature is throwing braids over the head and creating an original braided styling:
- Tie your hair into a high ponytail and divide it into two sections for two braids.
- Braid two braids starting from the ear.
- Then throw the braid over your head and secure it.
Do the same with the second braid.
This hairstyle is good for girls who cut their bangs. And if the strands from the braids are slightly disheveled and decorated with hairpins, you will get an evening styling option.
You can also make a bun from a braid:

Two tourniquets on the sides of the head look good. They can be slightly fluffed up and given an openwork volume, making the image unobtrusive and romantic.
Spit in the form of a waterfall
This hairstyle looks especially beautiful on wavy or slightly curled long hair. You can do it this way:
- Take some hair near your forehead and divide it into three strands.
- Make one twist, starting to braid a classic braid.
- Add an additional piece of hair to one of the strands or replace it, carefully releasing it with the first “wave”.
- Continue weaving throughout the entire volume of the head.
 Or you can stop in the center of the head and repeat the weaving on the other side. Or stop near the ear and mostly leave the long hair hanging freely at the back. If desired, the waterfall can be combined with other types of braids.
The difference between this weave and the French one is that an additional strand is attached to one of the parts or replaces it, allowing the second to freely descend to the shoulders.
There is a pattern for weaving an openwork braid in the “waterfall” style. To do this, you just need to add another row of the waterfall, but a little lower. The curls that became the original waves are taken as the strands to be picked up.
If you plan to experiment with braid options, it is advisable to buy a set of thin, invisible elastic bands. When dividing long hair into equal parts, use a comb with a sharp tip.
Different types of braids look impressive when combined into one hairstyle. To do this, you need to braid the strands on the sides in one way, and when you reach the crown, connect them and continue weaving in a completely different way. You can weave colored ribbons into your braids or add wire to give your hair an original shape.
Thus, on long hair you can make all sorts of braided hairstyles, and by decorating them with decorative elements, you can create a ceremonial styling option. So don’t be afraid to experiment and delight yourself and those around you with your own versions of original styling.
Various weaves are a sign of good taste and allow you to give long strands a neat and well-groomed look. This is why DIY braids for long hair are a huge success not only among young teenagers, but also among young women. Do you want to learn how to braid beautiful braids? Read our master class carefully and perform weaving for all occasions!
Classic fishtail
To create this hairstyle, you will need a massage brush with natural bristles, a hair clip or elastic band, and water or a hair smoother.
- Comb your hair and lightly moisten it with water or a special product.
- Divide the hair into two equal parts.
- Separate a thin strand of hair from the right side and throw it to the left.
- On the left side we take a strand of the same thickness and throw it to the right.
- We continue weaving to the edge of the braid.
- Secure the tip of the tail with an elastic band or a hairpin.

A fishtail can be neat and sleek or tousled and loose. If you wish, you can decorate it with flowers, ribbons or beautiful hairpins.
Snake all over my head
This long braid is a stylish combination of thin braids and a loose bun.
1. Divide the hair near the face into a clear side parting.

2. Make another parting from one ear to the other.
3. We collect the back of the head into a tight ponytail.

4. We divide the strands to the right of the parting into three identical parts and weave them into a regular three-row braid.
5. After a couple of centimeters, we begin to add thin strands to the braid. You only need to take them from the left. The weaving should be quite tight and dense.


7. We continue weaving, periodically adding strands to the left. We reach the end of the parting.

8. We make a loop again and return to the face.

9. You need to create three twists - you will get a retro style hairstyle.

10. Fix the tip of the braid with an elastic band and connect it to the tail.
11. On the left side of the parting, we separate three equal strands and weave according to the same pattern. We also fix the tip with an elastic band and connect it to the tail.

12. We divide the tail itself into two parts and twist each of them into a fluffy rope.

13. We lay out the finished strands in a circle around the base of the tail and secure it with bobby pins or hairpins.

Crown braid for long strands
Do you want to feel like a real queen? A crown made from your own strands will help you with this, as well as the following set of tools:
- Comb;
- Clip, hairpin or bobby pin;
- Rubber;
- Hairpins.
1. Comb your hair, separate a part from the temple to the ear and pin it with a clip.

2. Immediately behind the ear, separate three thin strands and begin to weave them into a French braid in reverse, but add only the top strands.

3. We move to the back of the head and carefully ensure that the braid goes straight and does not creep down or up. We weave our crown to the place indicated by the hairpin, and continue weaving above the forehead.

4. Having reached the place indicated by the invisible thread, we continue the usual weaving of three strands.

5. Tie the end of the braid with an elastic band and connect it to its base.
6. For reliability, we fix the crown with hairpins. And we decorate the junction with a flower.

Feminine braids for long hair
Airy, feminine braids look best on long hair. If you have the desire and time, try this option for yourself.
Step 1. Comb your hair with a straight or slightly angled parting.
Step 2. Separate three not very thick strands near the face (on the right side).

3. We begin to weave a classic three-row braid from them, adding thin curls at the top and at the bottom. The weaving should not be tight. Make it airy and light. Only in this case the hairstyle will turn out with a bang.

4. We do the same on the left side. You will end up with two soft braids.

5. Carefully add even more volume to the braiding - we separate both braids with our fingers along their entire length and pull out individual curls.

6. Cross the braids over each other and secure them with hairpins. We hide the ends inside and also secure them with a hairpin.

Pigtail around the edge of long hair
With this simple but original hairstyle, you can quickly tidy up even very long strands.

- Separate a strand at the back of the head and divide it into three equal sections.
- We intertwine the strands with each other as for a regular three-row braid.
- Now we begin to add individual curls on the right. The hair on the left should not get caught in the braid.
- We reach the end of the braid and tie the end with an elastic band.
- To give the braid some airiness, gently stretch it with your hands.
Greek braid hairstyle
This romantic and very beautiful braid for long hair will take literally minutes, but the result will exceed all your expectations.
1. Gather your hair into a ponytail (tight), leaving only a few thin curls near your face.

2. The tail itself must be divided into four equal sections.

3. Take the first one and divide it in half. We braid a fishtail braid.

4. We do the same with the three remaining sections.

5. We separate each braid with our fingers - this will make it lacy and free.

6. Place the first braid from left to right around the head. You will get a headband of hair. We fix it with invisible ones.

7. Place the second braid under the first from right to left and also secure it with hairpins or bobby pins.

8. Now we take on the third braid. We lay it in a circle from left to right.

9. Place the fourth braid in the central part of the head in the shape of a flower. We fix everything with pins and bobby pins.

Four-row braid in folk style
Do-it-yourself braids for long hair cannot do without an original four-strand braid. This styling will make even very thin and sparse strands look voluminous.
Step 1. Gather your hair into a ponytail (tight). Its location is at your discretion.

Step 2. Divide the tail into 4 sections.

Step 3. Place 1 section over 2 and pass under 3.

 Step 4. Overlay 1 section onto 4.

Step 5. Place 4 under 1 (it should be in the center).
Step 7. Throw 2 on top of 3.
Step 8. Skip 4 over 2.

Step 9. Braid the braid to the end. Secure the tip with an elastic band. To make the styling beautiful, do not make it very tight.

Wide braid for long hair
Unusual weaving in folk style that will decorate any appearance.
1. Gather all the hair into a ponytail (tight).

2. Divide it into three sections.

3. We begin to weave a three-row braid, leaving thin strands on the sides.

4. We take apart the braid with our fingers, giving it more volume.

5. Weave an outer braid from the remaining strands and also stretch it with our fingers.

Volume braid for long hair
- First, comb the strands with a comb and divide them into three equal parts.
- We make an inverted French braid - we pass the left strand under the middle one.
- We do the same with the right strand.
- We separate a thin curl from the general part of the hair on the left, attach it to the left strand and place it under the middle strand.
- We do the same on the right side of the weave.
- We continue the braid to the end.

Step 7. Gently stretch the loops with your fingers, this will add volume to the braid.
Step 8. Curl the hair at the back of the head in the shape of a snail. We fix the bun with hairpins.

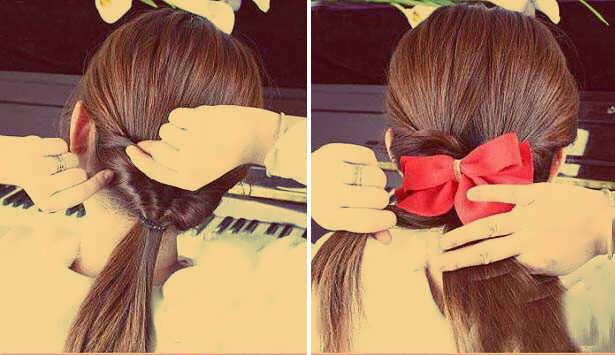
Romantic braiding for long-haired ladies
This styling is based on the same spikelet, but the side braid (one-sided) gives it originality.
- Comb your hair with a comb and part it sideways so that the left side is much larger.
- We braid the left section of hair into a spikelet.
- From the right side we braid the hair along the very edge, picking up curls from only one side.
- We tie both braids at the base with an elastic band. Decorate it with a beautiful bow or hairpin.

Elegant braid
Step 1. Comb the strands with a comb.
Step 2. Separate a thin strand of hair on the right and weave it into a one-sided French braid.

Step 3. Bring the weaving to the end and tie the end with an elastic band.

Step 4. We braid the lower part into a spikelet and also tie it with an elastic band.

Step 5. We wrap the ends of the braids under the bottom and secure the bun with hairpins.

Step 6. Decorate your hair with a bow or hairpin.
Inverted ponytail braid
Step 1. We collect the strands in a low ponytail, make a depression near the elastic band and turn all the hair through it. You can attach the bow right away, or you can leave it until last. With a bow, it is a little more difficult to twist your hair, but the result will be different.
Step 2. Form a braid from loose hair and tie its end with an elastic band.

With braids made using this tutorial, you will look absolutely amazing! Get ready to receive compliments!
Beautiful braids on long, well-groomed hair have always looked feminine and attractive. Since ancient times, such hairstyles have been popular among ancient Greek women, Indians, Egyptians, and were also part of Slavic culture.

Beautiful feminine images based on braid hairstyles
Advantages
Why is weaving so popular? The thing is that braids help to create any image depending on the mood and situation, emphasize individuality, and correct facial imperfections.

Classic weaving
Thanks to the large number of braiding methods and options, beautiful braids for long hair are increasingly used by girls for special occasions, for example, in photos from wedding ceremonies you can see hairstyles in the Roman and French style.

Options for wedding hairstyles based on braids
Little beauties and their parents prefer braids for their practicality, because hairstyles for long hair based on braids remain in order for a long time, despite the increased activity and restlessness of girls.

Braid option for school
So, among the main advantages that make braiding an ideal choice for long hair are the following:
- convenience - hair does not need frequent combing;
- gentle conditions for hair, because styling does not require the use of an iron or curling iron, while the curls are protected from the negative effects of the environment and ultraviolet radiation;
- a large selection of hairstyles - based on weaving, you can create many different looks, changing options at least every day;
- versatility - such hairstyles are suitable for girls of all ages and perfectly complement both everyday looks and holiday looks.
The only drawback of such hairstyles is the laboriousness of the weaving process, which often scares off novice fashionistas.
Popular weaving options
Surely, every girl knows the basic principle of creating braids. To obtain the desired effect, you need to carefully divide the curls into strands of the same size and throw them together in a given order.

Volumetric
To give your hair extra volume, you should take a closer look at this option. After weaving, you need to carefully pull out several strands, trying to maintain symmetry with respect to the central part.

Volumetric braid
To keep your hair looking neat for as long as possible, you should lightly spray it with hairspray.
Classical
Braided quickly and easily, it is the simplest hairstyle option for all occasions. All you need to do is divide the curls into three strands and alternately weave them together. After reaching the desired length, you should secure your hair with an elastic band or a hair clip.

Regular braid
To prevent the image from looking boring, you can use the “reverse” version of the braid; to do this, you should not lay the strands on top, but place them under each other.

Reverse Russian braid
In order for the hairstyle to better hold its shape and not lose its appearance longer, when braiding, you should keep the strands under tension.
From a tourniquet
This braid is very easy to make with your own hands, and the weaving process will not take much time. Therefore, this option is perfect for going to school. All you need to do is divide your hair into two equal parts, twist each into a tight rope clockwise, then twist them together and secure the bottom with an elastic band.

Braid made of plaits
A step-by-step diagram of weaving a hairstyle is presented in the photo below.

Braid diagram
If the hairstyle is done with a cascade haircut, then special attention should be paid to short strands, securing them tightly in the hairstyle with bobby pins, hairpins or hairspray.
French
This weaving is almost completely identical to the classic version. However, it is not made from the tail, but starting from the back of the head. Chubby ladies should place the braid as high as possible and braid it the entire length of the hair, thereby correcting the shape of the face.

French braid
To prevent novice fashionistas from getting confused about how to weave a braid, we suggest using step-by-step instructions:
- Comb your hair well.
- Divide the hair at the top of your head into three sections.
- Arrange the strands as in classic weaving, adding hair from the sides at each stage.

Spikelet - weaving pattern
To make your hairstyle voluminous, you should take thicker strands and not pull them too tight.
"Fish tail"
A fashionable option that appeared relatively recently. Weaving is carried out using four strands, which allows you to get a wide and dense structure.

Fish tail
A “fishtail” can be woven from hair previously collected in a bun, or you can also start from the back of the head, similar to a “spikelet”. The main requirement is the same thickness of the strands involved in the weaving, this allows the result to be a symmetrical and interesting styling.
The photo below shows a detailed weaving pattern that will allow you to easily create an original hairstyle on long curls.

Fishtail weaving pattern
Waterfall
If you want to decorate a braided hairstyle with loose hair, then the “waterfall” styling will be a real find! The hairstyle is based on a “spikelet”, and the desired result is achieved by alternately releasing the lower strands.

"Waterfall"
To put the “Waterfall” into practice, you should part your hair into two unequal parts and start braiding three strands from one of the sides. After several “spans” have been woven by analogy with a “spikelet,” each lower strand should be left, replacing it with curls from the top of the head. The resulting braid should be secured with hairpins in the temple area.
 – a great option for a holiday. This hairstyle is suitable for a girl on September 1 and any other special occasion.

Flowers from braids
- heart– ideal for creating a romantic image. Moreover, such a hairstyle will not take much time.

Romantic braid hairstyle
Girls with a triangular face shape should give preference to fluffy and loose braids.
Weaving rules
In order for a braided hairstyle to look neat for a long time and keep the desired shape, the hair should be properly prepared.
- The hairstyle should be done on clean, slightly damp hair.
- For durability, you can apply a special mousse to your hair before braiding.
- The finished hairstyle should be sprayed with hairspray.
When planning to braid your hair, stock up not only with patience, but also with auxiliary accessories - a comb, bobby pins, hairpins, elastic bands, clips.

Beautiful braids
The ability to make beautiful braids on long hair allows you to look stylish and original every day. And simple manipulations will save time and effort on daily styling.
Following fashion is useful not only for the relevance of images. Designers take into account the diversity of female body types and offer stylistic solutions for any appearance. Take the best from fashion news and don’t forget to emphasize your individuality!
Beautiful long hair is the pride of any girl. The range of standard styles for long hair is very limited, and very long hair is uncomfortable to wear loose. Braids come to the rescue. Weaving a variety of braids is not difficult to learn.
The main advantage of braided hairstyles is variety. Depending on the weave and decorations, the braid will be appropriate for both a business style and a chic holiday hairstyle. Correctly selected braids are suitable for any type of hair, even thin ones. A hairstyle with braids will add variety and well-groomed appearance to your look.
However, trichologists warn that if hair is weakened and prone to loss, it is not recommended to wear tight braids often.
Some braids are quite difficult to perform, so you need to calculate in advance whether there is enough time for the intended hairstyle.
How to choose a braided hairstyle to suit your face shape?
Face shapes are divided into the following main types: round, oval, triangular, square, rectangular. A properly chosen hairstyle with braids will hide imperfections and highlight the advantageous aspects of your appearance. 
Braiding
To make the braid easy to braid and look beautiful, you must first comb your hair well and, if necessary, apply styling product. For some types of weaving, you will need a comb with a thin sharp end to separate the strands; for fixation, you will need bobby pins, silicone rubber bands, and hairpins.
Russian braid
Russian braid is the simplest and at the same time the most effective type of braiding for long hair. It is the braid that has always been a symbol of girlish beauty and feminine strength.

To perform a braid, the hair must be divided into three equal parts. Next, the side strands are thrown in turn over the middle one. The braid can be braided by pulling it tightly from the back of the head; a beautiful youth hairstyle can be achieved by combing the hair to one side and braiding it loosely.
Spikelet or French braid
The spikelet is often called a French braid. You can do the braid yourself. The hair should be combed back, with a medium-sized strand at the base of the forehead. The strand is divided into three equal parts. 

The strands are intertwined like a regular braid, but with each braid, strands from the remaining unused side hairs are added to the side strands. Weaving continues until all the free strands are in the braid. The remaining free hair is braided into a regular braid.
Greek braid
This hairstyle combines the spikelet technique on long hair and a regular braid.


First, you need to part your hair with a straight or side parting. One part of the hair needs to be pinned up, a small strand should be separated from the remaining hair and divided into three parts.
To start braiding, you need to weave several braids of a regular three-strand braid, then add strands of loose hair, then weave a regular braid again.
When the braid has gone around the head, you need to weave a regular braid from the remaining hair. A circular Greek braid is woven in the form of a crown from temple to temple.
The main difference between a Greek braid and a French braid is that when braiding a spikelet, strands are added with each braid, but in a Greek braid several braids do not need to be done every time. For the braid to look beautiful, the braid should not be tight.
Reverse French weave
Reverse French weaving looks very impressive. Weaving begins as a standard spikelet: you need to comb your hair back and divide the strand selected at the base of the forehead into three parts. 
Braiding differs from the usual one in that when weaving a spikelet, the strands are thrown on top of each other each time, and when weaving a reverse braid, the strands are held under the middle one. Otherwise, the technique is the same: with each new braid, additional strands of loose hair are added to the side strands.
Fish tail
Sometimes this weaving is called a “spikelet”. Curly hair is not suitable for braids.


The hair needs to be divided in half, then a thin strand is separated from the outside of one of the halves, for example, the left one, thrown over this half into the middle and combined with the right half.
Now the same thin strand is separated from the outside of the right half, thrown into the middle and combined with the left half. Using the same pattern, weaving continues until the braid is ready. The result is fixed with rubber bands. To make the braid look neat, you need to separate thin strands of the same thickness.
Waterfall
A waterfall braid, also known as a cascading braid, is a combination of braiding and loose long hair. Weaving always begins at the temple from any convenient side. Separate three small strands and start weaving a standard spikelet. 
After the first crossing of the strands, the lower strand must be released and left to hang freely. To continue weaving on three strands, you need to separate the strand from above, make another braid and leave the bottom strand again.
The waterfall braid can be braided in a straight line around the head, lowered to the back of the head, or you can start braiding from both sides and connect both parts at the back. You don't have to braid all your hair into a waterfall.
At any time, the waterfall can be continued as a regular spit. Having finished weaving the waterfall, you need to secure the braid with bobby pins so that the weaving does not fall apart. If you curl the remaining hair, the beautiful hairstyle becomes festive.
4-strand braid for long hair
A 4-strand braid looks unusual and will fit into any style. The hair should be divided into 4 equal parts. The rightmost strand is thrown over the second strand from the right, as if an ordinary Russian braid is being woven. 

But then the working strand is passed under the next strand and becomes second from the left. Then the leftmost strand is thrown over the second strand from the left and passed under the next strand. Weaving continues in the same pattern.
Braid twist
This original braid does not require any braiding. In fact, this is an inverted ponytail hairstyle, repeated several times. For the hairstyle you will need small silicone rubber bands. The hair is combed to one side and secured with a silicone elastic band. The hair above the elastic is divided in half. 
The tail is threaded through the resulting hole and pulled out. This is the first twist. Then the hair is again picked up with an elastic band a little lower, the tail is again threaded through the hole, a second twist is obtained. Weaving continues as long as there is enough hair. The twists above need to be pulled out a little to make the braid look voluminous.
Flagella braid
A braid made of flagella is well suited as a business hairstyle. The hair is gathered into a high ponytail and divided into two equal parts. Each part must be twisted into a bundle, for example, counterclockwise. The resulting strands are woven together, the result is fixed with an elastic band or a hairpin.
You can also braid a braid of flagella using the spikelet technique. In this case, the original strand needs to be divided into two parts, each twisted into a bundle. When weaving, the added strands must be combined with the existing strands, twisting them into the main strands. Loose hair can be styled as desired.
Snake
This hairstyle is also called a zig-zag braid. Braiding should start from the side. A strand is separated at the temple and divided into three lobes.  Standard French weaving is performed, but with some features:
- The braid is directed not down to the back of the head, but to the other temple;
- The side strands are picked up only from above;
- The lower strands remain free. They will be needed further.
Having brought the braid to the other temple, the braiding needs to be unrolled and continued in the opposite direction. Side strands are again added only from above. Weaving must be continued until the free strands run out. We braid the remaining hair into a braid.
The snake made using the reverse French weaving technique looks very beautiful. Flowers and beautiful accessories will turn the snake into a festive hairstyle.
Ponytail with braid for long hair
The combination of a ponytail with a braid gives room for imagination. You can braid one or more spikelets to the middle of the back of the head and then collect the hair in a high ponytail. On the contrary, you can gather your hair in a ponytail and braid any of the described braids or even several.
Malvinka
A simple hairstyle gives incredible possibilities for imagination. The front and side strands are combed back and secured with a silicone elastic band or bobby pins. 
At the same time, they can be twisted into flagella or braided into simple braids, connecting them together. Next, the strand already united at the back can be braided using any of the above methods.
Shell
The finished hairstyle really resembles a seashell. There are two main options for braiding. In the first case, a French braid is woven from the temple diagonally downwards, while the side strands are picked up only from above. Having finished the diagonal, you need to continue weaving a regular braid and secure it with an elastic band. 
Then, a little lower than the first braid, you need to braid another one in the same direction from the temple, diagonally down. Additional strands are woven only from above. As a result, there should be no loose hair left.
The lower braid is twisted into a bun, and the upper braid is twisted around it. The bundle is fixed with hairpins. The second version of the shell braid is to weave one French braid diagonally from the temple down to the back of the head and then along the lower part of the back of the head to create a soft arc.
The side strands are picked up only on one side; there should be no loose hair left. Next you need to braid your hair and wrap it in a circle to make a shell. The hairstyle looks very beautiful if the braid is made using the reverse braiding technique or like a fishtail braid.
Crown
To get a crown, you need to braid long hair. Beautiful styling can only be achieved if the braid can be wrapped around the head. The braid is made using the spikelet technique from the base of the neck in a circle. The hair is divided into two equal parts. 
One part is designated as the working part, and weaving begins with it. At the base of the neck, a strand is separated and divided into three parts. The spikelet weaves along the hairline towards the forehead. Starting from the middle of the forehead, you need to continue braiding down to the back of the head, using the second part of the hair.
If the hair is long enough, then you can continue to weave the braid further and also wrap it around your head on top of the main one. If the braid ends at the back of the head, then it needs to be secured with an elastic band and bobby pins.
Bubble Braid
The bubble braid requires two ribbons. The hair should be tied into a ponytail and divided into two parts. The ribbons are tied so that one is between the halves of the tail, and the second to the left of the hair. This tape will be working and will braid the selected strands and the central tape.
 Bubble braiding for long and beautiful hair
 Braiding is done as follows: the working tape is passed under two strands of hair and over the central tape. The tape is then passed over the strands and under the central tape. Then weaving continues in the same pattern.
The central tape and strands do not change position. Every 4-5 braids, the side strands need to be fluffed up, giving the braid volume. This kind of weaving requires skill.
Openwork braid of 5 strands
The hair should be divided into five equal parts. Weaving starts from left to right. The leftmost strand is draped over the adjacent one, then the middle strand is draped over it. 

Actually, one braid of a three-strand braid is made. Then the rightmost strand is draped over the adjacent one, and the middle strand is draped over it. Weaving continues in the same pattern.
Square braid
The hair should be divided into three equal parts. The left strand is additionally divided in half.  The middle strand is held between the halves of the left strand, then the halves need to be combined, the left strand becomes the middle one. Then the right strand is divided in half, the middle strand is drawn between the halves of the right one. Weaving continues in the same pattern.
Combination of buns and braids in hairstyle
Buns and braids go well together in a hairstyle. The bun goes especially well with French braiding, when the remaining hair is braided and pinned or pinned straight into a bun. 
A bun of pre-curled curls, decorated with beautiful pins, flowers and ribbons is a wonderful evening hairstyle.
Evening hairstyles with braiding
Rosette
A rosette can be made from the entire mass of hair or a small strand can be separated to make a separate decoration. To make a rose, you need to separate the required strand and, dividing it into three parts, weave a regular three-strand braid. 
While braiding, you need to pull out loops on one side of the braid, which should decrease towards the end of the braid. Then the braid is folded into the shape of a flower so that the elongated loops are on the outside and secured with decorative pins.
Heart
The hair should be divided into two parts with a straight parting. One part is pinned, the second part is braided using French braiding in an arc from the crown to the temple and then down to the back of the head. 
The side strands are picked up only from above. Having fixed the first braid, the same thing is symmetrically braided on the second half of the hair. It is important that the braids look mirror-like.
Triple Falls
The spit waterfall has already been described above. To perform a triple waterfall, you need to weave a waterfall braid from the temple around the head. Then the second waterfall braid begins from the same temple, while the lower strands remain free. 
The third waterfall braid again starts from the original temple and the lower strands again remain free. Each braid is braided to the end. Loose braids can be styled beautifully and decorated with decorative hairpins.
Simple weaving for girls
Multi-layer basket
There are many variations of the basket braid. To weave the standard version, you need to select a part of the hair in the shape of a circle just below the crown and pull it into a tight ponytail. 
Next, a spikelet is woven from the loose hair so that the outer strands are captured completely, and the inner strands are picked up from the tail. It is important to calculate that there is enough hair for a spikelet around the head. The remaining hair is braided into a regular braid.
Bow braids
To achieve this hairstyle you will need a large hairpin. First you need to weave a regular spikelet in any direction. In this case, be sure to leave a small strand on the side of the braid. After the braid is fixed, you can begin forming the bows. To do this, in the first braid you need to thread the hairpin with the round end forward towards the side where the strand is left. 
A small strand is separated, sprayed with varnish, and folded in half. The resulting loop is threaded through a hairpin and placed on the finger. Next, the hairpin is pulled back together with the strand. Taking into account the loop fixed with a finger, a bow is obtained. The remaining ponytail is laid along the braid; it will be covered by the next strand. This is how each braid of the spikelet is decorated.
Crisscross
This beautiful hairstyle consists of two spikelets braided towards each other. The hair is divided into two equal parts with a straight parting. Each part is further divided horizontally. Weaving begins from one of the upper parts with a regular spikelet from the temple to the back of the head along a long diagonal.
Having reached the middle of the head, you need to fix the braid and weave the spikelet on the other half in the same way. Then several braids of a regular braid are made, which should pass over the first one, and the braiding continues downwards with a spikelet using the lower quarter of the hair. The second braid is braided in a spikelet from the remaining hair diagonally downwards.
This is how a few basic weaving techniques open up the greatest opportunities to diversify your everyday hairstyles, as well as create an unforgettable evening look.
Videos: braiding for long hair
How to braid such a beautiful braid on long hair. Video master class:
Braiding technique. 3 beautiful and quick hairstyles:
Fashion changes and depending on it, girls not only choose clothes, shoes, makeup, but also their hairstyle. In recent years, women are increasingly choosing fashionable short haircuts, but long hair will never lose its relevance.
At all times and for all ages braids for long hair They were considered a beautiful decoration for a woman’s image, and now the choice of different hairstyles with braids and weaves is simply huge.
Everyone can learn how to weave braids for long hair with their own hands, let’s start with simpler braids and end with a variety of interesting braids.
Classic three-strand braid
A hairstyle that has passed through time - a classic 3-strand braid, suitable for both long and medium hair. Our grandmothers and great-grandmothers braided their long thick hair, and the thicker it was, the more beautiful the woman was considered.
3-strand braid patternToday this is the fastest and simplest braid that even a child can learn to weave.
The hair must be divided into three equal parts and then braided as shown in the diagram: The outermost strand on the right is transferred between the other two, then the outermost strand also moves between the two neighboring ones. Continue braiding to the ends of the hair and secure with an elastic band.
At first glance, this braid may seem boring, but once you look at the variety of hairstyles that can be done using this braid, it becomes a favorite for many.
Video tutorial on braiding 3-strand braids
Three-strand braid - photo
French braid for long hair
A French braid on long hair looks very impressive, besides, this weaving allows you to collect your hair tightly, it will not fall out of your hairstyle and disturb you. It can be braided straight or obliquely, or two or more French braids can be braided over the head.
French braid patternWeaving also begins with three strands as in the previous version, but we start weaving from the top of the head and separate three small strands. We start weaving in the usual way, the only difference is that when moving the outer strand, each time we grab a small strand of loose hair to it.
Video instructions for weaving a French braidBy adjusting the thickness of the strands, you can determine for yourself what kind of braid you will have, with small or large weaving.
Reverse French braid
This hairstyle is also called dragon braid. As you already understand from the name, weaving occurs according to the same pattern as a regular French braid, but the outer strands do not move upward, but under the adjacent strand, that is, from below.
Weaving patternThere can also be several options for such a braid; you can braid two symmetrical braids, or one zigzag. If you pull out small loops from each braid of the finished braid, you will get a beautiful voluminous hairstyle for long hair, which is suitable even for going out.
Weaving videoReverse French braid - photo
Fishtail braid for long hair
A fishtail is a fairly simple weave that is actually made from two strands. More precisely, the hair is divided into two parts, then a small strand is pulled out from one part and transferred to the adjacent part, we will do the same on the other side, thus we get an interesting weave that really vaguely resembles a fish tail :)
Fishtail (spikelet) - weaving patternThis braiding looks especially good on long hair; the braid turns out to be very unusual and interesting. You can also make a high ponytail on the top of your head and braid it into a fish tail - you will get a fashionable and stylish hairstyle.
Weaving video tutorialWaterfall braid - a wonderful hairstyle for long hair
The combination of loose curls and a beautiful braid is an ideal hairstyle for girls who like to wear long hair loose. At the same time, framing your hair with such a braid will give the image a finished and neat look.
The waterfall spit is perfect for a special occasion, a romantic walk or a trip to the theater.
The weaving can be seen in the diagram, it is quite simple, it is done like a French braid. To get the effect of flowing hair, the additional strand that enters the braid is not braided, but remains hanging freely.
Waterfall braiding pattern Video weaving lesson4 strand braid for long hair
We have looked at simple braids of 2 and 3 strands, now you can move on to more complex openwork weaving patterns. These include braids for long hair with 4 or more strands.
Four-strand braid patternWhen weaving a braid of 4 strands, the main thing is not to get confused about what goes behind what. Once you get the hang of it, such a seemingly complex braid can be completed in a few minutes.
The easiest way to learn how to weave this braid is through video lessons.
Weaving an openwork braid of 5 strands for long hair
Weaving a five-strand braid requires some skill and experience; if you can already easily perform the previous weaves, you can move on to more complex ones.
A 5-strand braid can only be done on long, thick hair; I advise you to carefully watch the diagram and video tutorial to master this braiding technique.
Weaving pattern Video tutorial for 5-strand braids
Braid - mermaid tail - hairstyle for long-haired beauties
A very delicate and romantic braid, it looks voluminous and a little careless. We take the French braid as a basis, the only difference is that when we grab another strand of loose hair, we do not pull it into the braid, but leave it in a weakened form.
The mermaid braid can also be made in several variations, look at the photo and video.
Scythe shell
Another great hairstyle for long hair. It can be performed using any braid (classic, French, fishtail). Here the location of the braid plays an important role; it should start from one edge, then make a semicircle and curl like a shell.
Also, to create a shell you will need bobby pins or pins to secure it in the desired position.
Video tutorial on braiding shell braidsBraid around the head (crown)
A spectacular hairstyle that is not suitable for everyone; if you have a beautiful oval face shape and pronounced features, then you can safely adopt this braid. This hairstyle is also called a basket hairstyle.
Braiding can be done in several ways; it can be a classic braid, which when finished goes around the head, or it can be a circular French braid.
If you choose the first option, then keep in mind that the hair must be very long so that it is enough to completely cover the head.
Video lessonsNew articles
- Christmas angels made of paper - Irzeis – LiveJournal
- Treasures of great civilizations: Mask of Agamemnon Myths and reality
- Funny congratulations to the hero of the day
- Listen to the poem I
- Fashionable and comfortable hairstyles for training
- Face tattoos of Russian rappers: Kizaru, Face and others
- Hunting Shoes for Low Temperatures Best EVA Ice Fishing Boots
- The best braided hairstyles for long hair with step-by-step photos
- Cleansing pores at home
- How long do eyelashes grow, and what factors influence this?
Popular articles
- Latest pension indexation news
- How to remove armpit hair using an epilator
- Is a normal family life possible after my husband’s betrayal?
- Home technologist: how to make jeans frayed How to fray jeans
- Married, but fell in love with a colleague
- No-spa during pregnancy - dosage Use of no-spa in early and late stages for tone and headache
- When the word "died" disappears
- The best foam cleanser reviews
- Reasons why lips dry and crack
- Stylish winter manicure. Openwork manicure. How to style short nails