Mobile toys made of cardboard, diagram templates. DIY Valentines - funny twitch toys
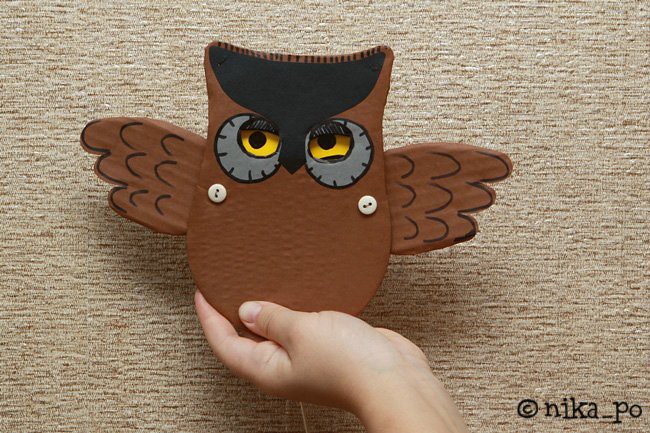
Actually, I don't really like twitchers. But one day I saw a picture from an old book, where there was a description of how to make a children's hanger - an Owl. She opened her eyes when they hung clothes on her. And I wanted to make such a twitchy owl. Most of the time this owl sleeps peacefully, but when you pull the thread, it opens its eyes and flaps its wings. And maybe even shout “Woo-hoo!”

Materials and tools:
- Thick cardboard or corrugated packaging (used to make boxes)
- Colored paper
- Colored cardboard (yellow)
- PVA glue
- Scissors
- Thick threads
- Marker or felt-tip pen
Pattern sheet A4 format.

Cut out the owl's body and two wings (in a mirror image) from cardboard.

We cover them with brown paper. We dry it under a press (put a heavy book on top).


Glue the head parts from colored paper and dry them.

Cut out the part with the pupils from yellow cardboard. We outline the location of the pupils and eyelids with a pencil.

We glue the lower eyelids on it from paper of the same color as around the eyes.

Using an awl, we pierce the shoulder and wing at the junction. It is convenient to do this on a hard rubber mat or on an unnecessary album (magazine).

We make a mount for the wing. You can use special clips for scrapbooking, or make them yourself from a button and a piece of wire. We fasten the wings, they should move freely.

We pull the first thread through the holes in the upper part of the wings and in the lower part of the part with the pupils. We pull the second thread only through the holes in the lower part of the part with the pupils.

We secure the upper part of the part with the pupils with an elastic band. We securely sew it to the “ears” of the owl.

By adjusting the size and tension of the threads, you can tie them together. We tie a button or ball to the end of the thread, which we will pull on.


Using a black marker or felt-tip pen, draw the feathers on the wings and complete the eyes.

Most of the time this owl sleeps peacefully, but when you pull the thread, it opens its eyes and flaps its wings. And maybe even shout “Woo-hoo!”
Materials and tools:
Thick cardboard or corrugated packaging (used to make boxes)
Colored paper
Colored cardboard (yellow)
PVA glue
Scissors
Thick threads
Marker or felt-tip pen
Cut out the owl's body and two wings (in a mirror image) from cardboard.

We cover them with brown paper. We dry it under a press (put a heavy book on top). 


Glue the head parts from colored paper and dry them.

Cut out the part with the pupils from yellow cardboard. We outline the location of the pupils and eyelids with a pencil.

We glue the lower eyelids on it from paper of the same color as around the eyes.

Using an awl, we pierce the shoulder and wing at the junction. It is convenient to do this on a hard rubber mat or on an unnecessary album (magazine).

We make a mount for the wing. You can use special clips for scrapbooking, or make them yourself from a button and a piece of wire. We fasten the wings, they should move freely.

We pull the first thread through the holes in the upper part of the wings and in the lower part of the part with the pupils. We pull the second thread only through the holes in the lower part of the part with the pupils.

We secure the upper part of the part with the pupils with an elastic band. We securely sew it to the “ears” of the owl.

By adjusting the size and tension of the threads, you can tie them together. We tie a button or ball to the end of the thread, which we will pull on.
Using a black marker or felt-tip pen, draw the feathers on the wings and complete the eyes.


Pattern sheet A4 format.

Twitch toys have been known since ancient times. These mechanical figures of people or animals, whose arms, legs or paws twitch funny thanks to a simple hinge mechanism, have always been especially loved by children.
Initially, twitchers were made of wood; in Rus' they were called “dancers.” Subsequently, the manufacturing technology was greatly simplified through the use of paper and cardboard. With the advent of color printing, twitch patterns drawn by artists began to be published in magazines, which made it possible to make colorful toys for everyone.
Well, the Internet has made the possibilities for creating a variety of twitches almost limitless. :) I invite you to use ready-made templates to make a mechanical toy from cardboard in the form of the famous fairy-tale hero - Puss in Boots. And at the end of the master class, another version of the twitch awaits you - the Monkey.
Master class: cardboard twitch toy “Puss in Boots”
Materials and tools:
— sheets of A4 size office paper (for printing templates);
— packaging micro-corrugated cardboard (1.5 mm thick) or cardboard for children's creativity;
- a sheet of thick white A4 paper;
- standard (stationery) knife;
- scissors;
- awl;
— paracord (4 mm in diameter) or other fasteners;
- nylon thread, narrow ribbon;
- glue stick;
— glue “Moment Crystal”;
- double sided tape.
So, we start by preparing the cardboard parts for the base of the twitch toy.
We print outline templates on office paper. We cut them out with small allowances.
We glue pieces of double-sided tape on the wrong side and glue the templates to the wrong side of the cardboard.

In this case, micro-corrugated cardboard with a thickness of 1.5 mm is used. But I want it right away to draw your attention: the contours of the parts here are quite curly, with small elements, so cutting out of micro-corrugated cardboard can be a little difficult if you’re unaccustomed to it. And here you can go two ways:
1. neglect small elements and smooth out the contours when cutting;
2. use thin cardboard (for example, cardboard for children's creativity; for greater rigidity, you can make it in 2 layers); In this case, the toy will also be quite functional; below you will see an example of such a design of the twitch.
Next, use a regular stationery knife to cut out the parts of the base. Immediately make holes for fastening. I used a punch with a diameter of 4 mm. If a punch is not available, you can cut holes with a knife or awl.
The diameter of the holes may differ from the original depending on what fasteners you use.

On thick white paper (on the front side) we print colored puss in boots templates. Cut it out.

Alternatively, you can color the cat with pencils or felt-tip pens together with your child. A special set of templates is provided for this.
Using a glue stick, glue the colored parts onto the cardboard bases (on the front side of the cardboard).

We fold our paws in pairs (on top of each other). And with an awl we pierce small through holes on the upper edges, as shown in the photo. These holes will be used to control the paws.

To attach the paws, white paracord with a diameter of 4 mm is used here. Cut 4 small pieces (the length is such that you can tie 2 knots).
We tie a tight knot at one end and melt the tip with a lighter. We pass the cord through the holes of the body and paws.

The paws should be located under the body.

This is just one of many mounting options. For movable fastening, you can use, for example, brads, buttons, wire, etc. - whatever you like best. The main thing is to make sure that the limbs of the twitching toy rotate freely in the same plane!
Let's proceed to the most important stage - creating the paw control mechanism. In fact, everything here is extremely simple. It is necessary to tie the paws in pairs with nylon thread through small holes. When the thread is taut, the limbs should be in a downward position.

Now we tie a long thread (can be folded in half) or a thin cord to the horizontal threads, both the top and the bottom, as shown in the photo.
We tie knots on the paracord from the wrong side of the toy. We check whether the paws rotate freely enough. We melt the ends of the cord.

Cut out 2 circles with a diameter of 2.5 cm from cardboard. If you use micro-corrugated cardboard, make a slot in the middle on the wrong side of one circle and place the end of the thread there.

Glue both circles with Moment Crystal glue.

Alternatively, instead of cardboard circles, you can attach a large bead - for convenience and beauty.
Glue a cardboard circle with a diameter of 3.5 cm to the head from the wrong side onto a loop of narrow ribbon. 
The cardboard twitch toy is ready!

This is such a cheerful and lively cat in boots. The kids will be delighted! :)

A set of templates (contour, color and for coloring) for making the Puss in Boots twitch toy can be purchased at the Kartonkino store:
I already mentioned above that similar toys can be made from thin cardboard for children's creativity. These charming monkeys, created by, are made in just this way.
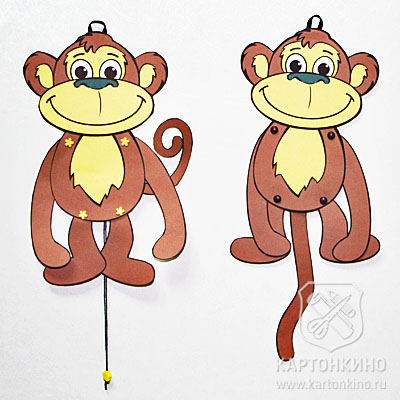
Note that the monkey on the right uses a tail, not a string, to control its paws. Or rather, there is a lace there too, it’s just glued between the halves of the tail. A very interesting option, you will agree.
And this is what the inside of the monkey looks like. Everything here is quite traditional.

The paws are attached here using brads. It looks very good, and the attachment process itself is simpler than with paracord. Don’t forget that when using brads, the holes need to be made smaller; just pierce them with an awl.
It is worth noting that the tail on the side was not the best solution - it interferes with the movement of the paw. But there is a choice: if you want, do it with a tail on the side, if you want, do it from below, or without a tail at all (not completely, of course, without a tail, it’s kind of in the background and just didn’t come into view).
Templates for the twitching toy “Monkey” can be downloaded here:
By the way, Anya Shidenko has many other interesting templates for making various products for children, as well as holiday accessories. You will find them by going to.
Well, now you know a simple and working way to make a twitch toy out of cardboard with your own hands. By analogy, you can even draw your own favorite character - some hero from a folk tale or cartoon.
Or use ready-made templates. I have already shown you two versions of the toy. And you will find another one - Kitty - in the 9th issue of the electronic magazine "Masterklassnitsa".

We wish you pleasant creativity, fun and useful games with children!
Yours Inna Pyshkina and the Kartonkino team.
I present to your attention a step-by-step process for making a moving paper toy “Teddy Bear”. The master class will be useful for primary school teachers, kindergarten teachers, and young parents who have a small child. The baby will find it interesting because the toy’s legs move with the help of a thread.
In addition, mothers and fathers can make such toys themselves and introduce their children to wild and domestic animals in a playful way. Also, older children, following step by step and relying on photographic material, can make a bear cub with their own hands and give it to their younger friends.
For manufacturing you will need the following material:
- sheets of colored paper in blue, red and orange;
- white cardboard (1 sheet);
- PVA glue or pencil;
- scissors;
- a coil of wire with a diameter of 0.45 mm;
- a simple pencil;
- awl;
- a stand for making holes with an awl in the places where the parts of the teddy bear are attached;
- spool of thread;
- a black thin marker for drawing the eyes and nose of the teddy bear (can be replaced with black paper);
- template of a toy - a bear cub: the base of the toy, the back and front legs (elements of movement), 12 washers.

Description of work
Step No. 1. Using a pre-prepared teddy bear template, you need to cut out “clothes” from colored paper to make the toy bright.
To do this, mark out the decoration elements for the teddy bear on colored paper. From orange paper - a teddy bear's nose, a blouse (upper body), from blue paper - a tie and panties (lower body).

Step No. 2. Now we cut out all the parts with scissors.

Step No. 3. Using a glue stick, glue the orange parts onto the teddy bear (nose, blouse).

Step No. 4. Then glue the blue parts in the same way: pants, tie, draw the eyes with a black marker and outline the outline of the nose.

Step No. 5. Take an awl and a stand to make holes in the parts - the legs of the toy and on the main part of the teddy bear.

Step No. 6. Take a spool of thread and cut 4 parts from it, each up to 20 cm, then fold it in half (for strength). We pass it through the upper holes into the bear's paws and tie it with a knot.

Step No. 7. To fasten the parts we will need wire, scissors and an awl.

Step No. 8. You need to cut a piece of wire about 10 cm. Then thread it like this: washer, main part (body), washer, foot, washer. We twist the ends of the wire with a spring using an awl.

Step No. 9. We managed to attach the upper and lower legs to the body in this way.
DIY Birds toy. Master class with step-by-step photos
Alexander Yashin
Feed the birds in winter!
Let it come from all over
They will flock to you like home,
Flocks on the porch.
Their food is not rich.
I need a handful of grain
One handful - and not scary
It will be winter for them.
It’s impossible to count how many of them die,
It's hard to see.
But in our heart there is
And it's warm for the birds.
How can we forget:
They could fly away
And they stayed for the winter
Together with people.
Train your birds in the cold
To your window
So that you don’t have to go without songs
Let's welcome spring!
Making a dynamic toy “Pecking Birds”. Master class with step-by-step photos.
The master class “Making a dynamic toy “Pecking Birds”” was recommended for participation in the “Living World” competition by a methodological association of additional education teachers of a scientific and technical orientation. Head of the association T.V. Rassushina
Erygina Natalya Nikolaevna, teacher of additional education of the first qualification category of the MBU DO SUT Angarsk
Description: This material will be useful to additional education teachers, technology teachers, kindergarten teachers, children of primary and secondary school age and creative people.
Application: Children can use their crafts in games or as gifts.
Target: Making a dynamic toy “Pecking Birds”.
Educational objectives:
1.Introduce the concept of a dynamic toy, increase interest in this activity.
2.Expand knowledge about the appearance and lifestyle of birds.
3. Teach how to make a dynamic craft “Pecking Birds”.
Developmental tasks:
1.Develop fine motor skills of children’s fingers.
2.Develop attention and memory.
Educational tasks:
1. Cultivate perseverance, accuracy, and the ability to bring the work started to its logical conclusion.
Birds are warm-blooded creatures. Their average body temperature is 41°C. This means that they can remain active during the cold season, but require more food. Therefore, many birds leave their snowy native places and go to warm countries for the winter.


Sparrow. They move on the ground by jumping. The voice is relatively high-pitched, the well-known chirping sound.
Prefers forest edges, gardens and vegetable gardens. Lives on the outskirts of cities, in villages and towns, in the south - in forests and bushes. It feeds on various seeds and feeds its chicks with insects. Often settles in groves, parks and gardens. In November, tree sparrows concentrate in human settlements, where they spend the entire winter. Winters in nesting areas. The tree sparrow catches a lot of harmful insects, but in the fall flocks of sparrows can cause quite significant damage to gardens and vegetable gardens.

Nuthatch. Lives in forests, gardens and parks with old trees. It feeds on insects, less often seeds, nuts and acorns. It usually feeds on thick tree trunks, moving upside down. Often visits feeders, in city parks it learns to take food from an outstretched palm. For the winter, it stores tree seeds in cracks in the bark. A significant part of these reserves subsequently goes to tits. Thanks to its peculiar manner of movement, the nuthatch avoids competition with flock mates - tits and pikas. Crawling down the trunk, it takes out small insects mainly from cracks in the bark that open upward. In winter, it often wanders in flocks of tits.


Crow. Raven and crow are completely different birds, not male and female. It moves along the ground with long strides and, in case of danger, begins to “jump.” Crows are omnivorous birds, they feed on insects, chicks and eggs, rodents and lizards, frogs, fish; plant food - seeds of various plants, as well as the plants themselves, as well as food waste. The intelligence of crows and their ability to use objects in their environment are also well known; for example, if a city crow comes across a nut in a shell, it can throw it on the road and wait for the car to crush it, after which it calmly eats it. In the 1970s-1980s, when stores sold milk in half-liter cardboard tetrahedral pyramids, crows often stole these packages, took them to a secluded place, punched a hole in the cardboard with their beaks, and drank the milk. To prevent the bag from slipping out of its beak in flight, the crow used its beak to bend one of the corners of the bag in advance.
By autumn, crows concentrate in large numbers around landfills, garbage dumps and other food sources. The maximum age accurately known is 20 years. Crows are able to show ingenuity, for example, remembering the location of hidden prey, returning for it when necessary, or throwing nuts from a great height.

Pigeon. Possessing excellent vision, the bird is able to distinguish not only the colors of the rainbow, but also ultraviolet rays. Hearing can detect sounds of a much lower frequency than humans are able to hear - for example, the sound of the wind or the distant sounds of a thunderstorm, and this may be why birds sometimes leave the area for no apparent reason. The ability of rock pigeons to always find their way home, no matter where they are, is well known - this behavior has been used by humans for postal communication since ancient times. Birds with this quality are able to travel up to 1000 km per day. The rock pigeon, due to its predominantly rocky lifestyle, does not know how to perch on tree branches; it moves along the ground at a walk, constantly shaking its head. It flies superbly, reaching speeds of up to 185 km/h. The rock pigeon feeds mainly on plant foods: seeds, berries, fruits of fruit trees. There are pigeons that cannot fly. This breed is called a salon roller.


Tit. Lives in forests and parks. By destroying a large number of forest pests, it brings undoubted benefits to nature. In winter, it forms mixed flocks with other birds and wanders in search of food. More often than other birds, it settles near humans. Looks for insects and spiders on branches and trunks. In winter it feeds on seeds and other plant foods. A common visitor to feeders in city parks. In some places, by December, tits are already accustomed to taking food from an outstretched palm. Distributed in the European part of Russia, the Caucasus, southern Siberia and the Amur region.

Goldfinch. The goldfinch is one of the most beautiful birds found in our forests. Because of its festive, smart attire, the bird was called the “goldfinch.” A cheerful, agile, agile bird. In the conditions of enclosures and cages, they quickly master and quickly get used to it. Even in captivity they love to sing a lot. With good maintenance, proper care and feeding, they sing all year round and live up to 15-20 years.


Crossbill. They have a special beak structure: the ends of the mandible and mandible overlap each other, crossing each other crosswise. On the territory of Russia there are 3 species: spruce crossbill, pine crossbill and white-winged crossbill. Common nomadic birds. From the taiga, crossbills, during their frequent migrations, fly into all regions of Russia, often very far from their nesting sites. They stay on coniferous trees in flocks, often hanging from cones, tearing them off and dropping them. During the flight they constantly call to each other, but, having settled on a tree, they fall silent. They feed mainly on the seeds of coniferous plants. Crossbills are often kept in cages. Captured birds very quickly get used to captivity.

Bullfinch. Lives in forests (only pure pine forests are avoided) with dense undergrowth, in gardens and parks. In summer, the bullfinch lives both in dense forests and in open forests on the edges of burnt areas and clearings, but is very secretive and rarely catches the eye. But in winter it’s simply impossible not to notice a colorful flock of bullfinches. It feeds mainly on seeds, buds and berries. Feeding on berries, it eats the seeds from them and throws away the pulp of the fruit.

Magpie. Thanks to its characteristic black and white plumage and unusually long tail, the magpie is unique and easily recognizable. On the ground, the magpie most often moves by jumping, but can also walk. She moves very skillfully in the crown of trees. The flight of the magpie is wave-like and gliding. Common magpies are sedentary birds. They live in small forests, parks, gardens, groves, copses, often not far from human habitation. Magpies eat a wide variety of foods. Its diet includes both small mammals and insects. Magpies also often destroy bird nests, carrying eggs and chicks. And sometimes they even steal bones from dogs. Magpies living next to a person are not afraid to steal some food from him. The magpie is considered one of the most intelligent birds. Magpies were found to have elaborate social rituals, including possibly expressions of sadness. The magpie is the only non-mammal currently known to be able to recognize itself in a mirror, unlike, for example, a parrot, which perceives its own reflection as another parrot.

Waxwing. Inhabits sparse coniferous and mixed forests, overgrown burnt areas and clearings. In summer it feeds on insects, which are often caught in flight, larvae, various berries and young shoots of plants. At other times, they feed mainly on berries and fruits, for example, lingonberries, rowan, viburnum, mistletoe. In winter, it wanders widely, appearing in large flocks in cities, especially during the years of the mountain ash harvest. Waxwings play an important role in the life of the forest, as they widely distribute the seeds of rowan and other juicy berries, which, having passed through their intestines, do not lose their germination.

Woodpecker. The Great Spotted Woodpecker is widespread in the forest zone of Russia, including mixed and deciduous forests. Woodpecker is a good tree climber. The woodpecker deftly moves in short leaps up and sideways along the trunk, moving in a spiral. At the same time, he constantly chisels the bark in search of insects, their larvae and pupae. Its beak, straight and sharp, hits the tree with force and not only destroys the bark, but also breaks the wood, making a depression in it. The woodpecker inserts a long flexible tongue covered with sticky saliva into the cracks formed in the bark, the end of which is seated with small teeth directed backwards. Having pricked the insect with his tongue, he pulled it into his mouth. This is how it feeds all summer, destroying many forest pests (bark beetles, borers, etc.). In winter, the woodpecker feeds on the seeds of coniferous trees, breaking the cones with blows of its beak, having previously squeezed them into a crack in the bark or a slot hollowed out in the wood. Although woodpeckers destroy many seeds of coniferous trees, reducing their yield, in general they should be considered useful birds, since they destroy many insects harmful to the forest, and by making new hollows every year, they provide housing for insectivorous birds. In addition, woodpeckers cull sick trees infested with pests that are subject to sanitary felling.
Tools and materials:
Cardboard,
colored paper
scissors,
gouache
simple pencil,
brush,
glue,
wire,
toothpick,
needle.


Rules for safe work with scissors.
1. Before work, check the serviceability of the tools.
2.Do not use loose scissors.
3.Work with scissors only at your workplace.
4. Watch the movement of the blades while working.
5. Place the scissors with the rings facing you.
6.Feed the scissors rings forward.
7.Do not leave scissors open.
8. Store scissors in a case with the blades facing down.
9.Do not play with scissors, do not bring scissors to your face.
10.Use scissors as intended.
Safety precautions when working with glue.
1.Work carefully, trying not to drip glue.
2. Try not to get the glue on your clothes, face, or especially your eyes.
3.If glue gets into your eyes, rinse them well with water.
4.After work, close the glue tightly and put it away.
5. Wash your hands after work.
Safety precautions when working with needles.
1. Store needles in a pincushion.
2.Always thread the eye of the needle. One thread runs out - a new one is needed.
3.Needles should not be put in the mouth.
4. Before work and after finishing work, count the needles.
5.Needles should not be attached to clothing or left in the fabric.
Elena Blagina
Frosts are severe
This year!
Worried about the apple trees
In our garden.
Worried about Zhuchka:
In her kennel
The same frost
Like in the yard.
But most of all
Worried about the birds -
For our sparrows,
Jackdaws, tits.
We have it prepared
Everything for winter:
We'll wrap you in matting
We are apple trees.
More hay
We'll bring it to the kennel,
Poor mongrel
We'll save you from the cold.
But the birds! So cold
In the air!
Will we help
Defenseless like that?
Let's help! They need to be fed
And then
It will be easy for them
Survive the cold.
Dynamic (or moving) are called toys that convey the types of movement of living beings and mechanisms.
Manufacturing algorithm.
1. Trace the templates on yellow cardboard. The templates should be placed compactly on the cardboard and traced on the back side of the colored cardboard. Be sure to mark the points - the places where we will pierce the cardboard with a needle.

2.Cut out the craft blanks.

3. Glue them together to make double-sided parts.

4. Color the birds and wings with gouache.

5. Bend the base of the wing.

6. Apply glue only to the base of the wing and glue it to the bird.

7. Glue the wing in a similar way on the reverse side.

8. On the back side of a sheet of white cardboard, draw four lines at a distance of 1.5 cm.

9. Cut into strips.

10. Glue together to make double-sided parts (to give rigidity, you can glue several strips together).

11. Draw a drawing on the feeders with a simple pencil.
New articles
- Master class: decorating a kanzashi Easter basket
- DIY Valentines - funny twitch toys
- We sew warm slippers from old sweaters
- DIY hair ties - step-by-step instructions for making How to make an elastic band the easy way
- Personal hygiene rules when traveling
- Furniture for dolls with knitting needles
- More booties with ruffles, very detailed description
- We create (from pattern to outfit) a small doll - a pumpkin head from knitwear according to MK Yulia Titova
- Fashionable sets, looks, looks Stylish sets, looks, looks
- DIY New Year's coffee magnets
Popular articles
- Crocheted amigurumi sun
- Dog booties: master class with photos and videos
- Which is better leather or rubber?
- Peach oil for facial skin against wrinkles
- Microcurrent procedure: types and methods of therapy, indications and contraindications
- How to get rid of skin scars using home remedies
- When and how to perform physical therapy for infants?
- Knitting socks - a guide for beginners
- Simple New Year's crafts with children: inspiring ideas and master classes
- How to properly clean fur products at home How to treat fur to make it shine