Make something for Halloween out of paper. DIY Halloween Decorations
Tweet
Cool
The fun and slightly creepy autumn holiday of Halloween is coming very soon. And if you decide to throw a party at home, to please your friends or children, then you definitely need to create an atmosphere appropriate for the holiday at home. Decorating your home may be easier than it seems at first glance. Various available materials will be used - from paper to New Year's garlands, as well as seasonal vegetables and fruits.
Pumpkin home decor
Pumpkin is the main character of Halloween. You can use it to make anything you want: lanterns or candlesticks, draw scary faces on pumpkins, paint pumpkins, or make dishes from it for the Halloween table. Below I suggest you look at a few photos of decor ideas with pumpkins.


Lanterns and candlesticks
If you don’t have pumpkins in your arsenal, but want to make a traditional Halloween lantern with a creepy face, then use oranges. You must first remove the pulp from them, and then cut out the face with a knife or scissors. A small candle is placed inside and the flashlight is ready.


In addition, candlesticks can be made from glass glasses or jars by painting the desired designs on them with paints or gluing silhouettes cut out of paper.
Lanterns can easily be made from any plastic cans or containers by drawing scary faces or other images on them and placing New Year's garlands inside.


Spider web and bats
These are mandatory Halloween attributes, so add them to your interior immediately. Both cobwebs and bats can be easily made from paper or thick cardboard and hung throughout the apartment: on the ceiling, doors, windows.


Flying ghosts
What would a holiday be without them? You can make small ghosts from pieces of gauze, bandage or white balloons and hang them from the ceiling, you can make larger ghosts from your own white T-shirts, or limit yourself to paper ghosts in your home decor.


Halloween table decor
Themed food and dish decor are a must-have addition to a truly mystical party. Actively use pumpkin dishes, but don’t limit yourself to them. The whole trick of Halloween baking is to turn ordinary dishes into something special with decorations. For example, you can easily turn regular chocolate muffins into spiders using chocolate sticks, and bake your friends’ or family’s favorite chocolate cookies in the shape of bats. Pancakes should be baked in the shape of a spider web, and pizza should be given a scary look with the help of olives. How to do this, see the photo below.


Halloween is one of the most ancient holidays in the world. Its history dates back thousands of years. It closely intertwines the Celtic rite of honoring evil spirits and the Christian rite of worship of all saints. Halloween is celebrated on October 31st. It was on this night, as our ancestors believed, that the evil spirits of nature gathered in the forests and on the tops of the hills, and the Druids lit fires and made sacrifices to them in order to achieve favor on their part.
Halloween is one of the most ancient holidays in the world, its history dates back thousands of years.
We invite you to learn how to make several interesting crafts that will help you beautifully decorate your apartment for Halloween.
Craft options
There are many interesting craft options for decorating your home for Halloween. They can be created from:
- Pumpkins;
- Orange;
- Papers;
- Salt dough
- Polymer clay, etc.
Below we will look at master classes on creating Halloween crafts from the materials listed above.
From pumpkin

Beautiful glowing pumpkins create the perfect Halloween atmosphere
Pumpkin is an essential attribute of Halloween. According to ancient beliefs, it can scare away evil spirits from your home. The traditional version of crafts made from this fruit is a carved face with lighting inside. To create it you will need the following materials:
- Pumpkin;
- Tablespoon;
- Knife;
- Template with a face;
- Thick needle;
- Spatula.
Step-by-step instruction:
- Let's take a pumpkin. Cut out a circle as shown in the picture and remove the cap. If you want to place a candle in it, start cutting from the top. If you are placing a glowing jar or flashlight, it is better to cut the bottom of the pumpkin.
- Take a spoon and remove the seeds and pulp from inside the pumpkin. This can be done by hand if the pumpkin is very ripe and soft inside.
- Take a ready-made face template or draw it yourself. We apply the finished design to the outside of the pumpkin and use a needle to pierce it along the contour.
- Using a sharp thin knife, we cut out a design on the pumpkin, adhering to the previously outlined outline. Don't rush, the holes should be perfectly straight.
- After the pumpkin has a “face”, we proceed to lighting it. To make a bright glow, you can use a single-color New Year's garland. We wrap it around the jar and place it inside the pumpkin. In this case, the hole in the pumpkin should be at the bottom so that the wire from the backlight is not visible. An easier option to illuminate our craft is to use a simple candle.
Photo gallery: Halloween light-up pumpkin craft

Illustration for point 1

Illustration for point 2

Illustration for point 3

Illustration for point 4

Illustration for point 5
Orange candlestick

What's not a worthy substitute for pumpkin?
Not everyone starts preparing for Halloween early. Many people usually remember it at the last moment. Then you may not have a pumpkin suitable in shape and size at hand. But don't despair: you can replace it with an orange and make a beautiful Halloween-themed candlestick out of it. To make it you will need the following materials:
- Large orange;
- Felt pen;
- Knife;
- Face template;
- Big spoon.
Step-by-step instruction:
- Take a large fruit and cut it into several parts. Cut off about 1/3 of the top, leaving 2/3 of the orange.
- We carefully clean the peel, trying not to damage it. To do this, cut the pulp several times with a knife, divide it into several parts and carefully separate it from the peel.
- We proceed to the most creative part of the work: we give the peel the shape of a smiling and at the same time fearful face. Take nail scissors, they will be easier for you to cut out small details. On the “lid” we make a cut in the shape of a star, create eyes and a nose, and cut a smiling mouth in the shape of a triangle.
- All that remains is to put a drip candle inside and set it on fire. The decoration is ready.
Photo gallery: Making an orange candle holder for Halloween

Illustration for point 1

Illustration for point 2

Illustration for point 3

Illustration for point 4
Origami
You can also create original Halloween crafts from plain paper. Let's consider several options.

This garland can be hung on the wall on the eve of Halloween.
First, let's make a garland in the form of ghosts. It will serve as a wonderful themed decoration for the apartment. To make it we need:
- Roll paper;
- Felt pen;
- Scissors;
- Thread.
Step-by-step instruction:
- Take rolled paper and cut a strip of the desired height to the width. You choose the length of the future garland at your discretion.
- Draw a ghost pattern on a separate piece of paper. Fold the main paper into an accordion shape. Its width should fit the ghost blank.
- We attach the template to the paper accordion so that the ghost’s hands are clearly along the edge of the paper. Let's redraw it.
- We cut clearly along the line, capturing all the small details. The ghosts in our garland are holding hands, so we leave the connecting lines uncut.
- We unfold the garland on the floor and draw eyes and a mouth on each element.
Ghosts can also be located separately from each other. Then they will need to be attached to a thin thread.
Photo gallery: Creating a ghost garland for Halloween

Illustration for point 2

Illustration for point 4

Illustration for point 5
You can also cut out a beautiful pumpkin from paper. To make it you will need the following materials and tools:
- Orange paper;
- Felt pen;
- Scissors.
Step-by-step instruction:
- Fold the sheet into a square and draw a template on it.
- Take small scissors and cut out a pumpkin with a mouth and nose.
- We bend the sheet again over the already cut out mouth. Draw half a triangle and cut it out. These will be the eyes.
- We unfold the sheet and we get a pumpkin.
Photo gallery: Cutting paper pumpkins for Halloween

Illustration for point 1

Illustration for point 2

Illustration for point 3

Illustration for point 4
The bats

Original interior decoration for Halloween
Now let’s find out how to make a beautiful bat. We need very few materials and tools:
- Black paper;
- Templates of different sizes;
- Scissors
- Pencil.
Step-by-step instruction:
- First you need to prepare a template. You can take a ready-made one or draw it yourself.
- Fold the paper in half and place our template on top.
- Carefully redraw the required number of mice along the contour and cut them out with nail scissors.
- If desired, we add faces to them and attach them to the wall using double-sided tape.
Photo gallery: Making black paper bats for Halloween

Illustration for point 1

Illustration for point 2

Illustration for point 3

Illustration for point 4
Crepe paper spider
A simple and, at the same time, original spider can be made from corrugated paper. With its help, you can give volume to the body of our insect, making it look as if it were alive.
To make it you will need the following materials and tools:
- Crepe (corrugated) paper;
- Black cardboard;
- Yellow paper (ideally fluorescent);
- PVA glue;
- Double-sided tape;
- Scissors;
- Pencil.
Step-by-step instruction:
- Prepare black corrugated paper, a small piece of black cardboard and yellow fluorescent paper.
- For a small spider 10 centimeters long, cut a piece of crepe paper measuring 50x20 centimeters.
- We measure a third of the length and bend the paper in this place. This is where the division between the head and the torso will come.
- We squeeze each side into a ball, straighten the folds so that they are on the bottom. Two hemispheres are formed on top.
- We cut out a base from paper of the same shape as the main part of the spider, only slightly smaller in size. We glue it to the bottom using double-sided tape or glue.
- We correct the upper part, giving the spheres volume.
- We cut out 8 identical strips of cardboard, 9 centimeters long and 1 centimeter wide. These will be the legs of our spider. We also make a “tick” for the mustache.
- Fold the strips in half and bend them in the opposite direction 10 and 13 millimeters from each edge, respectively.
- We glue legs, antennae and glowing eyes from fluorescent paper to the body. Now this spider is ready to scare everyone in the house!

Illustration for point 1

Illustration for point 2

Illustration for point 3

Illustration for point 4

Illustration for point 5

Illustration for point 6

Illustration for point 7

Illustration for point 8

Illustration for paragraph 9
Salted dough pumpkin
You can even create a beautiful and unusual Halloween decoration from salt dough!
To prepare the dough, mix a glass of flour with a half glass of kitchen salt. To add flavor, you can add vanillin and a spoonful of vegetable oil. Stir and divide the dough equally into four parts. Add a little food coloring of the desired color to each of them. Our example uses Easter egg dyes. Knead the dough.
Helpful Hint: If you have any unused dough, you can cover it with plastic wrap and use it after a few days. It is important that it does not come into contact with air. Otherwise, it will dry out and quickly become unusable.
Step-by-step instruction:

Salted dough pumpkin will surprise your family
- Roll several orange balls. You can make several different sizes of pumpkins (for example, 3 and 5 centimeters).
- Press them down a little with your finger.
- Take a toothpick and make several dents with it - the relief of the pumpkin. Start from the bottom and gradually change the angle of inclination.
- Roll out small green dough flatbreads.
- Now you need to cut out the leaves and create several relief strips with a toothpick
- Place in the oven and bake until completely hardened at 180°.

These pumpkins can be created at home
A small but original decoration in the form of a skeleton pumpkin can be made from polymer clay.
Step-by-step instruction:
- To begin, roll out the orange layer with a rocker and cut out round pumpkin molds.
- We form identical balls from the figures by rolling the clay in our hands.
- We also roll out a black layer. We form balls of the same size.
- Roll out another orange layer and wrap black balls in it.
- Using a blade, we cut out the eyes of our skeleton pumpkin in the form of small triangles. We make such cuts only for those pumpkins that have a black base inside.
- Just below the eyes, exactly in the middle, we make a triangular hole for the nose. Carefully separating the top orange layer of the bases of the eye and nose, remove it to the black base.
- We make the mouth with curves using a blade. We cut through the top layer of orange plastic to the black clay.
- Using a stack and a ball, we make a depression in the plastic at the top and bottom of the pumpkin.
- Use a toothpick to make grooves by pressing on the base.
- In the formed orange balls we make similar indentations using a stack.
- Fill the entire surface with grooves.
- We form a thin strip of green polymer clay and wrap it around a needle. This will be the top of our product.
- Carefully remove the tendril from the needle. Make a small hole in the top of the pumpkin. We place the antennae there. Spread it a little over the base of the pumpkin.
- From the same green clay we make thin strips that are needed for the tail on the top.
- Place the tail exactly on top in the middle and press it to the surface of the product.
- Now we make leaves. Take the green layer and roll it out. Cut out a leaf from it. If you don’t succeed the first time, it’s better to draw a template on paper and cut it out. Using this contour it will be easier for you to create leaves of the desired shape.
- Use your fingers to bend the edges of the leaves and use a needle to make small indentations that look like veins.
- Before fastening, we make through holes in the leaves and thread metal nails with heads through the entire workpiece. Bake the finished decoration in the oven.
- Finally, the last stage. After firing, degrease each part and cover it with varnish.
Photo gallery: Creating skeleton pumpkins from polymer clay

Illustration for point 1

Illustration for point 2

Illustration for point 3

Illustration for point 4

Illustration for point 5

Illustration for point 6
Illustration for point 7

Illustration for point 8

Illustration for paragraph 9

Illustration for point 10

Illustration for paragraph 11

Illustration for paragraph 12
Illustration for paragraph 13

Illustration for paragraph 14

Illustration for paragraph 15

Illustration for paragraph 16

Illustration for paragraph 17

Illustration for paragraph 18

Illustration for paragraph 19
Balloon pumpkin
To make a beautiful pumpkin balloon decoration you will need the following materials:
- Three orange balls;
- One green ball for modeling;
- sediment;
- Calibrator.
Step-by-step instruction:
- Take the orange balloon and inflate it with a large pump. Then we deflate and re-inflate. On the calibrator we set a mark of 6 inches and measure the desired size of the ball.
- We tie it when it reaches the required dimensions. Divide the ball in half. Grab the opposite side and twist it.
- In the picture below you can see what the workpiece should look like.
- We perform the same manipulations with other orange balls, observing the proportions.
- Take two balls and connect them with a cross. We twist them so that they are on the same level. Then we attach the third ball. Align all the balls along one line. We get the base for the pumpkin.
- Then we take a green modeling ball and make the top of the pumpkin out of it. When inflating, leave a free edge approximately three fingers thick. From the other edge we measure a distance of four fingers. We twist in this place. Then - again into three fingers, twist again. We unite with the help of a ponytail.
- We make a few more bubbles with three and four fingers alternately. We repeat 5 times, after which we combine the resulting composition into a flower. Now we straighten the bubbles so that there are segments of 3 fingers at the bottom and 4 fingers at the top.
- To combine the stem with the base, we insert the bubbles inside the green ball through the cuts of the pumpkin.
- We measure 4 fingers from the base of the leg on the remaining segment of the ball and twist it. We cut off the other part and tie it. This cute balloon pumpkin is ready for the holiday.
Photo gallery: Making a balloon pumpkin for Halloween

Illustration for point 1

Illustration for point 2

Illustration for point 3

Illustration for point 4

Illustration for point 5

Illustration for point 6

Illustration for point 7

Illustration for point 8

Why not make such a cute spider for Halloween?
To make such a beautiful “airy” spider, prepare the following materials and tools:
- Several black balloons;
- Black and white cardboard;
- Scissors;
- PVA glue;
- Thread or rope.
Step-by-step instruction:
- We inflate the balloons. We make one larger (for the body), the other a little smaller (for the head).
- We tie them together with rope or thread.
- We make 8 strips of the same length and thickness from black cardboard. These will be the spider's legs.
- We bend the strips so that they look like legs. Glue them on the sides of the large ball.
- Draw the eyes and nose of the spider on cardboard and cut them out. Glue to a small ball. That's it, our spider is ready.
For Halloween, you can make many beautiful and original crafts yourself. They will decorate your apartment and create the atmosphere of this unusual holiday. We've covered the most popular crafts so you can get ready for Halloween in advance.
There are probably a few holidays on which it is not customary to give gifts. An unusual and bright Halloween is also no exception - you can prepare souvenirs for friends and family for a fun party. What should Halloween gifts be? First of all, original and extravagant. “The Fair Half” is ready to give you some ideas on what you can give on the occasion of “the spookiest day of the year.”
Halloween falls on October 31, which coincides with the height of autumn. It has many symbols, but the status of the most important of them is given to the pumpkin - ripe and bright orange. The top is usually cut off from it, then the seeds are removed and a face is cut out on the surface, which can be either ominous or perky. A burning candle is placed inside such a pumpkin - the so-called “Jack Lantern” or “Jack Lantern” is obtained. According to beliefs, it scares away evil spirits and evil spirits. Actually, this symbol is played out most often in the theme of Halloween gifts.

Halloween gifts: general design rules
Interestingly, in the USA and Western European countries it is not customary to give gifts on Halloween, except for the custom of pampering children with sweets. The tradition of giving each other various things of a funny or utilitarian nature on this occasion originated in Russia after the holiday itself took root here. Usually the role of gifts is played by souvenirs and trinkets with some humorous overtones.

The heroes of Halloween are witches, warlocks, werewolves, ghosts, voodoo, mummies, black cats, bats, crows, owls, and spiders. All these images, which are directly related to the world of evil spirits, can provide excellent ideas for gifts and their decoration. It’s great if you think of complementing them with traditional autumn motifs - images of crimson and yellow leaves, ripe ears of corn, bunches of rowan berries, acorns, nuts and so on. By the way, all these decorations are perfect for decorating your house for Halloween.

What to give for Halloween: the best ideas
1. Sweet gifts. At Halloween parties, it's common to play the game "Trick or Treat!" (“Trick or Treat!”). It is organized specifically for children, but adults, as a rule, do not remain aloof. The meaning of this fun is that the participant must make others laugh, and as a reward for a successful joke or hilarious antics, he will receive sweets. Candies, gingerbreads, cakes, and cookies are usually decorated in Halloween style. Of course, it doesn't always look appetizing, but it's something to laugh at. On what principle are they baked? Take a look at our article about New Year's cookies and try to bake similar sweets, only with a “Halloween” character.
2. Flashlights. They are quite easy to make with your own hands, using small pumpkins as a base. If you don’t have these on hand, it doesn’t matter: you can use ordinary glass and jars, painting them with acrylic paint or pasting them with paper. A lit candle is placed inside the flashlight - an original gift is ready!

3. Dolls and soft toys. Can you sew or knit? Perfect! It seems that it will not be difficult for you to make a rag doll in the form of a witch, a goblin, an insidious sorcerer or a good ghost. From threads and wooden sticks (even matches will do) you will get miniature “voodoo”. Naturally, they are not intended for dubious magical rituals, but to maintain the “Halloween” mood.
4. Pencils, boxes, boxes for storing various small items. It’s not at all difficult to decorate them in the “a la evil spirits” style. Some people have access to the technology of hand-painting with paints, some will prefer fabric appliqué, others will prefer the decoupage technique. Even a child can draw the same pumpkin or spider in a web. Don't be afraid to fantasize!
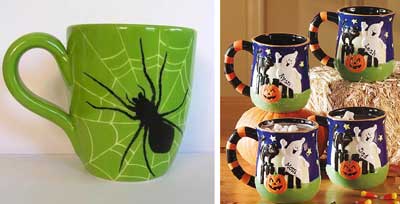
5. Mugs and plates. Unfortunately, not all stores offer souvenirs of this type. But the search process is simplified in many ways if it is carried out via the Internet. As a last resort, your own hands will come to the rescue. It is not at all necessary to paint the mug - just sew a nice warming cover for it: this thing, by the way, is now in great fashion.
6. Fridge magnets. A toothy pumpkin or a black cat will happily live on the refrigerator door of one of your friends. Buying Halloween-themed magnets is, in principle, not a problem. You can collect a whole collection if you're lucky.
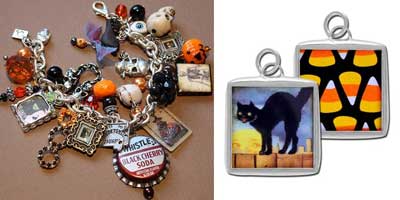
7. Jewelry, keychains, accessories. The black and orange color scheme itself brings to mind Halloween. Therefore, various accessories and jewelry, including brooches, medallions, ankle and arm bracelets, and keychains, decorated in these colors, are a worthy theme for a themed gift. We also don’t forget about the plots: everything mystical and gothic is welcome - for example, stylized images of skulls, bones, eyeballs, mysterious signs.
P.S.: We are waiting for new ideas from you about what to give for Halloween. Please post them in the comments to this article.
We also recommend reading the articles:
Halloween manicure: 16 photos, awesome manicure ideas
Master classes on scrapbooking - Halloween card
Makeup for Halloween: TOP 10 stylish photos
Dikmi: Although the night of All Saints is considered a time for the triumph of evil spirits, the main purpose of Halloween, after all, is not evil and meanness in its nightmarish and offensive essence. Remember the history of the holiday? Yes, yes, the one according to which once a year the most terrible demon leaves the place of his imprisonment and goes out to destroy good. And in order not to fall into his clutches, kind and good people turn outwardly into terrible and evil creatures similar to him. But only externally! And inside we are all sincere, nice and sincere human beings. Consequently, gifts should be externally in tune with the general atmosphere of fear, but inside - tasty and beautiful. If you agree with me, you are welcome to my article!
GIFTS-SYMBOLS IN HONOR OF HALLOWEEN
Black cat
This poor creature was also once unlucky. Someone somehow decided that the black color of her fur coat brings bad luck to those passing by, flying by, etc. That’s how she lives, not actually doing harm to anyone (sour cream stolen from the table doesn’t count!) but in eternal fear get a kick, or an unkind word after. However, some Indian tribes consider the black cat to be the goddess of fertility and wisdom. That’s why they always give each other black kittens as housewarming gifts. So that there are children in the house, and enough intelligence to increase wealth and take care of the hearth. Like this! If you also like the Hindu version, give your friend a tiny homemade black cat this Halloween.
To make this wonderful creation you will need only 15 minutes! And, of course, some improvised materials.
So, take a large black plain sock. Cut the elastic just above the heel in the shape of a semicircle (later there will be ears in this place).

We fill the sock with synthetic doll fiber or cotton wool (we form the head and body)

Sew the “top” and form black ears

We decorate the face with two green button eyes and a felt pink mouth. And also - tie a big orange bow around the pussy's neck! The gift is ready!

Let's continue the theme of black unlucky cats! Although, it would be better to say cats! Look at this handsome papier-mâché guy! He smiles at you so sweetly, as if he wants to please you with all his heart! Take it to your house, pour candy into a pumpkin, and make your friends happy with “twin brothers”!

Ghosts
Good Caspers and evil ghosts from other cartoons and feature films are almost the main characters of Halloween. There are many different variations on the theme of ephemeral afterlife creatures, but we will offer you a few that we especially love.
So, felted ghost keychains. Such a gift will not only delight (and not frighten) even your youngest guests, but will also warm your hands in cold weather. Felt is a very gentle, warm material, and making a weightless ghost out of a white piece is as easy as shelling pears.

Another interesting DIY haunted gift option is a ghost bell tower.
What will you need?
. 2 liter plastic bottle
. Dense foam disc
. Tennis balls
. toothpicks
. Wallpaper glue
. Acrylic paints orange and black
. Dry gloss (orange)
. Gauze
. fishing line
. Newspaper
. Thin branches
. Black marker
. Sequins
. Knife, sharp pencil, brushes, large, sharp needle
How to do it?
To begin, cut off the bottom of the plastic bottle, remove the label, and dry the container. Carefully “hide” the uneven, cut edge in the soft foam of the disk-bottom of the bell tower. Paint the foam base orange and cover it with glitter. Let dry.
Next, make the ghosts.
Insert one wooden toothpick into each tennis ball. Cut circles with a diameter of 5-7 cm from gauze and soak them with wallpaper glue. Remove excess glue and cover the balls with gauze, forming beautiful folds. Draw on the ghosts' eyes and mouths using black acrylic paint and a thin brush or black marker. Use fishing line to attach the casts to the branch. Then, carefully insert the branch into the foam disk, cover the structure with a plastic cap, and secure it at the bottom with glue.

Decorate the top of the bottle with glitter. You can even give such a gift to a teacher at school! Surely he will appreciate your creativity and skill!
Another gift option is a ghost washcloth.

It’s not difficult to make such a cutie either. You will need a white mylar washcloth, a wooden or plastic cane, a flower pot, artificial moss, polystyrene foam, glue, a couple of sheets of white cardboard and doll eyes.
How to do it?
Fill the flower pot with polystyrene foam, insert a stick and fill it with mounting adhesive. Let it dry and stand. Then, carefully cover the foam in the pot with a circle of artificial moss and secure with glue. Cut out handles and a gravestone from cardboard. Attach a washcloth to the top of the stick, glue handles and doll eyes to it. To the moss below is a slab. And then - start your fun journey to the party, already with a gift!
If you don’t feel like you have enough skill, but really want to give someone a ghost, use the option ghost-packing. Simple and tasteful! And most importantly - within the Halloween theme!

We bring to your attention several interesting crafts that you can do with children on the eve of such a mystical holiday as.
So, DIY Halloween crafts
1) Jack-o'-lantern or jack-o'-lantern
This is the most important attribute of the holiday. These lanterns can be used to decorate a house, a room, or small lanterns for a holiday table. In addition, various vases are cut using the same technique. The only difference is that instead of a candle, a container of water is placed in the pumpkin.
You can read in detail about how to carve a pumpkin for Halloween, so we won’t dwell on this position for long.
2) Gauze ghosts
Children and adults love to dress up as ghosts for Halloween parties. Well, houses, apartments, rooms and even streets are decorated with crafts in the form of ghosts.
How to make such a Halloween craft with your own hands?
To make a cast you will need the following materials:
1.
A large piece of gauze.
2.
Water.
3.
Starch.
4.
Decoration materials.
5.
Plastic bottle, ball, wire for frame.
6.
Spray.
1.
First, you need to make a frame from a plastic bottle, a ball and wire. Secure the ball with tape.
2.
Cover the resulting structure with gauze.
3.
Starch must be diluted in water and applied to gauze using a spray bottle.
4.
That's all, the ghost is almost ready. The main thing is to give it time to dry. To speed up the process, you can use a hairdryer.
5.
After the gauze is completely dry, remove the frame.
6.
Using various decorative elements, we draw, sew or glue the ghost’s eyes.
3) DIY Halloween crafts - little ghosts made of gauze
They are made in the same way as the previous ones, but the frame is prepared differently and PVA glue can be used instead of starch.
Materials for making ghosts:
1.
Balloon.
2.
Gauze.
3.
Two plastic or cardboard cups.
4.
PVA glue.
5.
A bowl.
6.
Scotch.
Cast manufacturing process:
1.
We place one cup on top of another according to the bottom-to-bottom principle. We fix it with tape. Place a small balloon on top of the glass.
2.
We take gauze and soak it with glue. Place it on the structure and wait until it dries.
3.
After the gauze has dried, carefully pierce the ball.
4.
Glue or draw eyes on the ghost.
5.
We hang it from a chandelier, door, trees, or hang it on hooks.

4) Paper pumpkins
To work you will need:
1.
Orange and black paper (double sided).
2.
Black, white, green, orange cardboard for decorating pumpkins.
3.
Scissors.
4.
Glue.
5.
Skewers or straws for cocktails.
Craft making process:
1.
Cut out a strip of orange or black paper and fold it like an accordion.
2.
Roll the accordion into a circle and glue it together.
3.
We decorate pumpkins with scary decorative elements: eyes, noses, ears, eyebrows.
4.
Glue pumpkins to skewers or cocktail tubes.

5) DIY Halloween crafts - lamps made from cans
These lamps can be used to decorate window sills, furniture, porches and approaches to the house.
To work you will need:
1.
Banks.
2.
Tablet suppositories.
3.
Colored paper or paints (gouache, acrylic).
4.
Marker.
5.
Glue.
Lamp manufacturing process:
There are two options you can use.
First:
- paint the jars with gouache or acrylic paint and draw scary faces, spiders, ghosts, cobwebs on them;
- Place a tablet candle inside the jar.
Second:
- cover the jars with orange colored paper and stick on them eyes, a nose, a mouth cut out of black paper, or a scary drawing in the form of Baba Yaga on a broom;
- Place a candle in the jar and light it. Now the lamp is ready.

6) Read how to cut and make bats that can be beautifully used to decorate walls.
New articles
- We sew haute couture and simply beautiful models
- Horrible incidents in children's camps
- Educational activities and games for little ones Entertaining tasks for children 2 years old online
- How to grow long hair Hair care at home
- The child does not want to go to school: what to do?
- Diwali: what is celebrated in India at the festival of lights
- International Navruz Day When is the Navruz holiday in the year?
- How to spend a day off with children: the best ideas and options
- Stage-by-stage development of a child from birth to one year
- Crafts - do-it-yourself birds from different materials
Popular articles
- How and what to feed a child?
- Choosing what to give for the birth of a girl
- Which camp to send your child to: instructions for thoughtful parents
- How did the ancient Greeks dress?
- Types and styles of family education
- Scenario of the event for the Day of the Elderly "autumn bouquet of congratulations"
- The most beautiful dolls in the world (photo) The most beautiful monster high dolls
- Agnès Martin-Lugan - you will succeed, my dear Agnès Martin, you will succeed
- Why are you attracted to your ex-wife? Why are you attracted to your ex-boyfriend?
- Happy birthday greetings to a 2 year old boy