Do-it-yourself crochet embroidery on fillet mesh. Hand-made fillet weaving and fillet-guipure embroidery
Good afternoon to all blog readers!
Today we will talk about the combination of two types of needlework - crocheting and embroidery. I think any needlewoman can do embroidery on mesh.
First, I invite you to look at the outfits of the English queen and princesses.
Have you ever been to England? Have you ever been to the Victoria and Albert Museum? What about Kensington Palace? So I wasn’t. 
Galina Kogan, already known to many readers for her , visited the above-mentioned museum and palace for us and took photos of the dresses of Queen Elizabeth, Princess Margaret, Princess Diana, and Queen Victoria especially for our blog!
All dresses are decorated with handmade embroidery. Gorgeous royal dresses! And what lace!


In those ancient times, only very rich people could afford such stunningly beautiful handmade things.
But what prevents us from looking like a queen?
We can do royal embroidery for ourselves. Even if the patterns are not so complex, it is naturally impossible to repeat masterpieces, but we can easily cope with simpler work. For example, embroider a scarf or handbag.
Embroidery on mesh
Handicrafts are fraught with great creative possibilities. Embroidery “gets along” well with crocheting; the two types of needlework seem to enrich each other. Using these two techniques, you can not only decorate clothes, but also create lovely items for home comfort.
To embroider on mesh, first prepare the fabric mesh itself. Some of the threads are pulled out along the base, and the remaining threads form a grid of squares. The mesh is sheathed and a pattern is embroidered on the cells using dowels, spiders, goats and other seams. This embroidery gives the impression that the pattern is contained in the fabric itself, and resembles a lace fabric.
But this method requires great skill.
Or you can crochet the mesh using the fillet technique, and then embroider a pattern on it, which is much simpler, faster and no less beautiful.
Embroidery on fillet mesh
The mesh is knitted, immediately completing the pattern, with double crochets (in empty cells between the columns there are 1-2 chain loops, in filled cells - instead of chain loops, double crochets).
The hook is taken twice as thick as the thread.
The finished mesh needs to be moistened from the inside out with thick starch and dried.
Then the mesh is attached to a wooden frame and the pattern is embroidered with a thick needle and thread of the same color as the mesh, preferably silk.
Original curtains
Using the mesh embroidery technique, you can make interesting, original curtains for the kitchen. Here are patterns for directly embroidering curtains and lambrequins.


Flowers, leaves, stems and butterflies are stitched onto the flooring. First, all the cells are filled in, and then the pattern is traced along the contour with a stitch forward and a needle in one and the other direction.
The middles of the flowers and small motifs are made with a cross.
The horizontal stripes are embroidered with a stem stitch.
Using the technique of grid embroidery, you can make tablecloths, panels, paintings, and decorative pillows.
For example, such a beautiful tablecloth with roses is made using the fillet technique, and if you also do embroidery on a grid, it will be charming, elegant, and will look like a king!

By the way, I recently posted diagrams for . Mesh embroidery will make these pillows even more gorgeous.
I express my deep gratitude to Galina for the pleasure she provided and the photographs taken for us! Galya is already almost becoming my co-author. She is simply a storehouse of different ideas, you will see!
Don't miss the next ideas for home comfort! ( Just blog news to your email).
Olga Smirnova
P.S. Today I saw an interesting video about a little boy and his wonderful talent. Look! This child has a great future.
Bargello - embroidery on mesh. Cute activity, fun and useful. Are we mastering it? The result is a voluminous and bright surface. Thick threads + thick needle = Florentine embroidery.
Bargello is an ancient Florentine embroidery, on the basis of which stunning fiery patterns are created on the canvas. This Italian bargello embroidery is used to create voluminous colorful patterns and ornaments. The figures embroidered in this way have both a sharp shape and a slightly smoothed – rounded shape.
First, let's admire the throw pillows embroidered using the Bargello technique.

And now there is embroidery on plastic mesh (canvas) - this technique is used to embroider mesh for bags, various boxes and boxes, caskets and even rugs.

They embroider on mesh with different threads: silk on large bobbins, wool for knitting, braid and thick bulky yarn. The order of embroidery is as follows: first, a large and main pattern is embroidered, and then it is filled with threads of a different color.


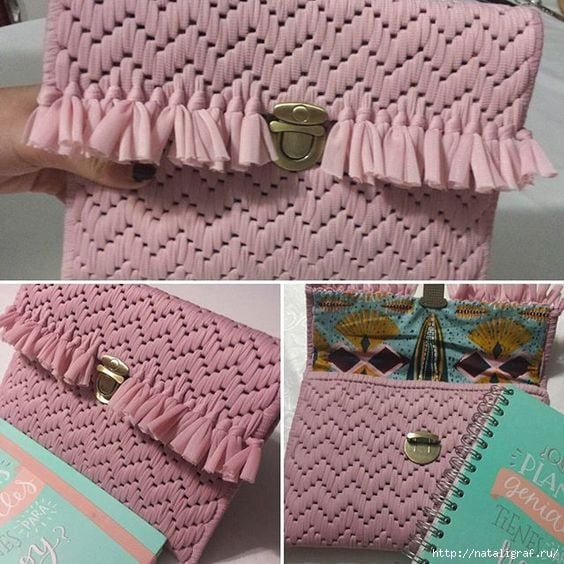
And here is a small purse or cosmetic bag.
Bargello or Florentine embroidery technique on mesh


What is plastic canvas good for? Yes to everything. Here are some examples:
napkin coasters

A house is already handicraft of the highest standard: there is imagination, great desire, and skill

A couple of illustrative examples. Stitches and needle. The width and size of the stitches can be completely different. The main thing is to decide what you want.


Napkin embroidered with braid

Lace embroidery

We hope you liked the ideas! As you can see, you can embroider using the Bargello technique on a grid not only with regular threads, but also with laces, ribbons and yarn, and also use leftover threads, the main thing is that you like the end result!
Embroidery on a grid and its technique (video)Embroidery on a grid and its technique (video)
Mesh embroidery or fillet embroidery is a great way that helps needlewomen create beautiful and unique things. It is based on embroidering empty and filled cells. When they are put together, the desired pattern is obtained.
Embroidery on mesh in its finished form will look original and unusual. Things created in this way resemble expensive antiques. The technique presented below is a simple one that will work for a wide range of patterns. 


Preparing for work
To get started you need a grid. You can make it yourself or buy it at a craft store.
Several ways to create your own embroidery base:
- the mesh is cut from fabric. To do this, you need to cut the threads of the fabric in certain places and pull them out;
- For weaving the warp, you can use a specially designed shuttle. At the end of the work, a classic mesh is obtained;
- Crochet. The mesh is a simple pattern that even a novice needlewoman can knit. To make empty cells you need to alternate double crochets with chain stitches.
When purchasing a ready-made mesh in a store, you need to pay attention to its size and location of the cells. 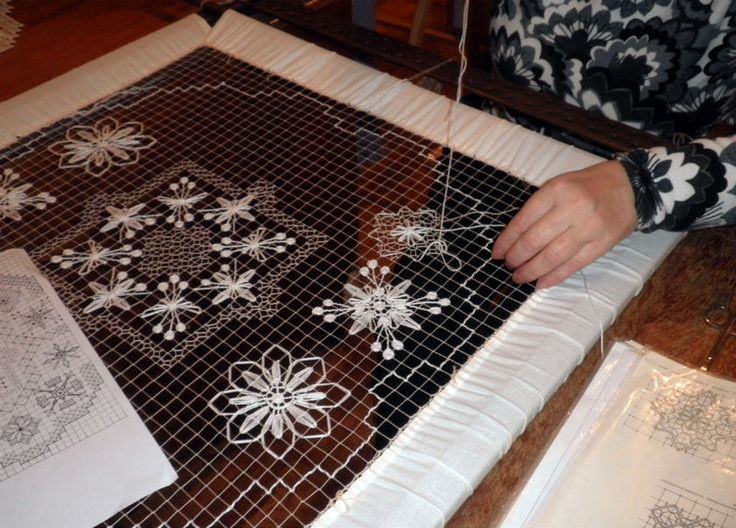
Tips to help while embroidering:
Grid embroidery technique

Embroidery on mesh can be done with multi-colored threads. This rule does not apply to embroidering curtains;
Varieties of methods for embroidering on a grid
This embroidery can be done in two different ways - darning and weaving.

How to finish embroidery on a grid correctly

Any embroidery on mesh must be finished correctly. There are several simple ways to get the job done:
Needlewomen can choose for themselves the most optimal way to secure the working thread to the mesh. In this case, special attention should be paid to the thickness of the thread used for embroidery. If it is thick, then it is better to finish the job using the first method. Otherwise, the borders of the pattern on one side will look ugly and denser.
The finished embroidery can be used as an independent gift. Some needlewomen put their work into photo frames to give gifts to friends and family. This can be a unique decorative element when decorating a variety of handmade products.
The use of grid embroidery in the modern world

There are several basic ideas that will help you use ready-made patterns embroidered on mesh:
- thanks to this product, it can be used as a stand for hot dishes;
- embroidery can be stretched onto a cardboard frame to form part of a large number of decorations, or as a lid for gift boxes;
- It is customary to decorate towels, tablecloths, and many other things with grid embroidery patterns.
Master class on embroidering stripes on a grid
Experienced needlewomen recommend using a mosquito net for work, because it has certain differences from plastic canvas. This basis includes the main advantage - the arrangement of rows of cells is not at right angles. Craftswomen can divide the finished work into optimal squares. The direction of embroidery should only go from the corner and strictly diagonally.


Mesh embroidery will help all needlewomen create excellent and one-of-a-kind items. They can be a wonderful gift or present for any event.
Video: different mesh embroidery techniques
Comments
Related posts:
 Satin embroidery types and techniques (photos and videos)
 Embroidery on knitted products: seam technology
Mesh embroidery, or, as it is also called, fillet embroidery, is a great way to create a truly unique item. Embroidery is based on the effect of empty and filled grid cells, which together form a specific pattern. Embroidery on mesh looks unusual and original; things resemble antiques. The embroidery technique is very old, but quite simple and suitable for a large number of patterns. It is also possible to adapt patterns for crocheting using the fillet technique to embroidery using this technique.


For embroidery using the fillet technique, you first need a mesh. You can make the mesh yourself, or buy it ready-made in craft stores.
You can create a network yourself in several ways:
- You can cut a mesh out of fabric. To do this, you need to trim the threads in the fabric at equal intervals and pull them out so that you get a mesh. Traditional embroidery is often performed using this technique;
- Using a special shuttle, the mesh can be woven. This produces a classic net; a similar technique is used when weaving a fishing net or mesh - string bags;
- The mesh can be crocheted. Mesh is a very simple knitting pattern that even a beginner can easily master. To form empty cells, double crochets are alternated with several chain stitches, and the stitches are knitted strictly one above the other. The fillet crochet technique is based on the same technique. Knitted items made using this technique are very reminiscent of mesh embroidery.
As already mentioned, you can also buy ready-made mesh in the store. When purchasing a mesh, you need to pay attention to the size and location of the mesh cells. The size of the finished work will depend on their size. In a classic grid, the cells should be located strictly above each other, and not diagonally.
The pattern on the finished mesh is formed by filling some cells, the remaining cells remain free.
Learning to embroider using a simple “Heart” pattern as an example.
We cut the finished mesh to size. We will need a blank measuring 15x13 cells:
As you can see in the picture, the pattern itself is much smaller, but it is necessary to leave a few squares on each side to attach the mesh to the frame for embroidery. It is necessary to embroider on a well-stretched and secured mesh, otherwise the design will be deformed. For convenience, the net can be sewn or glued (for example, with construction tape) to a sheet of thick cardboard slightly larger than the workpiece. You can sew the workpiece using running stitches or a “back needle” seam, the main thing is that the net is held tightly and does not stretch. If the net is made of very soft threads, to give it shape, you can also dip it in gelatin diluted in water, then spread it on a horizontal surface and let it dry. Dried gelatin will give the product rigidity (a sample of mesh attachment can be seen in the figure)
For ease of use, the pattern in the form of crossed out cells can be transferred directly to the cardboard mount.


Embroider the marked pattern
We fill the widest part of the heart horizontally with a “darning” stitch. This seam is used when you need to fill a large number of cells in a row. One stitch of a darning seam immediately closes a large number of canvas cells, forming a kind of “flooring”. The seam is performed as follows: the needle is passed alternately under the cell, then above it, and so on until the end of the row that needs to be filled. In the next row, the stitches are placed in a checkerboard pattern relative to the previous row, until the cells are completely filled. The finished embroidery looks like “wickerwork”.
However, in our case, you need to embroider not only horizontally, but also vertically. To ensure that the embroidery lies evenly on the mesh, we embroider as follows:
- We embroider two rows in one square with a darning stitch;
- We move on to filling the vertical rows (the stitches will overlap the horizontal ones and intertwine with them). The rows should be filled in sequentially, leaving no gaps. Weave the threads at the junction of the vertical and horizontal rows in the same way as when working with a mesh: alternate stitches above and below the main thread (see the figure for an example of filling the cells of the horizontal and vertical rows)
The horizontal rows should be filled from top to bottom, intertwining them with the vertical ones. Be careful when processing corners: Only fill in the cells marked with an “x”, otherwise the pattern will not work.
Having embroidered half of the pattern in this way, as shown in the figure above, we reach the point where it is impossible to continue embroidering without breaking the thread. In order to continue embroidering, you need to stretch the thread along the edge of the already embroidered cell. This embroidery method helps to properly and accurately process the edge of the embroidery.
The technique of threading around the edge of the product is shown in the figure below. The thread must be pulled under point “a” and over point “b” (the product in the figure is shown on the side). Then the thread must be pulled through the side loop so that it does not tighten the loop. After this, the thread can be pulled under point “c” and the embroidery of the pattern can continue.
We continue to embroider the pattern until the end, pulling the thread along the edge of the pattern. At the moment of completing the embroidery, you need to return almost to the starting point from which the embroidery was started.


Finishing the embroidery
You can do this in several ways:
- Release the end of the thread at the starting point of the embroidery. Carefully tie the end and beginning of the thread together, try to tie the knot so that it is flat and does not stand out against the background of the pattern.
- Pull the thread along the edge of several embroidered cells of the finished work so that the thread is securely fastened. Then the thread can be cut.
The choice of method for securing the thread depends on the personal preferences of the craftswoman and on the thickness of the thread when embroidering. If the thread is thick enough, it is better to finish the work using method number one, because... otherwise, the border of the pattern on one side will look much denser than on the other. The knot in this case will look more neat.
The finished embroidery can be used as an independent gift, for example, by inserting it into a photo frame. However, it can also be used as a decorative element when decorating various handicrafts or gifts.
.
...So, fillet embroidery
.
What it is?
This is one of the types embroidery on mesh.
(... to be honest, this thread was inspired by the wonderful works and master classes on stitching Alla Zhukova, this is also a type of embroidery on a grid
, which made me overcome my laziness...:))
Let's figure it out a little.
Embroidery on a grid involves 2 points.
1. You need a mesh.
2.Need an embroidery method.
Where does the mesh come from?
a) We can trim threads in fabric, entwine the resulting cells - you get an entwined mesh cut into the fabric. This approach is typical for traditional folk art.
b) The grid is possible weave using special fillet needles. It is this mesh that is used for classic fillet embroidery.
Fishing nets, string bags, etc. are woven in the same way. There, instead of a needle, a shuttle is used.
c) The grid is possible to tie crochet
You can also imitate embroidery by knitting a pattern on a grid - you get the well-known crochet fillet.
Or you can try embroidery on a knitted mesh - you will get a very interesting decor for knitted items.
d)...And finally - the most progressive way :)
The grid can be take the finished one.
- Where?
- Yes, in the curtain store.
True, tulle in a simple check made of pure cotton is not so easy to find now... But it is available. In kr. case, subpolyester. - But, of course, I have stocks of cotton tulle, and I know how to weave a mesh (see point b)).
So from time to time I turn my gaze to my sewing closet, take out a piece of tulle from there - and do this most pleasant thing.
==============================================
Now the second point.
Embroidery methods.
There are two types of fillet embroidery.
The first one is plain fillet.
Second - fillet guipure.
How are they different?
Plain fillet the meaning is akin to counted embroidery, such as cross stitch. With this embroidery, filled and unfilled grid cells alternate. Therefore, you can use any patterns for cross stitch.
There are several simple seams for filling the cells. The main ones are linen(like darning) and flooring. Some cells are crossed out, others remain empty - this is how a picture of a simple fillet appears.
Fillet guipure uses different techniques such as thread pulling, lace stitches, spiders, wheels, posts... characteristic of needle lace.
Using these techniques, flowers, stars, twigs, berries, leaves are embroidered on the mesh - and very beautiful patterns are obtained.
=====================================
The theory is outlined.
It's time to move on to specifics :).
First, I'll show you a few of my works.
I would like to note that if you use a ready-made mesh, it is quite fast work (with some practice, of course).
But very beautiful!
Personally, I do this work, like many others, without hoop, just in your hands.
But this is because from experience I have very sensitive hands, and I feel the tension of the thread with an accuracy of a nanometer :).
========================
So, NAPKIN technique plain fillet.
Ready-made cotton mesh was used, cell size 6 mm.
The diameter of the napkin is about 60 cm.
Crocheted.
A cross stitch pattern is taken.
Variegated floss threads.
Seam flooring.


Here you can see some tricks that significantly speed up the work :). However, these tricks give the work a more modern character.
First, the mesh is ready.
Secondly, instead of alternating and matching colors, variegated thread was used.
This was my first experience of this kind (with variegated thread) and I found it to be interesting! The flowers came out as if illuminated... I love this napkin!
...............................
New articles
- How to make original nail polish?
- Photocopier of life or “Why situations repeat themselves
- Hand-made fillet weaving and fillet-guipure embroidery
- Flower brooch made of threads in Tenerife Video: weaving a flower from threads on a special machine
- Step-by-step master class on topiary made from pine cones and acorns Topiary made from acorns, cones and rowan berries
- Congratulations on the wedding from the groom's relatives How to congratulate on the wedding from relatives
- Festival “5 lectures on love” Russian State Children's Library
- Chamomile competition for bride price
- Pine branch with corrugated paper cones
- A tie is not a decoration, but an attribute of dependence. What does a tie mean for a man?
Popular articles
- The best seduction schemes at work
- How to make a bead bracelet with your own hands Bracelet from pins and beads as a business
- The House Where Faces Appear The Faces of Belmes: The Greatest Paranormal Mystery of the 20th Century
- Simple ways to curl your hair without curlers and curling irons
- Military pension for long service
- I have to wash my hair every day, what should I do?
- Healing coconut: hair masks from coconut oil at home How to make a hair mask with coconut oil
- Current WHO recommendations for breastfeeding
- Working with masks in Photoshop How to remove a quick mask in Photoshop
- New Year's clothes for a cup (mug)