DIY New Year's cards. DIY New Year cards
In stores today you can find New Year's cards for every taste. But I think that homemade ones are much warmer. After all, when we make something for someone with our own hands, we put our love into it.
Below we have collected ideas for beautiful, original and, most importantly, “quick” New Year’s cards, the creation of which does not require any rare materials - beautiful paper, cardboard, and colorful ribbons and buttons lying around the house.
Volumetric Christmas trees

Volumetric Christmas trees made of white and colored paper are so simple to make that you can make them at the last moment.

Making 3D Christmas trees even faster. All you need is a ruler, sharp scissors and cardboard
Penguin

We really liked this penguin, well thought out. You will need black and white cardstock (or white paper), an orange paper triangle, and 2 miniature snowflakes, which we all know how to cut out. The eyes are, of course, the highlight of the postcard, and you’ll have to look for them at a hobby store (or tear them off from an unnecessary children’s toy, with the children’s consent, of course).
Gifts

This cute and simple card requires 2 sheets of cardstock, a ruler, scissors and glue. And also pieces of wrapping paper that you have left over from gift wrapping, ribbon and ribbon.
Santa Claus

A friendly Father Frost (or Santa Claus) can be made in just half an hour. The red hat and pink face are strips of paper glued onto a card or gift bag. The fur of the hat and the beard are obtained like this: you need to take drawing paper and simply tear off strips of the desired shape to get uneven edges. Place on the card over the red and pink stripes. And then draw two squiggles - a mouth and a nose - and two dots - eyes.

Simple drawings

An irresistible idea in its elegance is to draw Christmas balls with patterns with a black gel pen. The main thing here is to draw the correct circles and mark the lines for the patterns. Everything else won’t be difficult—the stripes and squiggles that you draw when you’re bored.

The same principle that underlies the postcard with black and white balloons. Simple silhouettes, painted with simple patterns, this time in color - best done with felt-tip pens. Warm and very cute.
Many, many different Christmas trees

For the first, you will need decorative tape or colored cardboard (with or without glitter - now you can easily buy these at an office supply store or in hobby stores). For the second - elegant straws for drinks and good glue.

This is where patterned paper or cardboard left over from children's crafts or wrapping paper for gifts will come in handy. The Christmas trees are sewn in the center - this is not at all necessary, you can glue them. But if you really want to, you first need to make holes with a thick needle along a ruler, and then sew with thread in 2 rows - up and down, so that there are no gaps left. Draw a snowball with white gouache.

A laconic and stylish idea is a grove of Christmas trees, one of which is glued to foam double-sided tape (and therefore rises above the rest) and decorated with a star.

This card requires 4 or 3 layers of cardboard (you can do without the red one). You can use paper rather than cardboard as a color layer. In the top, white one, cut out a Christmas tree (a stationery knife will do this well) and glue it with double-sided tape for volume.

A round dance of Christmas trees made from various leftover cardboard, scrapbooking paper, and wrapping paper, tied with a simple ribbon and decorated with a button. Try playing with colors and textures - here you can find an incredible number of options using different colored ribbons, paper and even fabric.

Wonderful watercolor so in the spirit of New Year and Christmas! A simple watercolor sketch can be done by anyone, even those who last painted in school. First, you need to outline the patterns with a pencil, color them, and when dry, carefully erase the pencil sketches and complete the patterns with a felt-tip pen.
Winter landscape

For this card it is better to use structured cardboard, but you can get by with regular, smooth cardboard - it will still turn out impressive. Using sharp scissors, cut out the snowy landscape and moon and paste it onto a black or dark blue background.

Another, white-green, option for a winter landscape that will take a little more time. If you find velvety cardboard (remember, back in school they made crafts out of this), it will be great; if not, you can simply color the Christmas trees with a felt-tip pen. Snow is polystyrene foam disassembled into peas. You can also use a hole punch to make circles out of cardboard and glue them to the card.
Hugging snowman

The author of the blog My kid craft made this snowman with her children. The snowman throws his arms up in joy when the card is opened. You can write your wishes inside. It will be interesting for children to make an applique (and paint their hands and cap),
More snowmen

Snowmen peering inquisitively into the starry sky will look better if you can find a bright ribbon for a scarf.

For that postcard on the left, You need unpainted cardboard, white drawing paper and foam tape to glue the snowman with. Drifts are made simply: you need to tear off the drawing paper so that you get a ragged wavy edge. Fill it in with a blue pencil and blend it with anything, even with your finger or a piece of paper. Also tint the edges of the snowman for volume. For the second You will need buttons, a piece of fabric, eyes, glue and colored markers.

You will want to keep this card for a long time. All you need are circles made of cardboard, a nose and twigs made of colored paper. All this must be assembled using double-sided bulk tape. Draw eyes and buttons with black paint, and a snowball with white gouache or watercolor.
Balloons


Balls are one of the main symbols of the New Year and Christmas. These are made from velvety colored paper and ribbon. But balls are such a win-win option that you can allow yourself to fantasize: make balls from patterned paper, wrapping paper, fabric, lace, cut out from a newspaper or a glossy magazine. And you can simply draw the strings.

Another option is to glue the paper with a pattern on the inside of the card, and cut out circles on the outside with a sharp stationery knife.
Volumetric balls


For each of these balls you will need 3-4 identical circles of different colors. Fold each one in half and glue the halves to each other, and the two outer halves to the paper. Another option is colored stars or Christmas trees.
Multi-colored balls

Wonderful translucent balls are obtained using a regular eraser on a pencil. It’s worth starting with a pencil to outline the outline of the ball. Then dip the eraser into the paint and leave marks on the paper. Fun and beautiful.
Cards with buttons
Bright buttons will add volume to the cards, and will also evoke subtle associations with childhood.

The main thing is to find buttons of interesting colors, but the rest is up to you to “hang” them on the Christmas tree, on a branch with cute owls, or on newspaper clouds.

What could be simpler and cuter than a button snowman? The second card will require more effort, but the result is worth it.
Children really love to make something with their own hands before the New Year; under no circumstances should you deprive them of this joy. In this master class I will show 10 options on how to make New Year's cards with your own hands with step-by-step photos. These unique New Year cards will be a wonderful gift for grandparents, mom, dad and friends.
Today on the Internet you can find all kinds of congratulatory miniatures, emoticons and incredible masterpieces that can be sent to anyone by e-mail. You don’t even need to invent words; any phrase can simply be copied. But is this comparable to a postcard made by yourself? Will the image on a flickering cold monitor screen have such positive energy?
How to make New Year cards with your own hands
New Year card with yellow pig for New Year 2019
For the New Year 2019, we invite you to make a custom card with your own hands. It is unusual in that it depicts the cute face of a pig, and the animal is yellow. You shouldn’t be surprised by this turn, because a new era is coming, albeit a short one - the year of the yellow pig.
Very soon, man's good friend, the devoted and cheerful dog will be replaced by a wise and generous pig. At all times, this animal has been known as an indicator of wealth; it is not for nothing that piggy banks are depicted in the shape of a pig. We will not depict the entire figure on cardboard, but will only make its head. The round piece will become the central one.
What you need to prepare to complete the craft:
- thick cardboard of any color;
- yellow plasticine;
- additionally other colors for making all parts of the animal’s face, for New Year’s decorations, for the inscription.
Prepare green (or another color) cardboard for the base; you can cut the edges round. And also knead the yellow plasticine in your hands. Of course, the pig can be made more traditional - pink, but for a real symbol yellow is more suitable.

Place the yellow ball in the center of the cardboard and press firmly with your palm. Next, press down with your fingers over the entire surface and smooth out. Thus, a round cake will appear in front of you, which will subsequently become the pig’s head. You will not only deform the ball to the desired round shape, but also press the main part to the base.

Start turning the cake into the head of the planned animal. For now, use the same yellow plasticine. Attach a small round piece to later create a patch. Make pointed ears and attach them to the top of the head

Take a thin red stripe and stick it under the snout as a smiling mouth. Use pink dots to add cheeks and nostrils.

Add eyes. Pigs are usually depicted as having blue eyes. We can do this too. Use small white and blue dots. Glue our eyebrows above the eyes.

Now you need to decorate your craft so that it really looks like a New Year's one. It is not yet clear why such a copy is shown before us. Make lots of small plasticine beads of different colors to create garlands.
Bright tinsel sparkles under the ceiling in decorated halls and rooms. We also need to create a similar festive atmosphere.

Collect small balls into thin threads and attach them to the cardboard at the top. Make several different colored stripes.

And one more touch is the inscription “Happy New Year!” You can write it with a marker, but it is better to glue it, making all the letters from plasticine, so as not to disturb the overall ensemble. Stick the words on the top, bottom, or sides—any free space.
Also glue small balls, pressing each one onto the cardboard with your finger to imitate scatterings of confetti. Now we have before us a real New Year's card, from the canvas of which the smiling and positive face of a symbolic pig looks out.

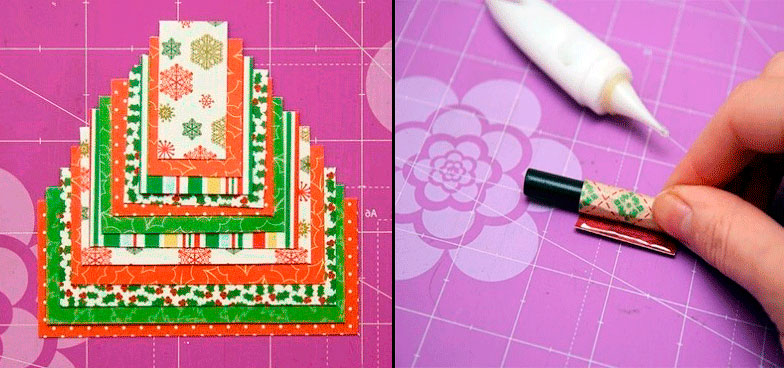
Craft for the New Year with a Christmas tree made of ribbons
This lesson shows you how to make a DIY New Year's greeting card with your children. Its base will be cardboard, and the picture will depict a Christmas tree, or rather, its imitation - a green triangle, decorated with green and white satin ribbon, bright rhinestones on an adhesive base. If you liked this option for a New Year's gift, consider what is needed to make it and how to make it.

To complete the festive New Year's craft proposed in this lesson, the following were used:
- white and green cardboard;
- scissors;
- multi-colored strips of corrugated paper;
- glue;
- satin ribbon 0.5 cm wide, white and green;
- red round rhinestones;
- flower-shaped rhinestones - 1 piece for the top;
- foil;
- white lace;
- plastic bow with rhinestones;
- black pen;
- orange colored paper.
As you can see, the list of materials includes a lot of items, but there are no exclusive or expensive ones. In addition, some of them can be replaced altogether. For example, green and white cardboard will be needed to create a background and a triangular copy of the Christmas tree, but the colors may differ.
Strips of corrugated paper are needed to make a striped bright covering; fabric or ribbons will do instead; also, together with rhinestones, you can come up with another Christmas tree decoration, and so on. So, first of all, cut out 2 rectangles from green and white paper, and the size of the second piece should be slightly smaller than the first.

Cut corrugated paper into strips of arbitrary length and width. Cut out a few stars from foil (or candy wrapper).

Glue the strips onto the top layer - white cardboard. Create a fun, colorful finish by layering stripes lengthwise. Glue the ends of the strips at the back. Glue the entire structure onto green paper. The background for the postcard is ready.

Add a strip of white lace at the bottom, bringing the ends under the top layer of paper. Cut out a triangle for the Christmas tree from green cardstock.

Wrap a white ribbon randomly around the triangle (glue the ends at the back).

Then add green ribbon in the same way.

Glue the resulting Christmas tree in the center. Decorate with rhinestones and a bright top. Glue foil stars around the Christmas tree.

On a bright orange paper cutout, write “Happy New Year” with a pen and glue it below - under the lace, add a bow.

A bright, hand-made congratulation is ready.

In the modern world, the 3D format is very popular. You can also apply it to a paper card. To do this, you just need to take a few decorative elements and glue them onto a white base.

The main decoration will be a paper figurine, for example, an angel. A similar image suitable for the New Year theme can be found in any magazine. Cut it out with scissors, and the central part of the craft is ready.
Materials:
- A5 paper – 1 sheet;
- sequins;
- silicone glue;
- paper figurine of an angel;
- double sided tape.

Manufacturing Instructions
Fold a piece of white paper in half. This can be a regular album sheet or cardboard for creativity.

Cut small pieces from double-sided tape. We glue them onto a paper base in the place where the angel is supposed to be located.

Remove the top protective layer from the pieces of tape.

Glue the paper figurine of an angel with double-sided tape.

Another piece of tape will be needed to attach the snowflake. We glue it on a free area of the sheet.

Cut out a small snowflake from plain white paper. It should have an empty middle. We apply it to the workpiece so that a piece of tape is in the central hole. Glue a sequin in the shape of a snowflake on top. This way both snowflakes will be fixed on the paper.

Using silicone glue we draw abstract stripes on paper.

We lay out sequins of different colors along the glue strips.

Glue single sequins onto the remaining empty areas of paper. We arrange them without a specific system or arrange them into patterns.

All decorative elements protrude above the surface of the paper. They are convex and have different thicknesses. Thanks to this, the craft as a whole turns out to be voluminous and unusual.

A plasticine flat image of a Christmas ball glued to cardboard will look like a three-dimensional 3D New Year's card. Even using plasticine, you can carefully decorate the ball, make an interesting design on it, or receive a unique gift or piece of holiday decor.
Before buying ready-made cards in the store, try making something yourself. The plasticine version can be made with children. You will have in your hands a wonderful souvenir, painted with your own hands.

To create a beautiful New Year's craft with a plasticine pattern, prepare:
- bright red cardboard;
- several pieces of plasticine of different sizes and colors to make the body of the ball itself and the tail, decor, bow, as well as a green Christmas tree branch on which this ball is attached;
- thin needle or stick.
It is the bright base in the form of thick cardboard that will set the character of the entire product. A beautiful ball against an expressive background will be emphasized favorably, will not get lost, but will sparkle with new colors, so take the brightest color from the set. To create a New Year's image in the form of a ball, knead several pieces of plasticine in your hands.

Mash the selected color in the largest quantity in your hands, make a round flat cake. Glue the Christmas ball onto cardboard as the body. At the top, glue a small loop with which the ball is attached to a spruce branch (it can be made from plasticine of a different color).

Pull a piece of blue plasticine into a thin thread, and make small peas from the white mass. All these details will be used to further decorate the ball. An interesting ornament will be created.

Glue a track of two blue plasticine threads in the center across the body of the ball. Place white balls in a row between them.

Pierce each small white dot with the point of a needle or stick to create an interesting visual effect.

Prepare an additional yellow sausage by pressing the segments at equal distances from each other with your fingers, making a zigzag. Glue 2 zigzag stripes at the top and bottom. Between the corners also glue white balls that remained from the previous operation.

A beautiful bright yellow bow will also fit perfectly into the overall ensemble. Make a decoration with loops and tails, glue it to the loop of the ball itself.

It is advisable to place a large central design so that there is still room at the top for a spruce branch. The ball should be suspended from it. Make an oblong green cake.
Glue at the top of the picture, adjacent to the top loop. Make needles on the Christmas tree using the same thin stick. Now the product really looks like a living, three-dimensional applique.

After the lesson, you will be convinced that making New Year's gifts with your own hands is much more interesting than just shopping around looking for ready-made products. And children will definitely like this work.

New Year card using scrapbooking technique
Your craft will turn out elegant and unusual if you buy designer paper and use it for needlework. Today on sale you can find all kinds of materials for creativity: foil, paper in the form of a leather texture, sheets with colored patterns and much more. And you also need to be prepared for the fact that when creating it you can use not only paper, but also other materials, for example, ribbons, rhinestones, bright floss threads, chains, etc.
A simple version of a postcard using the scrapbooking technique is presented in this lesson. What is needed to complete it? This is a limited list, but you can easily expand it.

The following materials are suitable for creating a New Year's card:
- designer cardboard, the texture of which resembles green leather;
- three types of designer paper with different patterns;
- cardboard with shiny foil coating;
- rhinestones of different sizes, but the same color and shape;
- thin green satin ribbon;
- Velcro sticker with New Year's inscription;
- small pebble for a bow.
Tools for working with paper:
- ruler;
- pencil;
- scissors;
- glue.
Regular colored paper or cardboard will also work, but foil and sheets that imitate leather look very interesting. From the prepared sheets you need to cut 2 layers of a rectangular shape, and then fold them together. You need to glue the rectangles on top of each other.

Make the foil as the bottom layer and the green leather as the top. Using a ruler and pencil, draw sketches of rectangles on the sheets, then cut them out along the contour. You need to make sure that the silver part peeks out from under the green textured part. The size of the rectangle of the bottom layer needs to be made a little larger (with starts on the sides of about 0.5 cm).

Glue flags onto the top green paper. These decorative items are often used to decorate halls, houses, shops, and apartments for the New Year holidays. Cut out 3 flags of different lengths from colored design paper with a pattern. Glue the parts as soon as possible, their length will gradually decrease.

Cut a strip from a thin green ribbon of satin texture, the length of which, with small starts, is equal to the width of the top green rectangle. Glue a straight satin line at the top (where the flags are located). Bring the ends back, after adding a drop of glue.

To avoid writing the “Happy New Year!” message yourself, buy a sheet of themed stickers. Take a suitable Velcro sticker and add it to the free space. Glue a bow with a pebble to the ribbon.

And the final sparkling touch is rhinestones. If they gradually decrease in size, then overall the craft will look stylish.

If you get creative inspiration, you can easily give a beautiful gift to someone close to you for the New Year. The main thing is to choose materials that will look elegant on their own.


Option with an elegant Christmas tree


How to make such a craft with a beautiful elegant Christmas tree, see the step-by-step master class.
With a plasticine snowflake
An interesting handmade postcard will become an unusual craft filled with positive energy. Unique products are a gift for any occasion. But I still want to stick to the given topic. For example, if we are talking about the New Year, then it is better to depict some kind of winter ornament or figures suitable for the holiday.
This master class shows a variation of a New Year's card made of plasticine with a picture of a snowflake. And this snowflake does not have to be white, as we are used to. If we make it green, it will look very much like a Christmas tree - the central object of a fabulous winter holiday.
Are you interested in this type of handicraft? Do you want to repeat this New Year's craft with a plasticine snowflake with your children? This lesson is presented to help everyone. The central object of the application - a snowflake - can be made separately, if desired.

Materials needed for winter creativity:
- canvas-cardboard;
- mass for drawing - plasticine;
- decoration - rhinestones;
- a tool for drawing relief lines - a stack or a toothpick.
Since we planned to create a green snowflake - the central element of the postcard, we need to choose some kind of bright background that beautifully combines with this color. For example, red cardboard will do. It just needs to be cut from a large sheet.
It is also possible to use scrapbooking paper with a monotonous, unobtrusive pattern, a white base, or hand-decorated paper. A green snowflake must be complemented with some other color, for example white, to create a pattern on the figure.

Soften the green plasticine in your hands and press down on top. You can immediately press the mass with your palm to the surface in the central part. Now the resulting cake needs to be turned into a snowflake.
To begin, carefully cut out a star with 6 rays. Draw a sketch with the tip of a toothpick to get an even and beautiful result. Then cut off any excess along the indicated line, pressing harder.

Using the same tool or stack, make the rays of the snowflake sharper and more carved. Press down the plasticine in the right places in the same way.

Make a thin white pattern on the surface of the green blank. Glue a thin white thread along each ray and place the petals in the center in the shape of a flower.

Glue a sparkling crystal in the middle and press it tightly into the plasticine. Press each petal lengthwise with a toothpick.


Form the rays into small grains, pressing each one with a point.

Now write the congratulatory phrase “Happy New Year!” Since the image on the cardboard is plasticine, it is better to make the inscription from thin threads of bright color.

Add a sparkling effect by distributing small green pieces between the rays.

Postcard “Happy New Year!” ready, it turned out bright and thematic.


In winter, when there is frost and snowstorm outside, you want warmth and comfort. Everything should be warm and cozy at this time of year, including New Year’s crafts. Don't believe me? Then we offer you the idea of creating a beautiful New Year's card with a decor in the form of a mitten, which will undoubtedly cheer up the person who receives it during the holidays.

To make this “cozy” masterpiece you need: colored cardboard and colored paper, multi-colored cardboard (you can use bright paper for gift wrapping instead), bright threads, glue, scissors and a hole punch.

The first step is the foundation. For it we will use a sheet of white thick cardboard, folded in half. The interior decoration (the so-called “wishes field”) consists of two rectangles of colored paper, slightly smaller than the postcard itself.
We carefully glue them inside the product. On the outer front side we glue a rectangle of cardboard of the same size and shade.


On the back side of multi-colored cardboard (or gift wrapping paper) draw a mitten of the appropriate shape.

We seal its upper edge from the “wrong” side with a strip of cardboard and make a series of holes in it using a hole punch.

To decorate the mittens we will use threads. First you need to connect the threads from different spools into one and cut them into strips of 12-15 cm.


To attach the threads to the mitten, fold the strip in half, thread it through the hole and make a loop. This is how we decorate all the holes of the mitten.

Lubricate the back side of the mitten with glue (pay special attention to the part where the threads are threaded) and glue it to the front part.

A beautiful postcard with mitten decor is ready. Warmth and comfort to you on winter days!
For many, New Year's cards have already gone digital. They are sent by email or using smartphones. But the paper version still retains its unique charm. If you want to surprise the recipient doubly, then it is preferable to make a paper card as a New Year’s gift with your own hands.
Video lessons
FOLDING CARD “SNOWMAN”
THREE SIMPLE IDEAS
Preparations for the New Year have already swept the whole country! It’s not difficult to make DIY New Year’s cards 2018 using photo and video instructions, and giving them is incredibly pleasant! Everyone is in a hurry to think about the decoration of rooms, work areas, menus for the New Year's table, outfits and gifts. As you know, a gift in the form of a handmade postcard is doubly pleasant. After all, this is not some faceless trinket chosen in a hurry, but a targeted gift made with love.
In this article we’ll look at how to make one of your favorite gifts – a postcard. We will consider many options for creating New Year's cards with your own hands for the 2018 meeting. Next will be given tips on creating them, choosing materials and a theme for design, as well as options for signatures and wishes.

Materials for creating a postcard or what may be useful
Experienced handmade craftsmen already know that any material is suitable for a DIY New Year's card for 2018. Use your imagination!

What you might need to work on a postcard:
- The base is thick paper, preferably A4 format folded in half, but any other format can be used.
- Glue. It is better to use PVA produced by Luch, it does not leave yellow marks. For attaching non-paper decor, “Moment Gel” or “Crystal” glue is suitable.
- Decorative elements. These could be clippings from old postcards or magazines.
- Satin ribbons, lace.
- Flowers made of paper or fabric.
- Half beads, cabochons, rhinestones, sequins, pendants.
- Any decorative elements in the form of wooden snowflakes, insects, Christmas trees and so on.
- Paper: crepe, tracing paper, colored, corrugated, any decorative, old postcards or magazine clippings, pages of old books.
- Sisal, thread, foil, jute rope.
- Buttons, snaps, rivets, leather patches and so on.
Everything that remains from any decorations, accessories, old damaged postcards can be carefully preserved and used again to create a new masterpiece.

Step-by-step instructions for creating a New Year's card
You need to create any New Year's card following a certain algorithm. The success of a creative endeavor largely depends on this.
Before you start, it is important to think over the idea and size of the postcard, decide on the necessary material, and select everything that is needed in the work from the whole variety of decorative elements and materials.

Now we follow the plan described below:
- Think over the plot of the postcard, what will be depicted on it and the size of the base. Most often this is A5 format, that is, an A4 sheet folded in half, but you can choose any other format at your discretion.
- Next you need to think about the color palette of the postcard. Color and combination of shades plays a huge role in the overall perception of the finished product. Below are options for combining shades and a special New Year's palette in the photo. If you don’t have a special flair and knowledge of color combinations, it’s better to use a palette.
- Next, we think about the composition and arrangement of parts. Special ready-made templates or sketches can help with this, but this will be discussed later in the article. For a successful composition, it is important to choose the center and the main, larger element. Next, think about where the small details will be located; you don’t need to fill the entire area of the postcard with them, let them create a beautiful shape. It is important to unite the entire composition on the postcard with a common color idea and compositional idea.
- When everything is thought out and the idea is clear, you need to prepare all the elements. Cut out and paint the parts. Choose beads, cabochons, ribbons, lace, snowflakes, flowers and so on.
- Now you need to make the background.
- After that we glue the main element.
- Next, we place all the small parts in their places.
- We decorate if necessary.
Templates and sets for postcards, individual materials for realizing your own ideas
To create cards, including New Year's cards, for 2018 with your own hands, you can use various templates and sketches. They help you decide on the composition and idea of the postcard. Below are photos of similar sketches. They can be printed on paper or used for visual purposes by creating your own card based on the template.

Postcards can contain different elements: a Christmas tree, balls, stripes, beautiful background design, snowflakes, glued half-beads, and so on. Of course, each template can be changed to suit your taste, but in general the templates are thought out in terms of composition and color.
The Christmas tree is the main decorative element. Various methods and materials for its image
On New Year's cards you can most often see an image of a Christmas tree. We can make it using various materials:
- Buttons, rhinestones, half beads.
- Ribbons and lace.
- Paper or paper napkins.
- Openwork small snowflakes.
- Felt, old postcards or rolls of colored packaging paper.
Postcard templates:
The Christmas tree can be placed on the front side of the card or inside and open up beautifully.
Video:
Three options for creating a postcard with a Christmas tree
Option #1
For this stylish New Year's card with a Christmas tree you will need:
- Beautiful cardboard and corrugated cardboard in a stylish metallic shade and stripes.
- Colored paper to match the cardboard.
- Decorative cord.
- Adhesive rhinestones.
- Scissors, glue, ruler and a simple pencil.
We make a card like this:
- On white paper we draw templates of all the details (as in the photo);
- Cut out the template and transfer it to cardboard and colored paper, cut it out;
- We carefully place all the parts in the right places and glue the decor;
- Place the rhinestones, attach a cord and the card is ready.

Option No. 2
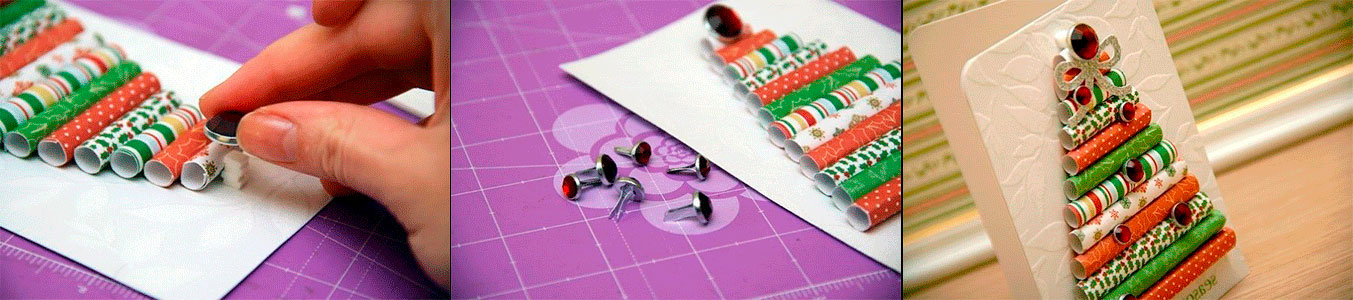
This card is made from rolls of colored paper. The manufacturing technique is somewhat reminiscent of quilling. To work you will need:
- Decorative cardboard with a pattern and white.
- Colored paper with a print in a New Year's theme and color scheme.
- Decorative buttons, rhinestones.
- A smooth round pencil or wooden stick.
- Glue, ruler and scissors.
Let's get creative:
- We cut out squares from colored printed paper of different sizes (as in the photo);
- We roll them into rolls and secure them with glue;
- We glue the rolls together into a triangle-shaped Christmas tree (see photo);
- We make a base out of white cardboard and glue a Christmas tree made of rolls to it;
- We decorate the Christmas tree with rhinestones and buttons.
The card is ready, all that remains is to make a congratulatory inscription inside.

Step by step photos
Option No. 3
This version of the 2018 New Year postcard is made on bright cardboard using corrugated paper. To work we need:
- Decorative cardboard in a bright red shade for the base.
- Green corrugated paper.
- Double-sided tape and glue.
- Decorative satin ribbon with New Year's print.
- Beads and small beads or braid, star-shaped cabochon.
Let's start creating:
- Make a card base from cardboard by carefully folding it in half;
- Apply decorative tape to the top and bottom of the card;
- Mark the outline of the Christmas tree with a pencil and place double-sided tape (see photo);
- Cut strips of different sizes from corrugated paper and, squaring a little, stick them on top of the strips of double-sided tape. So we got a Christmas tree;
- We glue the beads, beads and star into place.
These are variants of New Year's cards with the main character - the Christmas tree. Next, we’ll look at how to make your own postcard with the symbol of the year – a dog.

The dog is the symbol of the year on a postcard
You can make a postcard with a picture of a dog - a symbol of the coming year. There can also be many variations here. Make a postcard in the shape of a dog's face from colored paper. Below are step-by-step photos of the manufacturing process.

In addition, you can make a postcard in the shape of a dachshund. For it you need:
- Colored thick paper in 4 shades: blue and white for the base, golden and brown for the dog. You also need some black paper for the eyes and nose.
- Glue, scissors and ruler.
We make a card like this:
- Cut out a rectangle from blue paper. This is the basis. Fold it in half, then one front part in half again.
- We cut out rectangles from white paper of such sizes that they overlap each part of the folded base, and glue them on top of the base.
- cut out the dachshund. A long oval body so that it fits over the entire unfolded card. Cut out the paws, head, ears, tail, eyes. We duplicate each small detail from brown and gold paper.
- Glue the body onto the entire postcard, followed by the paws and muzzle, and then all the small details.
- This is how we got a dachshund, whose head is on the front bent half, and the end of the body is on the half of the postcard that is not bent. A closed card comes with a short dog, and an open card with a long dog.
You can paste a congratulatory inscription inside the card on a separate square or flag.
Step-by-step photos of creating a postcard for the New Year 2018 with your own hands in the form of a dog:
Step-by-step photos of postcards:


Simple cards with a good mood
Today, fashionable and stylish does not mean complicated. You can make an excellent DIY New Year's card 2018 in a couple of minutes, which will have style and a good mood.
Option #1
- Take bright cardboard and fold it in half.
- From white paper, cut out the outlines of Santa Claus's beard and mustache, glasses and a few stars.
- Glue the small details onto the front of the card.

Option No. 2
On white cardboard folded in half, draw a beautiful thin line with curls diagonally. This will be the base of the garland. Then, in some places marked on the garland, draw multi-colored circles - light bulbs.

Option No. 3
Postcard with a funny snowman - top view. To do this, you need to cut out several circles of different diameters and stick them on top of each other; you can line them with thick cardboard. Next, all that remains is to add small details and inscriptions.

Option No. 4
Use buttons. Here you can keep a postcard in minimalism, it will acquire a special style and charm. A couple of white buttons are enough to create a snowman, which we will complement with red braid - a scarf and black braid - a hat. Or several bright buttons that will depict Christmas balls. We will draw a string on it and make a beautiful inscription at the bottom.

Postcards in different techniques
Postcards for the New Year 2018, made with your own hands using the quilling or punching technique, are very interesting and beautiful. In order to create such a miracle with your own hands, you need to make a lot of effort, be careful and attentive. These are quite complex techniques that require extreme accuracy and concentration to achieve a good result.
Postcards using the quilling technique can depict a Christmas tree, a dog, or winter patterns. To perform them, you need strips of colored paper, which are rolled into rolls and given the desired shape. These rolls are then used to lay out intricate designs.

The vytytnanka technique involves cutting out scenes from several layers of paper and placing them on top of each other. These cards fascinate with their grace and beauty.
You can also use threads and thread printing or embroidery techniques to create a New Year's card with your own hands. To do this, the intended design is embroidered with a cross or satin stitch on a separate square of paper, or laid out using the thread printing technique. This square is then glued onto the postcard base.

A design for a postcard can also be made from felt, for example, cut-out deer, a snowman, mistletoe flowers or a Christmas tree, which are then attached to the base for the postcard.

If you are making a card with your child, then a wonderful New Year’s option would be to make a drawing on a 2018 New Year’s card with the baby’s handprint. To do this, you need to paint the child’s palm with white paint. The kid will be delighted with this activity! Immediately you need to print your palm onto the prepared colored base for a cardboard postcard.


If you print it with your fingers down, then you can finish drawing Santa Claus, your fingers will be a beard. And if you print your palm with your fingers up, then the palm itself will be a snowdrift, and we will finish drawing the fingers and turn them into snowmen and Christmas trees.
Did you like our New Year cards, which you can make with your own hands in 2018 using step-by-step photos?
Video:
Good afternoon. Today we will make New Year's cards with our own hands. I will show you the most interesting ways and techniques. You will not only see photographs, but also receive detailed instructions and diagrams for creating each such postcard. I will give you the necessary master classes to illustrate complex techniques (quilling, origami) step by step.
I decided to divide the entire article into 5 parts - according to the topics of New Year's cards.
- First we will look at a variety of Christmas trees on postcards.
- Then I will show you which Santa Clauses can decorate your card.
- Then we will make Snowmen using different techniques.
- Then we'll move on to Christmas wreaths.
- And of course, let’s look at appliqué snowflakes on postcards.

So let's get started...
Part one
TREE on New Year's cards.
Method number 1 - paper triangles.
If you still have old signed New Year's cards, you can no longer give them away for the second round. But you can use them to create a NEW card. You can cut a triangle out of a New Year’s card, put it on a leg and you’ll get a Christmas tree. The New Year's motif on the card came out naturally - like the colors of a Christmas tree.

Or you can cut a Christmas tree out of a regular cardboard box - rough corrugated packaging cardboard will harmonize with delicate lace or pearl beads. And you will receive an elegant New Year's card made by yourself.
You can cut out a triangular silhouette of a Christmas tree with wavy edges, and cover it with sequins that imitate Christmas tree decorations on the tree.
You can give the triangular silhouette of the Christmas tree a jagged edge (as in the photo of the cards below). You can also cut out several silhouettes at once and combine them on one New Year’s card.
On the blue New Year's card with the photo below we see how a three-dimensional bladed Christmas tree is glued together from three triangles.
Or one Christmas tree silhouette can be larger in size and with a different shade of color - we put it as a duplicate background under the top silhouette (as on the right New Year's card with the photo below).

Method No. 2 - paper ribbons on a New Year's card.
You can very quickly and easily form a herringbone applique from paper or textile tapes.
You can use regular strips of colored paper. Or buy embroidered braid in the sewing department of the store. Or, in the gift department of the store, buy a sheet of elegant wrapping paper and cut patterned strips from it for a Christmas tree applique on a New Year’s card.
In the photo below we see several options for creating such a New Year's tree applique.

Paper strips do not have to be glued in strict order and symmetry. You can cut strips of four lengths - 10 cm, 8 cm, 5 cm, 3 cm. And arrange them in a chaotic inclined order starting from the bottom 10 cm, in the middle we lay strips of 3 cm and 5 cm, and at the top 3 cm. Top it all off paper star and get a New Year's card with your own hands as in the left photo below.
You can also take a triangle cut out of thick cardboard and cover it with strips of paper or fabric, bending the edges of the strips to the underside of the cardboard triangle. And we will get a ready-made elegant Christmas tree that you can safely stick on your postcard (right photo below).

But with paper strips you can make not only planar applications. You can make Christmas trees using the three-dimensional technique. Here I give a detailed description of how to make a looped Christmas tree with your own hands on a red New Year’s card from the left photo below.

Step 1 - cut strips narrow and long - their lengths will also be different: 2 strips of 15 cm, 2 strips of 12 cm, 2 strips of 9 cm, and one strip of 7 cm.
Step 2 - make slits in the front side of the card with a blade - 2 slots on both sides along an imaginary line(the width of each slot is such that our strip can easily fit into it).
Step 3 - push each one through strip at one end through 2 slits– turn it in a loop and return to the same slots again. The ends of the strip meeting at the side glue it into the same loop as on the opposite side.
We repeat a similar procedure with the remaining strips. Naturally, you need to arrange the strips from bottom to top in decreasing order (long at the bottom, short at the top).
Or you can cut 6 paper strips of equal length 12 cm. Bend each strip in half and intertwine the flaps of the halves with each other crosswise - in a checkerboard pattern. It just looks difficult. But it's actually simple. Here you can tear out a sheet of paper from your notebook and cut 6 strips of any length and practice on such rough material to see how simple and easy everything really is.
And here is another New Year's card, where the tree is also made from strips of paper. Only here crepe paper is used (with a crumpled, crinkled effect) - it is sold in stationery stores in rolls (like wallpaper).

Step 1 - We cut wide strips of different lengths - 12 cm, 10 cm, 8 cm, 6 cm, 4 cm.
Step 2 - On the postcard we outline lines-tiers (rounded), to these lines we will glue each tier of our paper Christmas tree. We attach a strip of double-sided tape to these drawn lines.
Step 3 - We take the longest strip (12 cm) and fold its entire upper edge into small folds - tucks - and place these tucks on the bottom line of the tape. Take the next largest strip (10 cm) and do the same. And so we move to the top tier of the tree. Then we decorate the Christmas tree on a New Year’s card with any design of our choice.
Method number 3 - paper circles.
Here's a way to make a Christmas tree on a New Year's card using circles cut out of paper. You can cut out circles of the same size (like the blue card in the photo below). Or you can cut the circles into 4 different sizes - 2 circles for each size. And then the Christmas tree will turn out to be triangular in shape (tapering towards the top) as on the red New Year’s card with the photo below.

Method No. 4 – quilling technique for New Year cards.
Here’s another technique that produces very beautiful hand-made New Year’s cards. You can make beautiful twists from paper strips.

This is what the process of creating a Christmas tree using the quilling technique looks like. Cut the paper into even strips(it’s convenient to do this under a ruler with a paper cutting knife - on a wooden board so as not to cut the table. Or you can buy ready-made strips for quilling. Or have a machine for cutting quilling strips.

We lay each twist in the template circle(so that the twists are the same size). We allow the tight twist to open up a little and unwind – but within the framework of a round stencil. And then glue the tail-tip of the twist to the barrel of the twist itself. That is, we fix its size. This way you can remove it from the stencil frame and not be afraid that it will unwind and increase its size.
If you don't have a stencil, you can use round ones caps for creams or drinks. Place the twist on the bottom of the glass or cap and let it unwind to the diameter of the cap. Then carefully remove it with tweezers and fix the twist tail with glue.

Pinch the round twists on one side with your finger to give it a drop shape.

We put drops of different sizes in pairs and get a quick and simple Christmas tree.

Quilling technology allows you to create a variety of Christmas tree models from twisted paper.


Method number 5 - paper rolls.
Or you can cut the paper into wide strips of different lengths - and roll each strip into a roll. It's easy to do if wrap it around a pencil– glue it, wait for the glue to set, and only then remove it from the pencil. These rolls of different lengths make a beautiful Christmas tree on a postcard. Quick and easy to do with your own hands. Paper can be used simple color. Or buy sheets gift wrapping paper(sold in the gift department).

Method No. 6 – mosaic Christmas tree on a postcard.
You can use any small details as material to create a Christmas tree. Sliced snowflakes or butterflies. Buttons or origami stars or nuts and bolts (if you are preparing a card for your husband and want to make it in a brutal style).

Method No. 7 – lace Christmas tree on a New Year’s card.
You can make beautiful lace on a New Year's card. you can use ready made lace paper napkins(sold at the hardware store, where the muffin tins are). Such napkins are often placed under cakes and other culinary products).
Or you can make your own paper lace– folding the paper as for cutting out a snowflake. And make an interesting pattern with holes along the folded edge.
Or can you fold the cut-out snowflake into a Christmas tree shape and paste it on a New Year's card.

Method No. 8 – origami technique.
And here are New Year's cards, which are decorated with a Christmas tree folded from a napkin. Such folding origami in the shape of a Christmas tree are made quite quickly and from a simple square (no need to cut anything). The main thing is that each upper square is slightly smaller in size than the lower one. And then the tiers of our Christmas tree will be tapered to the top.

Below I have drawn a diagram that illustrates the process of creating paper blanks for a Christmas tree on a postcard.

But you yourself can come up with YOUR OWN interpretations of a modular Christmas tree made of paper. Come up with your own triangular folds and create your own individual New Year's card with a Christmas tree.


Method No. 9 – folding Christmas tree on a postcard.
And here is another folding Christmas tree. Everything here is quite simple and is made from a separate single sheet of cardboard. And if you wish, you can additionally decorate the Christmas tree with inserts of colored paper and decorations.


You can also quickly fold an origami Christmas tree out of paper using this semicircular pattern. You can copy the shape of the Christmas tree and fold lines directly from the monitor screen. To enlarge or reduce the image on the screen, you need to roll the mouse wheel forward or backward while holding down the Ctrl button.

Or you can make such a Christmas tree yourself without a drawing. And simply bending the semicircle back and forth several times, as shown in the figure below.

If such a semicircular pattern for a folding Christmas tree is made not with a smooth edge, but the circumference of the pattern is notched into soft ruffles or teeth, then the edges of our tiers near the Christmas tree will turn out curly, as in the photo of New Year’s cards below.

Method No. 10 – paper carving.
The lapel carving technique is also suitable for Christmas cards. This technique is very simple to do. Part of the picture is cut with a razor blade and folded back. We see the most primitive example in the right photo below - half of the contours of the Christmas tree and snowflake are cut off and simply bent.
You can make a double contour - and then the bend will turn out to be a narrow silhouette strip, as was done on the left postcard in the photo below.

Or you can cut it and bend it downwards each tier silhouette of a Christmas tree on a postcard. And we will receive a Christmas card with the photo below.

You can first practice on any rough piece of paper to see how easy it is to actually implement this card carving technique and make your own unique New Year’s craft.
We've looked at New Year's cards with a Christmas tree theme, and now let's look at all the other New Year's themes that you can use to decorate our cards with your own hands.
Part two
SANTA CLAUS on postcards.
Large applications in the form of Santa Claus will decorate any Christmas card. There is no need to make a full-length silhouette of Santa Claus somewhere in the corner of the postcard in the form of a small booger. It is better to take the largest size of the hat, beard and occupy the entire part of the postcard with these main elements of Santa Claus - red nose, mustache, beard, hat.

You can fold Santa Claus for a postcard using the origami technique - as shown in the photo below.

Part three
SNOWMAN on New Year's cards.
And now you can move on to a new character of the Christmas holidays - the snowman. Usually we are used to seeing it on crafts in the form of three white rounds and a bucket on the head. But you can approach the task of depicting a snowman on a postcard creatively. For example, make it peek out from behind the New Year tree - like in the left photo below.
Or take a ready-made card with a snowman - cut it into strips of different lengths - and from these strips put together a Christmas tree pyramid. Fold in such a way that the cunning face of a snowman can be seen on some of the stripes (as on the left New Year’s card in the photo below).

Also, you don't have to make a snowman appliqué on a card made from classic white paper. You can take the musical staff of a New Year's song on the Internet, print it, and cut out round discs from such paper for a snowman appliqué.
Or take a printed text telling about New Year's traditions and from such a text cut round pieces for a snowman.

You can make a snowman on a card using a paper fan. When the fan is bent in half, its blades unfold in a circle.

You can make a snowman on a postcard using the quilling technique. Twist a strip of white paper into roll-up modules and make a quilling snowman.

You can depict a snowman in an interesting, unusual angle or setting. This could be a TOP VIEW of a snowman (like the left photo below)... or a snowman inside a snow globe (like the right photo).

You can make an applique of a snowman who makes a hole in a snowflake with his nose. Or a snowman lord in a top hat and a red bow around his neck.

It is not necessary to put a bucket on the snowman. The snowman looks good in a neat black hat with a brim, decorated with a sprig of holly.

A snowman on a postcard can be depicted very schematically. A semicircle, a stripe of a scarf, two beady eyes and an orange triangle of a nose.

You can make a simplified silhouette of a snowman as the side part of a two-layer postcard, as in the photo below.

Or you can use the entire white background of the postcard as the body of a snowman. The New Year cards with the photo below show exactly this principle.

The most difficult thing is to make a three-dimensional 3D card with the silhouette of a snowman.

Part four
DEER on Christmas cards.
Another New Year's character that looks festive on New Year's cards is a deer.
It can also be depicted in a non-standard way, but in an interesting situation. For example, it could be a deer enthusiastically singing Christmas songs, playing the drum, or skating - everything is up to your imagination.

You can choose the simplest silhouette applique of ONLY DEER HEADS on postcards.

Or you can decorate a New Year's card with the silhouette of a whole deer - from antlers to hooves.

Part four
SNOWFLAKES on New Year's cards.
You can cut out 2 ordinary stars from paper and stack them on top of each other with an offset into one ray - and we will get an elegant snowflake on a Christmas card with our own hands.

You can make a beautiful snowflake using the voluminous convex technique.

Or embroider a snowflake from threads. That is, apply a symmetrical pattern of punctures. And then, in a certain order, lace these puncture holes with threads to make an openwork snowflake.

You don't have to come up with very complex thread weaves. Even small patterns made from thread and needles will decorate your New Year's cards.

Using this thread technique you can make not only snowflakes, but also any other New Year's motifs.

And of course a snowflake using the quilling technique.

Here in the photo below we see the stages of creating a complex snowflake from ordinary quilling modules - you need to start each snowflake from the center - and grow petals towards the middle - circle by circle.

Your Christmas card with snowflakes can resemble a layer cake, in which a variety of details are mixed, layering and bumping into each other in an elegant chaos of beauty.

The snowflake on your card can be made from paper modules made using the origami technique.

Part five
Wreaths on New Year's cards.
And here is the theme of the festive Christmas wreaths. They can be depicted on a postcard using any technique. This can be a flat applique of any geometric shapes, decorated with ribbons, buttons and other tinsel.

You can make a New Year's card in the form of a door on which such a Christmas wreath hangs.


Quilling technique is also ideal for creating modules for a Christmas wreath.

New Year's cards can be decorated with birds. They can sing winter songs while sitting on musical birch branches.

Also, New Year's cards can depict a winter window, through which you can see either a snowy landscape or a festive room with a Christmas tree.

Here are some more ideas how to give money in a New Year's card . We are used to putting money inside a postcard. But you can put the money outside, making it part of the overall New Year's applique. I will now explain how to place money on the front side of the card and not ruin it with glue.

Here on the first postcard we see a bill that has been folded into a triangular cone - a ribbon was glued to the postcard (not money, we do not spoil it with glue) and the ribbon was glued so that it was glued to the glue in the middle, and its tails hung freely. We place the cone of the Christmas tree-money on the ribbon and tie it with the free ends of the ribbon.
In the second case We glue the snowman - but we don’t just glue it - we glue it onto thick pieces of styrofoam. That is, the snowman turns out to be towering on the postcard. This way, the snowman’s neck turns out to be moved away from the postcard canvas - and you can safely slip a striped bill under his neck.
And in the third case - We roll up candle tubes from paper. Glue them edgewise to the card. And into each tube we put a banknote rolled into a narrow roll.

These are the original ideas for New Year's cards that I found for you during these holidays.
Happy New Year crafts and Happy New Year.
Olga Klishevskaya, especially for the site ""
If you like our site, you can support the enthusiasm of those who work for you.
Happy New Year to the author of this article, Olga Klishevskaya.
No matter how good a gift is, it is not complete without a card. The range of greeting cards today is very large. However, if you want a unique postcard, then it is better to make it yourself. This is exactly what we will do now: consider ideas for DIY New Year greeting cards.
You will need: thick colored cardboard in A4 format, scissors, corrugated paper, PVA glue or double-sided tape, a simple pencil, decorative elements (sequins, beads, ribbons...).
Master Class

New Year card in scrapbooking style
Scrapbooking is a whole art that teaches you how to create and decorate photo albums (in our case, a postcard) with your own hands. Scrapbooking has a whole history of how a notebook turned into an album. At the end of the 17th century, notebooks with additional blank pages appeared. Their owners pasted in images, creating entire collections. This is how scrapbooking began to develop.
You will need: thick colored cardboard in A4 format, PVA glue or double-sided tape, scissors, scrap paper, pencil, decorative elements (sequins, beads, rain, buttons, sequins...).
Master Class
- Make 12 rectangles from scrap paper. The size of each rectangle should be different, starting from the smallest to the largest. (Width from 1 to 12 cm, length 5 cm for all rectangles).
- Roll each rectangle into a cylinder in the width direction, using a simple pencil to secure each cylinder with glue.
- Glue all the tubes together, starting with the largest and ending with the smallest, creating a Christmas tree shape.

- Let the Christmas tree dry well, then glue it onto the right half of the card.
- Decorate the card to your taste with sparkles, sequins, buttons, rhinestones...
You will need: A4 colored cardboard, wrapping paper or candy wrapper, thin black marker, scissors, PVA glue or hot melt glue, stapler, decorative elements (sequins, beads, rain, buttons, sequins, bows...).
Master Class

New Year card in minimalist style
Minimalism(from Latin - smallest) is a style that is distinguished by its simplicity and laconic composition.
You will need: A4 colored cardboard, a shaped hole punch or a stationery knife, thread, needle, sequins, a simple pencil, a ruler and scissors.
Master Class
- Make the base of the card by folding a piece of cardboard in half.
- On the right half of the card, sketch out a Christmas tree and a star top. Use a ruler and pencil.
- Cut through the star with a shaped hole punch or a stationery knife.
- Use a needle to make holes in the shape of a Christmas tree - a triangle.
- Take a thread and a needle and make stitches. After each stitch, string sequins.
- Carefully fasten the thread on the reverse side.
New Year card in origami style
Origami- This is a type of decorative and applied art, literally translated from Japanese as “folded paper” into various figures.
You will need: multi-colored A4 cardboard, PVA glue, scrapbooking paper or thick paper, decorative elements (sequins, beads, rain, buttons, sequins, bows...).
Master Class
- Make the base of the card by folding a piece of cardboard in half.
- Take 3 squares of thick paper whose sides are 20cm long.
- Fold the square diagonally, unfold it and fold it crosswise again diagonally (conditionally marking 4 triangles).

- Fold 2 opposite triangles inside.
- Press the resulting triangle to the surface and mark the conditional center.
- Fold the bottom corner parallel to the middle. Repeat this procedure with the second corner. The module is ready!

- Make 2 more of these modules, maybe in different colors.
- Assemble the Christmas tree in this way: glue the origami module to the right side of the postcard, form the Christmas tree from top to bottom, insert the next module into the previous one.

- Decorate the Christmas tree to your taste with sparkles, sequins, buttons, rhinestones...
You will need: A4 colored cardboard, scissors, a simple pencil, ribbons, PVA glue, decorative elements (sequins, beads, rain, buttons, sequins, bows...).
Master Class
- Make the base of the card by folding a piece of cardboard in half.
- Glue the tree trunk to the center right side of the card. The trunk should be made of brown tape and shaped like a trapezoid.
- Cut 6 strips of ribbons 2 cm wide, 2, 4,6,8,10,12 cm long.
- Cut the corners of the ribbons on both sides.
- Glue the tapes from bottom to top, in the shape of a triangle.
- Decorate the Christmas tree to your taste with sparkles, sequins, buttons, rhinestones, stars, bows...
You will need: A4 colored cardboard, scissors, a double-sided round napkin, a ruler, a simple pencil, double-sided tape, decorative elements (sequins, beads, stars, rain, buttons, sequins, bows...).
Master Class

You will need: A4 colored cardboard, A4 colored paper, scissors, a ruler, a simple pencil, a stationery knife, flat paper decorations (snowflakes, stars...), decorative elements (sequins, beads, stars, rain, buttons, sequins, bows...).
Master Class
You will need: colored cardboard and A4 paper, scissors, stationery knife, compass, thick thread.
Master Class

New articles
- Simple New Year's crafts with children: inspiring ideas and master classes
- How to properly clean fur products at home How to treat fur to make it shine
- Making jewelry using the Shibori technique: tips for beginners
- What to do if the baby cannot go to the toilet?
- Learning to make origami: Father Frost and Snow Maiden
- Paracord: weaving bracelets Paracord bracelet weaving pattern with clasp
- Origami paper bow Other paper bow patterns
- DIY fox costume What movie outfit would you wear to celebrate the holiday?
- Artistic design
- “I can’t improve my personal life after a breakup. What should I do to improve my personal life?
Popular articles
- Astrid Lindgren baby and Carlson • fairy tales Chapters from the fairy tale baby and Carlson
- In pursuit of youth - features of facial mesotherapy at home
- How to stop loving someone: ways to kill love How to understand that you have fallen out of love
- Lessons on knitting scarves with a braid pattern
- How to get rid of nail polish smell
- Take Libra men away from the family
- Knitted towel holder
- Women's mittens with Norwegian pattern
- Crocheting beads
- Folk remedies for cystitis during pregnancy