Original crafts made from matches. Crafts from matches - a simple small house What can be made from matches
Are matches not a toy for children? But no! We have made a selection of a variety of ideas for crafts made from matches for children. They are not only beautiful, but also useful. Working with this material develops logic, imagination, fine motor skills, and also contributes to the development of perseverance. If you add the use of plasticine or paints to the creative process, the kids will be even more happy.
We would advise you to do matchstick crafts with your children. If left to chance, they may quit this activity. If you get them involved, the process will be fun. Check out our selection, stock up on matches and get creative. We tried to make the most detailed master classes to make it easier for you to master the process of assembling crafts with your own hands.
Simple Shapes
Crafts made from matches and plasticine can be flat or three-dimensional. Choose any shape and fasten its body with bright plasticine balls.

In this way, you can assemble a simple house, a man, a pyramid, or any animals from matches. Take a look at the photo to understand the assembly principle and get some ideas. You can easily repeat them.
Any of these figures can be placed vertically. If you need a craft from matches for kindergarten or elementary school, we recommend making a house, a person and a dog. Place them on cardboard for a great composition!
Panel
You can make a cute panel from matches with your own hands. The craft can easily be turned into a photo frame or postcard - it all depends on the additional decor.

We will need thick cardboard. Measure the length of the match and multiply this number by 4. If you are making a larger panel, then multiply by 5, 6 and so on. Lay out the cardboard so that you get 16 equal squares. We fill the first square with matches, placing them vertically. One match looks up, and the other looks down. Fill the next square horizontally. So we go through the entire cardboard.
It is best to fix matches using simple office glue. Just don’t use too liquid, as it will soak the wood. The top of the craft can be coated with wood varnish. We glue a large beautiful artificial flower in the center, and beads or pictures around the edges.
If you are making a card, for example, for March 8 or February 23, find ready-made thematic clippings and glue them to such a panel. Or simply place a family photo in the center.
Drawing
Most children love to draw trees, houses and the sun. Almost every similar drawing can be made more interesting.

Take cardboard. Draw fairly large images of a standard house, fence, Christmas tree, apple tree, sun or something else. If the cardboard is not colored, paint it one color.
Take matches and fill all the empty spaces with them. You can fix matches using PVA glue or even plasticine.
All that remains is to decorate the matches in the desired colors. It is best to use gouache, as watercolor requires a lot of water and is not too bright.
Painting on a backing
It is very convenient to lay out paintings from matches on foam substrates. Wash it thoroughly (there were probably vegetables or herbs on it) and dry it.

Come up with a picture together with your child. You will need plasticine and some matches. Lay out the volumetric parts, and simply press the matches into the rolled out plasticine.
You can also create a painting using paints. True, watercolor will not fit on foam plastic. If you decide to paint the backing, take gouache and glue the matches onto PVA.
Such a craft made from matches can be safely taken to a competition in a kindergarten or elementary school (grades 1-2).
Finished drawing
If you have a child, then your house is probably full of different coloring books. If so, use a large image for the matchstick craft. You can also use various stencils and create your own drawing.

Glue the picture onto the cardboard. If there is no background, you can paint it over. Next, we begin to lay out the matches, pressing them tightly to the paper and to each other.
The heads of most matches will need to be trimmed first. In some cases their use may be appropriate.
It is best to glue matches with a cloth using stationery glue. If you need to fix a small part, it is best to choose superglue.
Complete the picture with any decor. If desired, the matches in this craft can be carefully painted with gouache or acrylic paints. Such works look beautiful in combination with autumn leaves and other natural materials.
Engine
For this craft, we will need not only matches, but also boxes. You also need to take 2 large “hunting” matches or matches for gas stoves. They are long, so they will be an excellent basis for the rails in our craft.

We lay out the rails from two matches vertically, then glue sleepers from short matches to them. Let them stick out a little around the edges. The easiest way is to coat long matches with glue, and then lay standard ones on top.
In the first box we make two small holes - we will insert toy headlights into our train. Fasten the boxes together with threads or matches. We will make the wheels from unnecessary batteries. If you don't have them, use buttons. We attach them to the craft with superglue.
This craft will be very interesting for children, especially boys. After all, we won’t just make it and put it on – you can play with it!
Snowflake
For this craft, you can additionally take toothpicks, although you can get by with matches alone. Snowflakes don’t have to be made in the winter – children love them at any time of the year.

As a blank, take a snowflake stencil or cut out a regular octagon. First we make the edges - glue matches or toothpicks so that they look beyond the edges. Then we fill each sector with matches, arranging them alternately: head up - head down.
It is best to stick the matches in the center first, and then lay the edges. If the cardboard is visible, glue cut matches to it.
You can lay out the second and third on top of the first layer. It all depends on how voluminous you want your homemade snowflake to be. Glue sparkles into the central part of the craft (make them from tinsel, rain or wrapping paper). You can also glue a decorative snowflake or polystyrene foam to imitate snow.

You can make this craft from matches with your child for the New Year for kindergarten. Or just for fun at home.
Vegetables and matches
Children always like crafts made from vegetables and fruits. If you add them with matches, it will turn out original and funny. Try making a hedgehog. Even the little ones can handle this kind of work.

Take a potato and a tiny garden apple. Draw a hedgehog face on the potato using a marker. Stick the matches in as tightly as possible to create needles. Plant an apple on top. If you don't have an apple, rolling it out of plasticine is a good alternative.
The craft is very simple, but it is perfect for kindergarten. And you can also play with it at home. Make a big hedgehog family - it will be fun.
Furniture
With this video master class, you and your child can easily make a toy furniture set. The table and chairs are useful for playing with dolls (albeit small ones) or kinder toys.
The assembly process seems confusing in words, so it's best to take a look at it. Step-by-step instructions will help you avoid mistakes and glue matches correctly.
We hope that this selection of matchstick crafts will inspire you and help your child do the best work for kindergarten or school. As you can see, all materials are very simple. In addition to a large package of matches, you will only need what almost every schoolchild has. Success in creative work!
Views: 3,088
You still don’t know how to make a house out of matches or create pictures from these wooden elements? Watch the master classes, which are illustrated with 57 photographs!
How to make a house out of matches?

To create it you will need only 3 items:
- matches;
- plasticine;
- coin.
- Place 2 matches parallel. Secure them to the work surface using plasticine.
- Place 8 matches on top, perpendicular to the data, so that the heads and tails peek out from both sides of the first two matches. Lay these “beams” at the same distance at home.
- The first tier is ready. The second also consists of eight matches, we lay them perpendicular to the first layer.
- Place 4 matches on top, around the perimeter.
- In total, you need to complete 6 such fragments, consisting of 2 rows of 8 and one of four matches.
- The creation of the frame of the building is completed with 8 matches laid parallel to each other and 6, which you place perpendicular to them. Here's how to make a match house next.
- To make the frame strong, press its fragments from above with a coin and from below with your hand. Holding the workpiece in this way, stick 4 matches in the corners of the house, and then around the entire perimeter.
- Place a coin inside the “logs”, press on it so that the structural elements are pressed tightly against each other, and the heads of the vertical matches are well defined. Insert 6 matches between them, and the same number perpendicular to the data.
- Here's how to make a matchstick house next to form the roof. Stick 4 matches into the corners of the frame, and then 7 more into the top of each wall.
- We place matches horizontally in the resulting roof box so that in each subsequent row there are fewer of them than in the previous one, and a triangular roof begins to form.
- There will be 6 matches left on one side and as many on the other side of the gable roof, while their heads will cross each other, and the reverse sides of the matches will be held on vertically placed “blocks”.

Here's how to make a matchstick house without glue.

Such a structure will be an original gift, and it is made of cheap material. If you liked this idea, don’t stop there, see what else you can make from matches. Such wooden objects look great, and you can organize a home display by placing them on a table or on shelves.

What can you make from matches?
Once you know the answer to this question, you will be able to make not only a house, but also many other interesting things. Do you want to have a whole composition made of wood? Then see how to make a well and a fence from the same material.

For this you will need:
- matches;
- stationery knife;
- wood glue;
- thin brush;
- toothpick;
- board;
- thin thread.
- First prepare your matches. Place one at a time on the board, cut off the heads with sulfur. Instead of throwing them away, they can be used for firecrackers.
- Place 4 matches, forming them into a square with ends extending beyond it. To do this, place the first one, place the second one perpendicular to this one, but so that at the point of their contact the end of the first one extends 5 mm.
- The edge of the second will come out the same amount and in the same way when you connect it to the third match. Using this technique, fold all 4 parts, gluing where they meet.
- In total you will have 9 rows of “beams” for the well house. In each subsequent one, the edges of the matches should come out so that with these elements of the previous one they form an angle of 90°.
- To make pillars supporting the roof of the well, place 2 matches parallel at a distance of 3 mm. Cut the third into 2 pieces, glue one to the top and the other to the bottom to connect 2 paired elements. Make another similar column.
- Insert a toothpick into the hole formed on one and the other side, having first wound a thread around it. Glue to the posts. Bend the toothpick on one side to create a handle for rotation.
- Making a roof. Place 2 matches in parallel, stick 13 matches on them perpendicularly, placing them close to each other. Also create the second half of the gable roof. Connect them by threading the top of two matches into the first slope, and the top of the other two into the second. At the bottom, glue a match horizontally on both sides so that the roof appears triangular from the side.
- Next to the well, place a fence made of two parallel matches, to which several more elements in the form of a picket fence are glued perpendicularly.

If you want, fashion a bucket out of plasticine or make one out of a thimble and attach it to the underside of the rope.
You can make a cart out of matches and add it to the landscape of village life.

To work you will need:
- matches;
- knife;
- glue;
- cloth

Now we will make an axle for the wheel. The first one will be the longest; this is necessary to connect the structure. Place the second axis so that it is perpendicular to this one.

Place four small pieces that will become the radii of this circle. Make the second wheel in the same way.

Glue them together with one match. Use the same technique to perform the second pair of wheels.

Now you need to connect these two blanks with three crossbars.

Let's start making the following fragments, which will tell you how to make matches an excellent building material for home creativity. For each of them, take two matches, place a small fragment of this material in the center, connecting the elements with glue. The second part is identical to this one.

Now place these two blanks in parallel, connect them with three matches, as in the photo. We glue two matches to the resulting part, placing them slightly diagonally.
There is very little left, and soon you will learn that you can make such an interesting cart from matches that will become an almost exact copy of the real one. We glue two diagonal pieces of wood together using a third one. We perform the same manipulation on the other side of the part.

Glue one matchstick on both sides of the cart and flip it over to the other side to fill each side with three small wooden sticks.

You can place the top of the cart on the wheel piece and place your new homemade woodworking exhibit next to the others.

After you've done a lot of useful things, you'll still have empty boxes, but they can be put to use.
The child will be simply happy if, together with him, you make a train like this, in which you can put small toys.

Here are the items that were taken for this creativity:
- match boxes;
- glue for cardboard;
- toothpicks - 9 pcs.;
- wine corks - 2 pcs.;
- several matches;
- threads;
- scotch;
- cotton wool;
- thick needle.

Make other cars in the same way. Connect them with a thread and a needle.
In order for the carriages to withstand the weight of the toys placed in them, take a strong thread, it is better to use yarn for this.

Now you can make a steam locomotive. To make it, glue an inverted box to a ready-made carriage, connect them together with another one, which needs to be placed on its small side.

To make a pipe that produces safe smoke, place several matches next to each other and place a toothpick in the center. Place some cotton wool on top of the pipe and wrap it all with tape to secure it. Attach this finishing touch to the locomotive by inserting a toothpick into its cardboard surface.
The kids will be interested not only in this idea. If you tell them what can be made from matches, they will be happy to make a funny picture. Depending on the age of the child, it can be simple or more complex.
How to make a portrait, a picture from matches?
If the child is small, before giving him matches for creativity, cut off the sulfur from them. After all, the baby can taste it, and the substance is very harmful.
Once the wooden sticks are ready, you can begin. So, for this picture you will need:
- matches without sulfur;
- sheet of cardboard;
- pencil;
- glue;
- paints with a brush.
Once the donkey is created, have your child paint over the background of the picture. You can glue a few small branches, and the masterpiece is ready.

See how to make a house out of matches so that it is flat.

The walls are square, the roof is rectangular. For trees, a trunk is first made, then branches are laid out from matches.
A very interesting idea is offered for older children and adults. After reading it, you will learn how to make a portrait from matches.

You will need a lot of them and preliminary preparation is necessary, since you need to remove the sulfur. To do this, matches are placed in a basin of water and the spraying that is unnecessary for further work is washed off. Then they need to be dried.

Using an awl or other sharp object, make 4 holes in the box, it is important that they are at the optimal distance. If it is small, then all the matches may not fit, and if it is too large, then the formed cube will become too loose and crumble.

Next, you need to make some kind of well, the walls of which consist of seven rows of matches.

We fill the inside of the blank by placing matches around the entire perimeter. We align them with a coin, after which we remove this cube from the box and, very carefully so that it does not crumble, press it on all six sides.
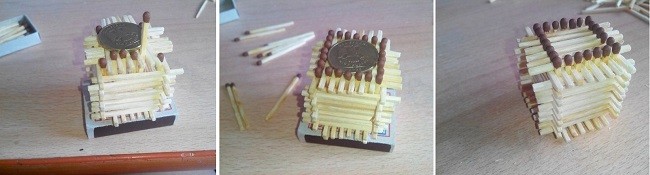
We place this square blank on its side and fill the top side with a horizontal row. We also decorate the other three sides.

During this work, do not forget to carefully crimp the cube so that the wooden components fit more tightly to each other.
Now let's talk about how many matches you will need. Approximately 150 pieces will be used for one cube. In total you need to make 30 of these figures. Place them next to each other so that the heads of the unwashed matches with sulfur are at the edges. Then they will form a beautiful frame.

Connecting the squares is very easy. Stick 4 matches along the edges of the first and second, press slightly so that these two figures begin to fit tightly to each other. Create the first row this way.

Then, also, connecting the elements with four matches, build a canvas for the picture.

To make a matchstick portrait next, print out the image. This could be a favorite hero, a friend, or a self-portrait. Print the image in black and white using checkered paper. If this is not possible, then simply line the photo by drawing rows with a ruler and pencil. The lines delimiting a square measuring 10 by 10 cells should be more distinct.
This is what the portrait should look like on the grid. For example, let's create the appearance of Paul Walker from matches.

Looking at the alignment, place the matches with the sulfur heads first where there are dark fragments in the photo. This will highlight them and you can take a portrait.

All that remains is to disguise the joints of the cubes so that these places look more neat, and you can put your work in the most visible place and be rightfully proud of it!

If you still have any questions, watch the three videos. From the first story you will learn how to make cubes for the base.
The second shows how to connect these fragments into a whole canvas.
The third plot will teach you how to transfer the image you like onto a stencil and lay it out from matches.
![]()
One of the simplest and at the same time common materials for needlework is, of course, matches. And making some kind of craft from matches can bring a lot of positive emotions and satisfaction.
Anyone who makes something from matches is akin to a creator who sculpts his own work of art. Sometimes even a craft that is simple in concept can actually become a unique creation.
From matches, using very simple techniques, you can make seemingly incredible things: cars and carriages, palaces and houses, and spaceships. But, of course, the most complex crafts cannot be completed in a couple of hours. This takes weeks, or even months, of persistent and painstaking work. But this work brings incredible satisfaction and delights in the result with an excellent result, which you are not ashamed to brag about to your friends and display in a prominent place in the living room. Especially when such crafts are made with young helpers.
At the same time, making crafts from matches not only brings pleasure, but also allows you and your child to develop fine motor skills and precision of movements, perseverance in painstakingly achieving goals and perseverance, quick wits and creative thought.
Let's take a brief look at the history and production of matches.
Where did the MATCH come from?
It is believed that the word “match” itself comes from the Old Russian word “matches”, which is a derivative of the word “spoke” - a pointed wooden stick. Initially, such “knitting needles” were sharpened wooden nails driven into the sole of shoes for fastening. To denote matches in the modern sense, the phrase “incendiary matches” was initially used, and only over time the first word disappeared and everyone began to call matches simply matches.
The first mentions of some kind of matches date back to the 13th century and are contained in manuscripts from China. So, we can assume that the Celestial Empire is their homeland. These matches made it easier to start a fire using tinder and flint and were lit not by friction with the surface, but by touching the smoldering tinder.
It was from China that matches reached Europe in the late Middle Ages.
In Russia, the first manufactories for the production of matches appeared in the thirties of the 19th century, after which at the beginning of the 20th century there were more than 250 match factories.

Production of matches.
An ordinary match consists of a head and a straw.
The head is made of powdered substances (Berthollet salt, potassium chromium, pyrolusite, ground glass, zinc white and red lead) diluted in an adhesive solution.
Straws are most often made from aspen.
To obtain the ignition process, a layer of powdered substances is applied to the matchbox: antimony sulfide, red phosphorus, red lead, kaolin, gypsum, also diluted in the adhesive mass.
Methods for making crafts from matches.
Crafts from matches can be made in two ways: with and without glue.
At the same time, of course, when using glue, making crafts from matches is much easier and even novice craftsmen and craftswomen can do it.
The undoubted advantage of glue crafts made from matches is that this material is essentially wood, and it is perfectly glued with various household adhesives (without the use of industrial or construction samples). All ages from kindergarten to old age can create with it.
By giving matches various shapes, bending and gluing them, you can get quite complex-looking objects, such as houses, and home interiors, figures of people and animals, for example. But there is one mandatory rule: the glue must be allowed to dry.

And at this time it is undesirable to do any manipulations with the craft, so as not to violate its integrity. Only after the glue has completely dried can you continue working on the craft.
Thus, although crafts with glue are much easier to make than those without glue, the time spent on making such crafts can be quite long due to waiting for the glue to dry.
However, can this be considered a very significant disadvantage?
Yes, it’s unlikely that you’ll be able to make a craft from matches and glue in one evening (except for very simple ones). But even if you spend a week, or even a couple, on creativity, as a result, when a neatly glued tower or do-it-yourself doll furniture rises on your table, and even more so with children, then a sea of positivity and joy is guaranteed to everyone who took part in creating such a craft.
When using the glue-free method of making crafts from matches, the creator requires a little more accuracy and dexterity. But this method is also very common and is a wonderful pastime.
Making even the simplest matchstick house without glue, such as a hut, requires quite a lot of perseverance, effort and patience. And sometimes you will need to practice several times on unsuccessful crafts in order to finally get a result that satisfies you.
The easiest way is to start by mastering simple general patterns for folding matches into one structure, and then move on to creating more complex objects from these simple “blocks”.
For example, having learned how to make a “hut” structure, from several such “block elements” you can later make a tower and a castle.
With this method of making crafts, it is necessary that each of the block elements, and with them the entire structure, be tightly assembled and can withstand the own weight of the entire complete structure.
In the absence of adhesive elements, this is very important and will not allow the finished craft to crumble and reduce all efforts to nothing.
In fact, it is possible to make a craft without glue due to the fact that the heads of the matches, intersecting with each other, create a kind of clamp-lock, and due to the rough surface of the wooden straws, a friction force arises between them, which keeps the structure solid.
It can also be very interesting to use matches with different colored heads in crafts. The most common matches are those with brown heads, but there are also green and red heads. By using and combining different colors you can get interesting decorative elements for crafts, for example, for the roofs of buildings or individual pieces of furniture.
Before you start making crafts from matches, you need to:
The very first thing, of course, is to purchase matches: on sale in hardware stores you can find boxes with a thousand or even several thousand units of matches. This is very convenient and provides a lot of material for crafts at once.
But no one bothers you to buy ordinary small boxes containing from several dozen to several hundred matches.
The only requirement: it is desirable that the matches be more or less even. It is unlikely that it will be possible to assemble an even, correct structure from bent matches and knots containing inclusions. Although, using imagination, it is possible to get very unusual results.
You need a suitable place for crafts, where you can collect them, prepare the initial blocks for them, so that no one accidentally knocks them down or scatters them.
And, of course, a place where crafts can dry out while working.
As we have already said, this can take quite a long time and it is unlikely that your unfinished crafts will remain intact and safe on the kitchen table of a large family.
It is advisable that this place be covered with oilcloth or paper, so as not to stain the surface with glue during the process of assembling the craft.
— for glue crafts, it is convenient to use tubes with thin necks, from which you can apply glue to matches in a thin strip or drops, for example these:
But you can also pour glue into a small container, from where you apply glue on the edge of the match with a toothpick or an unbent paper clip.
WARNING: Children must be supervised and avoid getting glue in their eyes. In this case, immediately rinse your eyes with warm water and, in case of the slightest suspicion that glue has actually gotten into the eye, consult a doctor.
As noted above, it is important that the matches are as even as possible. Sometimes it is necessary to select and sort those with the smoothest edges. This is especially important for the external elements of the craft, which will always be in sight. We use less even ones for internal, hidden elements fixing the structure.
You will definitely need a fine-grain sandpaper (silk) in order to remove small irregularities and burrs on the matches. A needle file is also useful for sharpening the edges of matches and grinding them to a specific size.
You will also need a knife, scalpel or paper cutter to cut matches to a certain length and cut off the heads. Which one will be more convenient to use? We sometimes take nail clippers.
ATTENTION: when handling sharp objects, try not to give them to small children and watch all manipulations with them. We don't need tears over cut fingers, do we?

Types of matches:
There are different classifications of matches, depending on certain characteristics:
straw material:
- wooden (made from soft wood - aspen, linden, poplar, etc.);
- cardboard;
- wax (paraffin - made from cotton material impregnated with paraffin).
ignition method:
- grating (ignited by friction against a special surface - a grater)
- sterile (sesquisulfide, that is, ignited by friction against any surface).
Special matches:
In addition to household matches, special ones are produced:
- hunting (so-called storm) - burn in rain and dampness;
- signal - when burning they produce flames of different colors;
- thermal (heating) - develop a higher temperature during combustion;
- photographic - give a one-time bright flash, used when taking photographs;
- fireplace matches - matches with very long straws, especially for lighting fireplaces and in hard-to-reach places;
- gift (collectible) - matches specially released in limited quantities for collectors of a unique type (shape and color of the head) or in unique boxes, and sometimes having a numbered or symbolic marking confirming their collectible value.
As the famous phrase from the poster says, “matches are not a toy for children.” But we won’t let the children set them on fire (although sometimes for crafts it is necessary to burn the head, but more on that next time). For us, children's crafts made from matches will be a great way to captivate little fidgets, spend quality time with them, and instill in them attentiveness, accuracy and neatness. And, of course, having made an original craft as a result, you will get a lot of pleasure and positivity.
It's a rough start, and the first, perhaps not entirely even and slightly skewed craft, can be followed by real masterpieces. And a child who enjoys such needlework will become a real master in the future, participating and winning in international competitions.

So the most interesting things are yet to come!
Best regards, Just Crafts!
Matches can be found in any home. In addition to the main function of this item, they can be used to create crafts. This activity improves fine motor skills, concentration and perseverance. Crafts made from matches can be of any complexity, so not only a child, but also an adult who loves making crafts with their own hands can find an interesting task for themselves.
What crafts can be made from matches?
A beginner who likes to create crafts may have a question about what can be made from matches. Crafts can be either flat or voluminous.


Here's a more detailed list of possible crafts:
- Boxes and boxes made of matches;
- Furniture for dolls;
- Paintings and compositions;
- Accessories;
- Volumetric products such as ships, houses, animal figurines, etc.

The list of possible options is not limited to five points. Rely on your imagination and bring any crafts to life.

If you need a craft that matches a specific theme, pay attention to the photos of crafts made from matches on the Internet - this will help you get an interesting idea.

Before you start creating match structures, you need to prepare for work. For convenience, we recommend that you adhere to the following recommendations:
- First of all, you need to find a comfortable place to work.
- To avoid surface contamination, cover your work table with a tablecloth.
- If glue is used for work, pour the liquid into a separate saucer. It is better to pick up glue with a toothpick.
- Prepare a utility knife.
- Before you start creating designs, cut off the heads from the matches. This way the result of your work will look much neater.

Simple match crafts for beginners
To create great things, you need to start small. So, before taking on complex work, it is better to start with simple tasks that will help improve concentration and skills.

In addition, handicrafts have a positive effect on the nervous system. Next, we list the favorite tasks for beginners in the field of creating match structures.

Making a match house without glue
Making a simple matchstick house without using glue is one of the most popular craft options. This initial stage is necessary in order to subsequently create magnificent matchstick copies of existing architectural masterpieces.


So, here's a list of the items you'll need:
- Stand;
- 7 matchboxes;
- 2 five-ruble coins.

After you have prepared all the necessary items, let’s begin the master class on crafts made from matches:
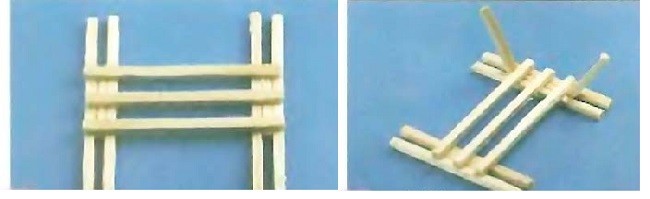
Place two matches parallel to each other on the stand. Place eight more matches perpendicular to the two existing matches. This is how we created the foundation of the future house.


Lay out 7 rows of four matches, heads in a circle. Place 8 matches facing away from the foundation. Place six matches at the top of the house and place a coin on top.

The last two rows have a hole into which you need to insert several matches. Place one match at a time, holding the structure so that it does not collapse.

Place a match in the holes between the walls, then level the structure.


Before you begin creating the roof, make a horizontal roof using the method of alternating the heads and backs of matches. Insert sticks along the perimeter of opposite walls. Insert items perpendicular to the ceiling.

Rely on the instructions for properly making crafts from matches. If the diagram shows windows and a chimney, they can be made using the method of creating an outline with brown match heads.


How to make a cat from matches
This task will definitely delight your child. So, in order to create a figurine of a cute cat from matches, follow the following algorithm:
- Glue 14 matches together with PVA glue. When the glue has dried, cut out a circle or oval from the plate. It will serve as a muzzle for the cat.
- Glue 7 matches together and cut out ovals from them for the cheeks, and 5 matches for the ears. Glue the cheeks and ears to the cat's head. Place the cut pieces of matches with sulfur on the muzzle so that it serves as a spout. Make eyes for the cat.
- Glue a pentagon from six matches. Fill it with scraps of matches. Attach the cat's head to the body. The torso should be supported by a stand. Glue three cut matches on the back so that they hold the cat's body.
- Make legs from three pieces of cut matchsticks and glue them to the bottom of the body. The components of the paws with sulfur can serve as the animal's claws. The remaining remains of the matches can be connected to each other so that they form a tail.

If you wish, you can attach a mustache or tongue to the cat from plasticine. So, the beautiful craft made from matches is ready, now it can decorate the shelf of a bookcase or desktop for many years.


Drawings from matches
In addition to creating crafts, you can make drawings from matches that are not inferior in beauty to crafts made from matches. Externally, such a drawing looks like an applique. The result can be framed and hung on the wall.

So, before applying matches to the surface of the cardboard, you first need to sketch a drawing with a simple pencil. Next, make an outline for the match pattern, thinking about what size match to use in which case. After creating the outline, start gluing the matches to the cardboard.

If desired, you can use additional decorative elements, for example, if a house is depicted on cardboard, you can glue ready-made fabric flowers or satin ribbons in the shape of a rainbow to the bottom.

Conclusion
In this article we learned how to make crafts from matches with your own hands. You will definitely enjoy this activity, because gluing together small particles to create a single picture or craft will instill delight in your heart.


In addition, such work is very calming and uplifting. Don’t be afraid to take on difficult tasks and conquer new heights, as creativity requires constant practice and learning new things!

Photos of crafts made from matches


One of the simplest, most accessible and cheapest materials is matches. They can be used by both children (under adult supervision!) and experienced adults to create artistic objects of varying complexity. From this simple material you can build a small boat and a fully armed battle cruiser, Baba Yaga's hut, a village house and a real church with onion domes and a high belfry.
The ability to make crafts from matches is not only a pleasant leisure activity for experienced adults. For young children, this is a way to expand knowledge and skills, and the ability to work with their hands develops fine motor skills. In turn, these skills help cope with learning difficulties - such children learn material more easily and have excellent memory.
First, you should master crafts from matches for beginners. Despite the simplicity of the material, you need to firmly grasp the basic rules, and then you can move on to real creativity with the invention of special forms and the manufacture of unique objects.
In most cases, there are detailed instructions or an interesting master class for any match object on the Internet. To facilitate the work, a photograph or painting depicting the future object can be used. There are also many videos of various crafts master classes online that can be downloaded to your computer and used as a visual aid.
For work you will need the following tools and materials:
- Matches - regular and fireplace, especially long and strong, which can be used as a basis for complex, large and fragile compositions. You can get creative and put together a set of matches with colored sulfur heads. With their help, interesting color accents are introduced into the work, the product becomes bright and individual. Matches with brown, hot pink, blue and green heads are often available for sale.
- Wooden toothpicks or skewers for kebabs. They are used for the same purpose as fireplace matches.
- Glue. It is better to work with something that “sets” as quickly as possible - this way the work does not “float” under its own weight.
- Plasticine. For small children, it is better not to glue matches, but to fasten them with tiny pieces of plasticine.
- Small side cutters or nippers, or old manicure nail clippers. They are much easier and more accurate to cut matches or “bite off” unnecessary heads than with scissors.
- The basis for work is most often thick cardboard.

Before starting to work, young children need to be explained that matches are not a toy, they can be dangerous. It is important to convey to them that sulfur from the heads is poison, and putting matches in their mouth can be very dangerous to their health.
Products made from matches with glue
Crafts made from matches with glue are much easier to make than without glue. To do this, it is enough to have a good idea of what the finished object will look like or have an image of it before your eyes. A novice civil engineer can use step-by-step tips to create a craft and use plasticine instead of glue for the first trial work.
When the first skills are obtained, you can move on to more complex work. Most children are especially interested in how to make a match house with glue. With its help, they will be able to act out various scenes from their favorite fairy tales.
Well
To begin with, you should make simple but interesting crafts from ordinary matches with your own hands. For example, a well. It's easy to do and very fun:
- First, two parallel lines are laid out on a solid base - the bases of the sides of the well.
- Two more parallel elements are placed perpendicularly on them. It turns out to be a square - the lower “crown” of the well frame.
- Gradually adding two parts at a time, alternating their positions, the desired height of the well is obtained. It is important to remember to glue each beam in those places where it intersects with others.
- When the log house is ready, it is allowed to dry completely so that the glue firmly connects the fragile parts.
- After drying, two skewers, toothpicks or fireplace matches are glued in the middle of the parallel sides. They will serve as supports for the gable roof of the well and for the gate. A through hole is first made in a pair of supports. The gate rod will be threaded through them.
- While the supports are drying, you can make the gate. For its rod, use a long match or a strong metal wire (you can carefully bend and straighten a large paper clip).
- A strip of paper is wound around the center of the rod, gluing it together to form a cylindrical collar.
- The finished gate is carefully inserted into the holes left in the vertical supports.
- For beginners, it is best to make a roof from a rectangle of cardboard bent in half. It is glued to supports or secured to them with plasticine.
- The top of the roof can be covered with matches, imitating wooden shingles, or you can lay out a figured pattern from them as you wish.
The resulting well can become one of the objects of a future village made from scrap materials.
Simple crafts with children
Crafts made from matches - panel “Star”
From a distance, such crafts made from matches look like decor made from natural wood, and only by looking closely can you see what they are made of. To create such beauty you will need to stock up on several boxes of used matches, glue and patience.


- Step 1. Print out the template for the “Star” matchstick craft (for convenience, we divided it into 2 parts). Using this template, you need to make a blank for our panel from thick cardboard (it’s convenient to use a cardboard knife).
- Step 2. Mark along the dotted lines indicated on the template. We will use these lines as our guide when we start gluing the workpiece.
- Step 3. Prepare the material. It is important that it all has approximately the same degree of charring, then our matchstick craft will look solid and neat. Fold them in the form of a bouquet, squeeze them between your fingers, lower their heads down, holding them at a slight angle, set them on fire and quickly extinguish them. Remove any remaining sulfur heads and charred ends. To save material, set fire to the next “portion” as you assemble the panel. To assemble the structure, use only matches of the same size.
- Step 4. The most painstaking stage of creating crafts from matches. We begin to assemble the panel from the center of the cardboard blank. Carefully dip one piece with the non-charred end into the glue and draw a line clearly along the pencil markings, similarly coat all 5 guide rays of our star with glue and glue matches to them (Fig. 4.). In the future, these lines will serve as guidelines.
- Step 5. Gradually cover the entire area of the workpiece, following the guide lines. Try not to allow gaps between adjacent matches (Figure 5-8). When the work is finished, wipe off the excess glue with a damp cloth and let the matchstick craft dry thoroughly.


The “Star” panel is ready. If desired, you can varnish it or paint it with paints.
"Candy" flowers
Matches are not a toy for children, but only if they are used for their intended purpose. If you use them as materials for applied arts, they do not pose any danger. An interesting and easy-to-make craft made from matches is “candy” flowers. We will need:
- box of matches;
- colored cardboard;
- glue.
First, cut out 2 circles from colored cardboard, with a diameter slightly less than the length of a match multiplied by 2. Connect them with glue with the colored sides facing out. Next, you need to make a cross, as shown in Fig. 1., dividing the circle into 4 sectors.
You need to glue 3 more pieces into each sector, keeping the same distance between them (Fig. 3.). Decorate the middle of the candy flower with a core made of colored paper or fabric (Fig. 4.). The final touch of our matchstick craft is gluing a stem cut out of colored paper.

"Order"
Another simple option for making crafts from matches with your own hands, which a child can master, is an order in the form of a star. To create it you will need:
- thick cardboard (you can take packaging);
- textile;
- large button;
- glue;
- a box of matches (it is better to take matches with red heads);
- wide ribbon.
First, draw a five-pointed star pattern on plain paper. Using this template, we cut out 2 blanks of the same size - one from cardboard, the other from fabric. Using glue, we decorate the cardboard template with matches (Fig. 3), glue a star cut out of fabric on top, decorating it in the center with a button (the button can be sewn in advance or also attached with glue), as shown in Fig. 5.
To make our match craft even more like an order, we complement it with a ribbon loop.

New Year's numbers
From ordinary matches you can make luxurious three-dimensional decorative elements in the form of congratulations, symbols, logos, etc. The principle of creating such masterpieces is the same:
- On a wooden plank, outline the contours of an image/number/logo, etc., with a pencil (Fig. 1);
- Attach the matches vertically, heads up, using glue. It is most convenient to use a glue gun (Fig. 2, 3);
- This way we fill the contours of the image completely. We decorate the empty spaces using liquid foil (Fig. 4).
Products without glue
Crafts made from matches without glue are considered more complex. In order to connect them to each other, you need to use a physical fastening method. This is a job for older children who are already good at performing small and complex actions. To complete this work, you only need matches and detailed instructions for implementation.
Basic model - cube
In order to perform complex work, you need to learn how to make simple geometric shapes. They form the basis of more complex and sophisticated objects.

- Place two matches parallel.
- Place eight pieces evenly on them perpendicularly.
- Place the elements with their heads in one direction. You should end up with two sides with heads and two sides without them.
- Lay out another row of beams perpendicular to the previous one.
- The resulting lattice is the basis for the future cube.
- Two parallel supports are placed on it on the sides of the base.
- In the next row, the parts are placed on the other sides of the lattice in exactly the same way.
- Perform six more such rows to obtain a uniform cube.
- The top of the cube is made in exactly the same way as the base - six beams intersecting with eight perpendicular elements.
- To complete the work and fasten all the parts at all four corners of the cube, insert the beam vertically.
- Gently press the work on top with a small weight, such as a coin, to secure the position.
- Insert vertical supports along the entire perimeter into the grooves between the elements.
- Lightly crimp and straighten the finished figure to obtain a durable structure.
Such a cube is the basis for creating other, more complex compositions, for example, a house and a boat.
House
Anyone who has learned how to make a cube can figure out how to make a small match house without glue:
- Turn the previously made cube upside down so that the bases of the matches without heads in the form of a square are visible on the surface of the cube.
- Inserting the parts with their heads up into the grooves between the horizontals, “circle” this square from the outside. A larger square should form from elements with heads.
- Insert into empty corner points along the vertical support.
- The two parallel sides of the cube will become the gables of the house. To do this, pull the parts up at exactly the same distance so that they look like two identical triangles.
- Connect the triangles with parallel lines, forming a gable roof.
- Fixing the elements with their tops, lay a roof with a ridge of heads on the “beams”.
- The pipe is made from 4 matches stuck into the roof. Their length must be shortened with wire cutters.
- The parts inserted with a square and a rectangle with their heads facing outwards will become a window and a door.

The house is ready. You can add a fence, benches, a front garden and several more similar houses, a well. The result will be a charming village for fairy-tale characters.
Ship
After the house, it's time to learn how to make a beautiful ship out of matches:
- Before starting, the sides of the cube are lined with matches so that there is a lattice everywhere.
- The cube is placed on its side so that its bottom faces to the right and its top faces to the left.
- From the bottom left, five parallel matches are pulled out on each side. You should end up with a staircase with the longest step at the top.
- Between the extended beams you need to mark matches horizontally, alternating their heads and bases.
- The lower level is 2 matches, the second is 4, the third is 6.
- Now you need to insert 7 matches parallel to the extended fourth side matches. The result will be the side of the ship's deck (from 4 and 5 extended matches).
- Along the slope of the stairs, install an oblique row of parallel matches - the bow of the boat.
- For the stern, extend 7 matches from the underside of the base to half the length.
- Reinforce the side with 7 elements.
- For the stern, insert three matches on each side using a ladder with a reverse slope (the lower ones will have to be shortened).
- Place the horizontal lines as on the nose.
- Insert 9 elements for strength.
- Secure the side surfaces with two parts.
- Make an inclined plane as on the nose.
- Make a pipe from the parts with the heads up.
- Draw portholes.
The work is ready! If the boat is assembled correctly, it will hold together perfectly without a single “nail,” that is, a drop of glue.
Based on this simple figure, you can create more complex advanced compositions, but the principle of operation will be the same. On a large ship it will be possible to install several pipes and try to attach a large paddle wheel. It will be very beautiful and interesting.
New articles
- Summary of a lesson on environmental education in the second junior group “Visiting forest animals”
- The procedure for registering additional payments to pensions for children
- Educational games for children of the fifth month of life
- Patterns for knitting mittens
- I hate my father: how to deal with this feeling
- Planning conception and pregnancy using the method of Dr. Jonas
- Payments for caring for disabled citizens
- Glazing hair Glazing hair pros and cons
- Review: “barefoot on the clouds” - for those who are afraid to fly, and not only
- Rinsing hair with vinegar: benefits, harm, recipes
Popular articles
- DIY New Year cards
- DIY paper Santa Claus
- Album "do it yourself" (soldiers)
- Make cheese out of paper. Mouse on paper cheese. How to make a mouse on paper cheese
- Why does the skin peel after surgery?
- Emphasizing your sense of style How to wear beige trousers
- Integrated modeling lesson “Hedgehog” (middle group)
- Repair during pregnancy
- How to crochet a dress for a girl
- Christmas angels made of paper - Irzeis – LiveJournal