Ways to weave braids for girls of medium length. Weaving beautiful braids for girls for different hair lengths
Those who have a daughter are familiar with thinking about what hairstyle to give a little fashionista, while combining beauty, simplicity and speed of execution. The answer to this question is very simple: stylish braids for girls. Weaving is at the peak of popularity today, and almost any hairdresser has such skills.
Hairstyles designed for little girls are distinguished by the fact that they do not require much time to perform, and the principles of weaving are understandable even to beginners in this matter. Moreover, there are many types of braids and techniques for different hair lengths; you can even braid short strands.
403 Forbidden
403 Forbidden
nginxFor children's braids, the priorities are:
- Practicality. The hairstyle should be maintained during dynamic children's games.
- Fast weaving. When getting your child ready for kindergarten or school, sometimes there is no time left to do a complex hairstyle.
- Safety. To fix everyday children's hairstyles, it is not recommended to use pointed hairpins, pins, bobby pins, as well as chemical modeling foams, gels and varnishes.
These qualities characterize braided hairstyles.
You should not immediately take on the execution of complex options. To learn how to make intricate braid hairstyles on hair of different lengths, you first need to master various braiding methods. Then it will be easier: by combining several options, you can not only weave popular braids, but also come up with your own.
The peculiarity of weaving in this case is that it is difficult for children to sit in one place for a long time. Fortunately, beautiful children's braids are quite fun to create, since such hairstyles can be made bold, mischievous and playful.
For medium and long hair
403 Forbidden403 Forbidden
nginx- Try to keep the braids fairly tight. They should last all day and not fall apart. But you shouldn’t tighten it too much so as not to cause discomfort to the girl.
- Children's hairstyles require some skill, since girls usually do not like manipulation with their hair. Hairstyles for little fashionistas should be easy, quick and at the same time beautiful.
Simple braids

403 Forbidden
403 Forbidden
nginx- The hair is divided into three identical strands.
- The right part of the hair is thrown over the middle.
- Then the left strand is placed on the right, which by this stage has already become middle.
- In this way, the strands are intertwined until a tiny tail remains.
Often girls have two such braids braided at the back or on the sides. You can weave bows, ribbons, and decorative cords into them. The big advantage of this hairstyle is that it is easy to do. Such braids look cute on both babies with short hair and young ladies with long curls. Over time, it will not be difficult for a child to learn how to weave such a braid on his own.
French braid (spikelet)
403 Forbidden403 Forbidden
nginx 403 Forbidden403 Forbidden
nginxThis hairstyle is the easiest to braid. Plus, it looks very advantageous and beautiful. Almost every girl knows how to weave spikelets, and some can easily make them for themselves. If you don't know how to braid ears yet, it's time to learn.

- Separate a strand almost equal in volume to the bangs. As with a simple braid, divide the strand into three equal parts.
- We begin weaving a simple braid. Place the strand on the right side over the central one. On the left side we also place a strand on the central one.
- Now begins the main difference between French braiding and simple braiding. Place the right strand over the center one. Take a small strand from the side and add it to the one you just used. We continue to weave in this way.
- As soon as the hair on the sides of the head runs out, you can add a regular braid or immediately tie a ponytail.
Spikelets are made not only one at a time, they are woven in twos, three or more. It all depends on the chosen hairstyle.


More experienced craftsmen can weave spikelets to one side, in a circle, from bottom to top. You can start braiding a spikelet from behind the ear, and then attach it to the remaining hair tied in a ponytail. This hairstyle can be done not only by a child.
French braid inside out
403 Forbidden403 Forbidden
nginxThe French braid is a very common hairstyle and can be seen in a wide variety of variations. One of them is the inside-out spikelet.
The weaving technique is practically no different from a regular spikelet. The only difference is that it is woven from the inside out. That is, the strands are placed not on the central one, but under it.
Braid-harness
403 Forbidden403 Forbidden
nginxIn principle, such a braid can be made like a spikelet.
Braiding - video
- We tie a high ponytail. We separate a thin strand and pin it, we don’t need it for now.
- We braid the braid in the opposite direction. In this case, from each applied strand we select one small strand.
- After we have braided the braid, we begin to make a tourniquet. Take two loose strands and twist them in one direction. Now we twist them together, but in the other direction.
- During the twisting process, we pick up the loose strands one by one. All of them must be twisted separately in one direction, and the common strand in the other.
Pigtail rope
403 Forbidden403 Forbidden
nginx- We take a thick strand, which we divide into four equal parts.
- We overlap the central strand on the right with the two left ones.
- After this, we place the right strand on the right central one.
- Place the left central strand over the right one.
- Place the left strand over the left center one. Thus we weave until the end.

403 Forbidden
403 Forbidden
nginx- We divide the thick strand into two parts.
- We twist each part in the same direction.
- Now twist the tourniquet in the other direction.
- After each twist, add one strand, also twisted.
- We weave to the end and tie.
403 Forbidden
403 Forbidden
nginxTie a ponytail. On the right side of the tail we take a small strand and weave a spikelet. But we take the strands only from the left side, as if from under the tail.
Practice before braiding your child's hair. Under no circumstances do you do your hair at the last minute: you will ruin your child’s mood and won’t be able to do it in time.
Festive version of the spikelet
403 Forbidden403 Forbidden
nginx- Using a comb with a long thin handle, draw a line from ear to ear, thereby dividing the hair into two parts.
- We fasten the lower part with a hairpin or elastic band.
- We divide the top one into two more parts with a vertical line. We also divide these two in half.
- We fasten all the ponytails with elastic bands so that they do not get tangled.
- From the left strand we begin to weave a not too dense spikelet inside out. We pull out the strands.
- Repeat this with all the other top parts. We secure all the spikelets with a common rubber band.


Unusual braid
First, we make a parting. For a better effect, the parting line can be zigzag.
- Divide the left side with a horizontal parting and tie two ponytails.
- We braid two braids from the upper ponytail. We tie them with an invisible elastic band when the braids reach the lower ponytail.
- We untie the lower ponytail and connect its strands with the strands of the braids. We are already weaving three braids out of them. We secure each one with rubber bands.
- Now they need to be tied together with elastic bands in several places.
- The braids need to be pulled out in such a way as to create voluminous shapes.
Wreath

403 Forbidden
403 Forbidden
nginxEvery girl has woven a wreath of flowers at least once in her life. Why not make something equally beautiful out of your hair, and it will last longer.
Take two strands near your temple. We wrap one of the strands around the other. We connect the strands and separate them again, but in a different way. We repeat the same operations. When you have finished braiding, secure the end with a thin elastic band and bobby pins.
Hair flowers
403 Forbidden403 Forbidden
nginxThis flower can be used to decorate the end of a spikelet, a tail, and any other hairstyle using braids. It's very easy to make.


We braid a regular braid, while carefully pulling the strands from only one, outer side. We twist the flower, securing it with several bobby pins.
Snake
403 Forbidden403 Forbidden
nginx- Separate a small strand at the temple and divide it into three parts. We begin to weave a spikelet, adding strands only from the forehead.
- When we reach the ear, carefully turn the braid and continue braiding.
- To make the braid look even more beautiful, we pull out the strands.

Hairstyles for short hair
Many people think that they can’t braid their hair with a haircut. Of course, some hairstyles are only suitable for long hair, but you can also find a hairstyle for short hair. You can braid different variations of braids, spikelets and plaits on short hair. So, don't despair!
Waterfall
403 Forbidden403 Forbidden
nginx


- First, we make a horizontal parting. We divide the hair from the top into three buns.
- We begin to weave like a regular braid.
- Next, we place the right strand on top of the central one, pick up a thin curl from above and release the just used right one down.
- We continue in the same spirit.
- We secure the hair with an elastic band and bobby pins.
Cobweb
403 Forbidden403 Forbidden
nginxThis braid is woven from bottom to top. From the temples we separate the strands that will be woven into it. We begin to make a spikelet from below. We tie our hair into a high ponytail. Or in another way, look at the photo below.


403 Forbidden
nginxThese braids are woven like French braids. The only difference is that the dragons are made small from very thin strands. Therefore, quite a lot of them can fit on your head. Usually they are not woven to the end, but tied in the middle of the head.
In the summer, in order not to spend a lot of time on hair, they braid many small, small braids after the dragons. This hairstyle can last for several days.
403 Forbidden403 Forbidden
nginx- We tie a ponytail.
- We divide it into three parts, each of which is braided.
- We leave the tails minimal and secure them under the elastic with bobby pins.


403 Forbidden
nginx- We braid several (from 5) braids up to half the head.
- Take two strands of hair from the top of your head. Place the right one over the braids, the left one under them.
- We tie the ends of the braids into a ponytail. Using styling products we form beautiful strands.
Some simple braid hairstyles
403 Forbidden403 Forbidden
nginx- We braid four thin braids on loose hair. We attach crabs at the base and on the tails.
- We make two tails, from which we weave braids. Decorate with beautiful rubber bands.
- We tie a ponytail at the top of the head, leaving hair at the edges. We divide them into strands, each into two more curls. We take two curls from adjacent strands and twist them into bundles. We twist a kind of braid in the opposite direction. Bring the braid to the ponytail. We do this with all hair.
- We take a strand from the tail, form a loop and thread its ends through the elastic band. We do the same with all hair.


To make the braids last longer, it is advisable to braid children's hair tightly. As you perform, you can spray your hair with water. A nice bonus after undoing many types of braids are small, attractive curls.
Zizi braids
403 Forbidden403 Forbidden
nginxThis is a hairstyle made from a large number of thin small braids, reminiscent of ordinary African ones. The difference is that zizi braids are ready-made braids that are woven in a special way, which significantly reduces the time it takes to create a hairstyle.
Zizi comes in several varieties:
- straight;
- wavy (small curl in the form of a light wave);
- corrugated (very fine spiral);
- zizi sue (spiral curl, gives voluminous curls).


The main advantage of zizi is their lightness. They are almost twice as light as afro braids. In this case, the number of braids ranges from 500 to 650 pieces, the hairstyle turns out voluminous and thick. The zizi color palette includes more than 25 shades - both natural and bright.
To braid zizi braids, only 5 cm of your hair is enough. The length of zizi braids is about 70–80 cm. They do not require special care. It is not recommended to wear such braids for more than 3 months. If you carefully undo the braids, they can be used again.
Hairstyles with beautiful braids add a neat appearance to a child's appearance, are great for school and give the hair the opportunity to stay clean longer. Anyone who is willing to show a little patience and perseverance can master the technique of braiding girls' hair.
(1 votes, average: 4,00 out of 5)
2 years ago 12 months ago
Do you spend a lot of time thinking about your hairstyle for a celebration? Do you put your hair in a boring ponytail every day? Consider learning how to braid hair. It's simple and we will prove it to you. 1 min
Every girl should learn how to make a couple of easy-to-make but elegant braids. Even a beginner can easily achieve a braid and at the same time always looks stylish and neat. Believe me, there are many variations of braided hairstyles, as well as braiding techniques that any girl can master.
The article presents seven hairstyle options:
Based on these braids, you can experiment and create new masterpiece braids for yourself. Take action!
What you need to braid your own hair
To successfully create any hairstyle, including braids, you need to have some tools on hand:
- Comb: ponytail comb(fine-toothed comb with a sharp tip for separating strands), hair brush or comb comb (for combing hair)
- Sets of elastic bands, tapes and other accessories with which you will secure your hairstyle
- Hairpins(wavy or jagged, of various sizes, for small strands or large hairstyle elements), bobby pins, clips and other tools for fixing strands or the entire hairstyle
- Decorations, ribbons, flowers and everything that can be woven, braided and pinned into your hair
- Hair cosmetics: varnishes, gels, mousses for fixing hairstyles and hair care
More details about what is needed for beautiful and neat weaving can be found at.
1.How to braid a simple three-strand braid for yourself
How to weave a regular braid of three strands: 1) gather your hair into a low ponytail, but do not secure it 2) divide the ponytail into three approximately equal strands 3) place the left strand on the middle one, then the right strand on the left one, which has now become middle 4) continue braiding braid, repeating the same steps 5) secure the braid with an elastic band after completing the braiding2.How to French Braid Yourself
 How to French braid: 1) Take a section of hair from the front of your head and divide it into three sections. 2) Start braiding a simple braid. 3) Add strands alternately from the right to the left 4) Braid the braid until the curls on the sides end 5) Secure the braid with an elastic band.
 3. How to braid a rope braid for yourself
 How to make a rope braid: 1) Pull your hair into a high ponytail. 2) Divide your hair into two equal parts. 3) Twist each part in one direction, forming a tourniquet. 4) Twist the resulting strands together in the same direction in which you twisted the individual curls. 5) Secure the end of the braid.
 4.How to braid a four-strand braidto myself
 How to weave a four-strand braid: 1) Divide the hair combed to the back of the head into four equal parts, mentally number them from left to right. 2) We place the first strand on the left under the second, the third strand is placed on the first. 3) The fourth strand is inserted from below the first, then the second strand is placed on the third, and the fourth on the second. 4) The first strand lies on the second, the third on the fourth. 5) The first strand goes on top of the third, and the third on top of the second. 6) Secure the braid with an elastic band.
 5.How to braid the edge of your own hair
 How to braid the edge of your hair: 1) Take a strand at the back of your head and divide it into three equal parts. 2) Intertwine the strands once, as for a simple braid: place the left strand on the middle one, then the right one on the middle one. 3) Each time, add a part of hair to the strand on the right and continue braiding (hair should only be taken from one side). 4) Secure the ends of the braid. 5) Pull the strands slightly to add volume to the braid.
 6. How to do a fishtail braid for yourself
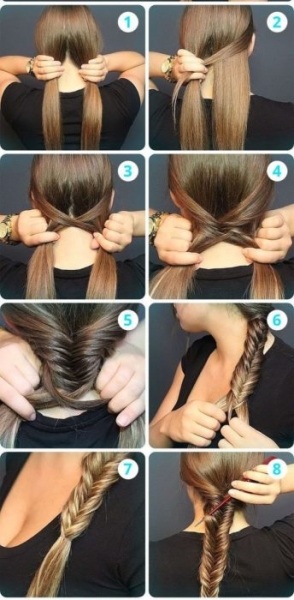
 How to make a fishtail braid: 1) Gather your hair into a high ponytail and tie with an elastic band. Separate a strand and wrap it around the base of the ponytail, secure with a hairpin or bobby pin. 2) Divide the main ponytail into two equal parts. 3) Separate a thin strand from the right side of the ponytail and move it to the left. Add the next thin section on the left to the hair on the right. 4) Continue braiding as described. 5) Secure the braid.
 note
The fishtail technique can be used when weaving a French braid.
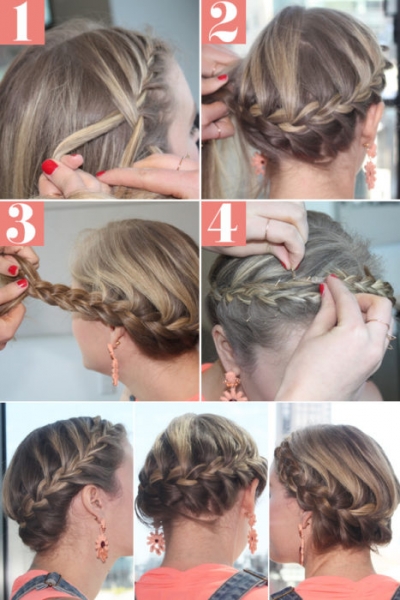
7.How to braid your own basket braid
 How to make a basket braid for yourself: 1) Divide your hair into two equal parts with a simple parting. 2) Separate a small section of hair from your face and begin French braiding. 3) Gradually add some hair to the strands on the right and left, continue braiding in the usual way, and secure the end. 4) Braid a similar braid from the second part of the hair. Roll the braid into a ring in the opposite direction from the beginning of the braiding, secure both braids with hairpins or bobby pins.
 Final touches - how to keep your braid beautiful for a long time and how can you decorate it?
Your imagination will help you decorate the braid at your discretion so that it suits your image. The same braid, but with different decorations, can look different.
The difference between a braid without any decoration and a braid with floral decorations is obviousMost often used to decorate braids
- decorative hairpins (with rhinestones, flowers, bows, etc.)
- hairpins with decor that will not only transform your hairstyle, but also secure your curls
- ribbons, colored laces, floss - they should be woven evenly, distributing decorations along the entire length of the braid
- artificial hair strands of various colors or artificial threads with rhinestones
- fresh or artificial flowers that can harmoniously complement the image
You can watch one of the options for decorating a braid with your own hands in the video:
To secure the braid and not worry about its appearance all day, lightly spray your hair with hairspray or pat down unruly stray strands with light finger movements with a special styling wax applied.
Advantages of braids over other hairstyles
Braid hairstyles have a number of advantages
- Braided hairstyles are one of the most versatile hairstyle options for every day. The braid is suitable for both business style (going to work, school), and for a date, party or get-together with friends.
- Hair styled in a braid looks well-groomed, neat and elegant.
- The hairstyle will last almost all day, which is important for the modern active woman.
- Every girl can master braiding techniques on her own (there are a lot of simple lessons and instructions).
- You will always have a wide variety of options to choose from: a simple braid, a comfortable French braid, braid baskets and crowns, or complex multi-layered hairstyles.
- Weaving can always be decorated to your own taste.
Having mastered simple braiding techniques, you can always combine them and create new, bright hairstyles, be different every day. Braiding is an art, but it is accessible to absolutely every girl.
Instructions for braiding children's hair. Step-by-step master classes on weaving various braids are presented.
Little princesses' hair requires careful care and regular washing. They get dirty quickly due to the mobility of children. Hairstyles based on braids will help keep your hair clean and tidy for longer.
Children's braids for short hair
Despite the short length, girls have a lot of options for braiding braids. Typically, braids are combined with ponytails and decorated with ribbons and elastic bands. Artificial flowers and hairpins are often used for decoration.
Simple braid


This is a familiar three-strand braid. It is braided by dividing the hair into three parts and alternately throwing the right and left strands over each other.
On short hair, such a braid is usually woven from ponytails, since the free length below the neck is not enough to weave a full braid. You can make an unusual hairstyle using braids.

- In the frontal part of the head, divide the hair into two parts, half vertical
- Make 2 small ponytails. Braid these ponytails
- Don't touch the rest of your hair.
- Now make ponytails again and connect them with an elastic band to the resulting braids.
- Leave the edges free
- You can curl your hair


Ponytail braid
When a girl is small (2-3 years old) and has very short hair, you can resort to a trick and weave a braid from ponytails.


- Using silicone rubber bands, tie 4 ponytails on each side of your head.
- There should be 8 tails in total.
- Now connect the two ponytails that are on a horizontal line in the middle with an elastic band
- Divide the resulting ponytail into 2 strands and attach to the next row of ponytails.
- You will get something similar to a snake


Children's braids for long hair
Long hair has plenty of room to roam. There are a lot of options for both holiday and everyday hairstyles. One of the most beautiful hairstyles is the French braid.


Simple French braid
This is a regular three-strand braid that is woven with a tieback.
- Divide the bun of hair on your forehead into 3 parts
- Throw the right strand over the center one and the left one on top of them.
- Now throw the right strand over the braid again and grab loose curls to this part of the hair
- Thus, when throwing strands on the right and left, add hair from the total mass
- Tie the end with an elastic band

Exactly how to braid braids on both sides. Based on the French braid, you can make a wreath, a snake and a diagonal braid.
4-strand braid with ribbon
Another great hairstyle option for long hair is a 4-strand braid. Usually it is woven with a ribbon, it acts as the fourth strand.


- Divide your hair into three strands
- Tie the ribbon between the second and third strands
- Now place the first strand on the second and pass under the ribbon
- Pass the ribbon under the second strand and place the first strand on the third
- Weave according to the pattern
- In the same way, you can weave a French braid from 4 strands. You just need to add hair from the total mass on each side
Children's braids for medium hair


Shoulder-length hair is the most comfortable. It is easy to care for, and if necessary, you can create a very cute hairstyle. The simplest styling option is a braid.

Fishtail for medium length hair
- Tie a ponytail at the top or back of your head
- Divide your hair into three parts
- The two on the sides should be thin, and the central one should be thick.
- Lay the side strands on the central one, you should get a cross
- Now just pick up thin strands from each side and lay them in the center
- You will get a very nice braid
- This fishtail can be braided not from the tail, but from free hair, starting weaving from the temples

Video: Snake and fishtail braiding
Children's hairstyles from braids


You can make many holiday hairstyles based on braids. Nowadays hair bows and babettes are very popular. Combine one of these elements with a simple French braid.


Video: Beautiful braid hairstyle
Hair bow with braid
The hairstyle is suitable for medium length hair.


- Comb your hair
- Ask your child to bend over so that the curls hang down
- In the back of the head, take three strands and using the pick-up method, weave a French braid to the top of the head
- Tie a ponytail
- Thus, from the tail to the back of the head you will have a French braid
- Thread another elastic band and make a loop out of them without completely pulling out the curls
- Divide the loop into two parts and wrap the remaining hair ponytail in the middle
- Secure the bow with bobby pins
Video: Children's hairstyle Bow


Babette with a braid
- Tie your hair into a ponytail at the top of your head
- Separate three thin strands from the right side of the ponytail
- Braid the strands and secure with an elastic band
- Thread a bagel or sock with the toe cut off through the tail.
- Wrap the tip of the ponytail around the sock and, turning the donut inside out, wrap all the hair
- There is no need to braid a bagel
- Secure your hair with pins and wrap it around your babette with a braid.
- Great hairstyle for a child's prom in the garden


Flowers from braids
- Divide your hair into two parts vertically
- Weave a classic French braid from bottom to top. Secure with rubber bands
- You should end up with two ponytails and braids from the elastic bands to the back of your head.
- Now braid each ponytail into a fishtail.
- Tie with an elastic band
- Pull out the strands
- Twist your voluminous braids into a spiral like a snail.
- Secure with pins


Video: Quick braids
Hair heart
- This is a casual hairstyle
- Divide your hair into two parts vertically
- Now divide each part in two
- In this case, the upper part should be smaller
- The parting separating such halves should be oblique and located at an acute angle upward
- You will get some kind of triangles at the top.
- You need to weave a French braid from each triangle in the direction from the corner to the forehead
- Now just pull the hair down and weave in the hair from the lower parts of the halves
- Move the braids towards the back of the head while braiding.
- In the end you will get a heart
- Weave loose hair into a fishtail or make a rose out of it


Children's hair sets
These are sets whose composition is completely different. For toddler girls, they usually contain combs, silicone rubber bands and duck clips. Girls in the older group in kindergarten really love Barbie, so there are many themed sets on sale. They include a tiara, beautiful heels with stones and various elastic bands.


Many manufacturers produce series for children's hair care. Inside the set you will find shampoo, glitter spray and even styling products.
All these products are made from natural ingredients and do not cause allergies and will not cause any harm to the child.


Video: Children's braids with ribbon
Nowadays, hairpins using the kanzashi technique are at the peak of popularity. These are cute decorations that geishas used to decorate their hairstyles in Japan. In our country, these are the cutest hairpins for children. They are used to decorate hairstyles for the holiday. It is not necessary to purchase such a hairpin; you can make it yourself.

To do this, you will need a metal duck - a base for a hairpin, a satin ribbon, a lighter, stones or rhinestones, a needle and thread.

- Cut 5 cm wide ribbon into squares
- Need 14 squares
- Fold the square into a triangle, and then connect the side corners to the vertex of the triangle
- Use tweezers to grab the product in the center, and cut off what remains below with scissors
- Melt over a lighter
- Make 14 of these petals
- Cut a circle out of yellow felt and glue petals to the bottom
- Glue the base underneath
- Attach the flower to the metal duck


- If you want to create a holiday hairstyle, wash your child's hair and dry it
- To disguise not entirely clean hair, you can also braid it.
- In the summer, a braid is a way to avoid getting your hair dirty. So, they look well-groomed and do not get tangled. Besides, the baby is not hot
- When making a braid for the first time, try to choose a simple weave; it is difficult for a child to sit still for a long time
- French braids and fishtails are ideal for children's hair. With enough experience, such braids can be woven very quickly.
Video: Children's hairstyle - hair bows on braids
Of course, long hair is not only beautiful, but also problematic. But with careful care, your princess’s hair will cause the envy of her friends, and you can practice braiding different types of braids every day.
VIDEO: Children's hairstyles from braids
- The braid retains a beautiful and neat appearance for a long time. Weaving is not afraid of wind or humidity, does not wrinkle under a hat and is less electrified than loose ones.
- Beautiful braids are appropriate everywhere. They will look equally good on the beach, in the office or at a wedding.
- Even if you master only one weave, you can create an endless number of variations based on it. For example, braid two or three braids instead of one. Or decorate your hair with accessories. You can weave ribbons, scarves into braids, you can add decorative pins or hairpins. In summer, fresh flowers will look good in your hair.
How to braid hair
- It's better to start with simple options. Don’t rush to weave a complex braid straight from your hair; practice using ribbons or floss threads. Having mastered the principle, you can experiment with the location, number and complexity of braids.
- If you are braiding your own hair, do not use a mirror, trust your feelings. It is quite difficult to navigate using the mirror; it is very confusing in the process.
- To make it easier to work with your hair, you need to wash it, dry it and comb it thoroughly. Mousse or styling gel will also come in handy: it will make your hair manageable.
- When braiding hair, it is better to use wooden combs. Wood electrifies hair less than plastic, which means it will be easier for you to work with strands.
- Alternate the strands according to the pattern, stretch them evenly. With practice, you will master any weaving.
6 braiding options
Two-strand braid
A two-strand braid is a twisted ponytail made of two strands that is suitable for medium-length hair. The braid can be used for a French braid. A ribbon woven into a plait will look beautiful.
- Divide your hair into two strands.
- Tie a ribbon to one of them.
- Twist each strand into a bundle clockwise.
- Weave the strands counterclockwise. The difference in directions will prevent the braid from falling apart.
- Secure the ends of your hair with tape.
Fish tail
This braid captivates with its effectiveness, although it is woven quite simply. Suitable for shoulder length, but looks especially good on long ones.
A simple version weaves from the back of the head.
- Divide your hair into two parts.
- Separate a thin strand from the left half on the side of the ear and throw it over the top to the right side.
- Then separate a thin strand near the right ear and move it to the left.
- Repeat steps 2 and 3 until you reach the ends of your hair. Secure the braid with an elastic band or tape.
If you want to complicate the braiding, make a French braid that turns into a fishtail.
French braid
A French braid goes well with a formal office suit. It is woven using a three-strand braid. Suitable for long and medium length hair.
- Divide your hair into three sections.
- Throw the far right one to the center.
- Then send the far left one there too.
- Continue until you run out of hair.
For variety, you can weave a French braid only to the middle of the back of the head. Gather the remaining strands into a bun or, securing with an elastic band, leave them in the form of a ponytail.
Waterfall
It's based on the same three-part braid. The loose strands give the hair an unusual look. This braid is suitable even for chin length hair. It weaves horizontally from the temple. You can collect hair in this way only on one side. Or you can make a symmetrical braid and wear it instead of a headband: the styling collects the hair and prevents it from getting into the eyes.
- Separate a strand of hair from your temple and divide it into three parts.
- The beginning is the same as in a regular three-strand braid. Bring the top strand to the center, then do the same with the bottom.
- Once again, send the top and then the bottom strands to the center.
- Add a section of hair to the top.
- You don't need to add anything to the bottom. Instead, gather another under the existing bottom strand, separating it from the loose ones. Let go of the old one. Move the new one to the center.
- Repeat steps 4 and 5 until you reach the middle of the head. Temporarily secure the braid.
- Make a symmetrical weave on the other side.
- Connect the ends of both braids and secure with an elastic band or tape.
Four strand braid
The complexity of weaving will allow you to apply this option without embarrassment not only to a woman’s hairstyle, but also to a long beard.
First, try a straight braid. When you master braiding, you can use this technique to make braids from the back of the head or headbands. To avoid confusion, remember that you only need to move the outer strands.
- Divide your hair into four sections. Take two strands in your right hand and two in your left hand.
- Stretch the leftmost strand (we will consider it the first) over the second and under the third. Now you will have the second and third strands in your left hand. The first and fourth will be in the right hand.
- Place the rightmost strand (the fourth) under the first.
- Take the leftmost strand (second) again. Pass it over the adjacent (third) and under the fourth. You will have the third and fourth strands in your left hand. The first and second will be in the right hand.
- Pull the rightmost strand under the adjacent one.
- Place the leftmost one under the adjacent one and above the next one, transfer it to the other hand.
- Place the far right one under the adjacent one, which we just moved.
- Repeat steps 6 and 7 until you reach the end of the strands.
- Secure the weave with tape or an elastic band.
Five strand braid
The weave is reminiscent of Irish Arana knitting patterns. This option will require training, but braids made from many strands look very unusual and bright.
Practice a five-strand braid using either a high or low ponytail. The tail will hold the hair, and it will be more convenient to work. When you master this method, move on to a hairstyle without a ponytail or make a French braid with this type of braiding.
- Divide your hair into five equal sections.
- Take three middle strands. First, throw the left one to the center, then the right one - just like in a three-strand braid. Then take the outermost strands of the three middle ones, lift them above the weave and temporarily secure them with a clip.
- You will be left with a middle strand and two side strands that we haven’t touched yet. Of these three strands, throw the leftmost one to the center. Then send the far right one there too.
- Use another clamp to secure the middle one. This will prevent the weave from falling apart.
- Release the strands you were lifting. Place them along the edges of the weave.
- Take the strands you just worked with: these are now parts two and four in the braid. Lift and secure them above your hair.
- Of the remaining three parts, first move the leftmost one to the center, then the rightmost one.
- Secure the middle strand with a clip.
- Lower the raised strands, placing them along the edges of the weave.
- Lift and secure the second and fourth strands.
- Repeat steps 7-10 until the end of the weave.
“The braid is a girl’s beauty” our ancestors have long said. Braiding is a good tradition; it is a practical, stylish and very creative solution for those who want to “tame” their unruly hair. If you have not yet learned how to weave various and intricate braids for girls: 100 hairstyles with step-by-step photos will come in handy for you. In our article you will learn a lot of interesting and useful information, learn the secrets of the perfect braid and learn how to make real works of art from ordinary braids.
We offer you various types diagrams, photo and video instructions, thanks to which you will stop visiting expensive salons and start making mind-blowing masterpieces. We will teach you how to style your hair in the most imaginative way, while spending a little time and effort. Together we will try to braid neat and stylish braids, designed for both long and short hair. Our methods are accessible and understandable even for dummies and are especially suitable for young mothers who dream of beautiful, practical and strong braids for their babies.
Braids for girls step by step for beginners
A little princess means beautiful outfits, bows, and, of course, braids. Any mother can make the most ordinary braid or ponytail. And we will teach you right now how to build something unusual and original by combining these 2 elements into an unusual ensemble.
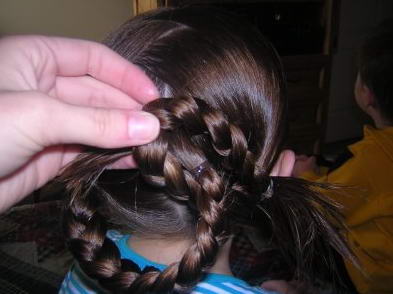
Master class No. 1. Chic composition of ponytails and braids
The first hairstyle seems quite labor-intensive, but we will tell you in detail how to quickly and efficiently create a beautiful composition.
Step 1. We comb the hairs and collect them on the top of the head into a small ponytail. We still have hair at the edges, which we will also divide into ponytails.
Step 2. Now we divide the hair on the top of the head into 3 more ponytails, forming even triangles at the base.
Step 3. We need to divide each of the strands into 2 more parts.
Step 4. And now we make original “flagella” from hair. To do this, we take a strand from one section and twist it with a strand from the adjacent one. So we connect all the strands one by one, having first wound them around our fingers (so that the flagella will hold better).

Step 5. The length of the flagella should be several centimeters, and at their intersection a tail of “loose” hair is formed.
Step 6 We transfer a strand of hair from the tail to the middle finger, forming a loop. We thread the end of the hair under the elastic, near the base of the ponytail. We make such loops of strands around the entire circumference of the hairstyle, threading them under the elastic band.
Step 7. We hide the remaining hairs in a small bun and decorate them with a ribbon.
Master class No. 2. Hairstyle for girls from braids

Master class No. 3. French braid for girls
This hairstyle is done within 10-15 minutes. And it looks gorgeous.


- You can form a small bump or bun.
- You can add a braid.
- We will tie the tail, decorating it with a ribbon.
Master class for moms: wonderful braids for every day
Little princesses are very active and mobile, so it is important for every mother that her hairstyle is not only beautiful, but also practical. With the following hairstyle, your little naughty girl will look very neat and stylish.
Comb your hair into a zigzag parting and spray with hairspray.

We make ponytails, secure them with an elastic band and braid them.

We tie the braids together, following the instructions in the photo.

We secure the braids under elastic bands and decorate them with hairpins or bows.
And this hairstyle looks very festive and spontaneous.


We offer weave a circular braid for you for your little beauty.


And this wonderful weaving will turn your baby into a fabulous Goldilocks.

It is based on the already familiar French braid.

Divide hair into 5 parts from the back of the head to the top.

At the very bottom we will have a ponytail, then a French braid goes above it.
Then comes the ponytail again, the braid and the ponytail on top.

We created a layered hairstyle and a long ponytail in the middle. Lubricate it with gel and twist it into flagella, there should be 3 of them.

The result was simply amazing. Your baby will be very pleased.
Braids for girls: 100 hairstyles for every taste
For girls, both small and large, it is important that the hairstyle is beautiful, strong and easy to weave. After all, mommy also wants to look feminine and elegant. We offer you various braiding options for both mothers and their charming daughters, as well as step-by-step photos of their implementation. Always be beautiful!
Braiding short hair
Babies with short hair will not be left without our attention, because any hairstyle can be made beautiful if you put in a little effort and imagination.

A bob haircut can be decorated with an original braided flower.
This is how easy it is to do a French braid for short hair.


Playful ponytails suit babies with short hair.

Even soft and fluffy children's hair can be braided very elegantly and beautifully.

Charming braids for those with long hair
See how you can braid long hair and try one of these hairstyles yourself.


Naughty braids for girls: original and simple
Very stylish and popular hairstyles for little beauties. Try this for your baby.


Popular braid patterns: quick and easy
Mothers know how difficult it can sometimes be to braid a braid for a restless and active child. We offer you simple and affordable braid patterns to make the braiding process quick and enjoyable.


First scheme- This is an ordinary braid, very popular among mothers. It is called differently: French braid, dragon, spikelet. The weaving pattern is quite simple and understandable.


This waterfall braiding pattern is very romantic and stylish.


French braid inside out creates the effect of stunning volume on the hair.

A dragon made of strands is an amazing weave.

A very comfortable braid combined with a bun.


Favorite and irreplaceable fish tail.
Braids for girls: 50 options for all occasions
You can admire beautiful hairstyles endlessly. Let's not just look, but make gorgeous braids together.


Video: braiding girls’ hair in different ways
New articles
- Recipes for flax seed masks against wrinkles on the face Mask made from flax seed decoction
- Weaving beautiful braids for girls for different hair lengths
- How to sew on stripes and chevrons
- How to make a snowflake from glue seconds
- Newspapers for weddings in Bashkir language
- Unusual newspapers for the New Year
- Happy New Year greetings New Year greetings show
- How do we see, see and perceive the world around us?
- Birthday gift for son
- Penguin made from plastic bottles
Popular articles
- Once upon a time there was a button. Lesson summary for senior children on the topic
- Knitted children's sandboxes - selection Knit a sandbox for a baby
- How to crochet a carrot
- What procedures can be done in a sauna?
- “Topographic anatomy and operative surgery of the chest walls, breast
- What to do with your child: the most useful ideas for the whole year and for the weekend Your child will have even more fun
- Studying the features of fingerprints 13 letters
- Age makeup makeup after 45 years
- Methodology for primary diagnosis and identification of children at risk (M
- What's written on your forehead?