How to make a snowflake from glue seconds. Snowflake made of glue
The idea of making snowflakes from PVA glue on windows quickly spread and prompted many to experiment. However, as my experience has shown, the laudatory odes in honor of these supposedly universal stickers are not entirely true. Our article will tell you how to make snowflakes from PVA and what you will have to face.
To make snowflakes from PVA, you will need:
transparent files;
PVA glue in tubes with a spout - they are the most convenient for drawing;
stencil-mesh for drawing snowflakes;
cardboard inserts in files for ease of movement and drying;
optional - dry glitter (sparkles) for nails, scrapbooking or children's creativity.
About stencils for PVA snowflakes
In fact, you won’t need any stencils with snowflake designs to create window stickers. What will come in handy is a drawn or printed circle grid with rays coming from the center. A snowflake has six rays. If desired, you can draw snowflakes with four, eight, etc. rays.
I used the mesh from the quilling kit.

You can randomly draw several circles of different sizes with one center, and rays from it. This template will give you the opportunity to draw smooth, beautiful snowflakes from PVA. Just put it under a transparent file and... draw!
How to make snowflakes from PVA glue
We place a template grid under the transparent file. First, we outline the rays of the length we need, then we draw the details of the snowflake. At this stage, if desired, add glitter by simply sprinkling it on the freshly drawn snowflakes. You can see an example of a sticker with glitter in the first photo of this article.

It is best to use PVA glue in a tube with a spout for drawing: it makes a good line, not thick or thin, but exactly the one we need. Today they produce glue in tubes of different sizes; the best option is 100 ml. If it is more, the heavy bottle will interfere with your work, and your hand will quickly get tired.

We put cardboard into the files and move the sheets to a place for drying. Can be placed near a radiator - PVA is considered non-toxic. At the radiator, our snowflakes will dry much faster than at room temperature. Dry the sheets horizontally!
Once dry, the snowflakes become almost transparent. And ready to use.
How and when to stick PVA snowflakes on windows
Carefully separate the stickers drawn with glue from the file and glue them to the glass. It is best to do this when the snowflakes are “fresh” (drawn in the evening and glued in the morning).
Dried snowflakes may refuse to attach to the glass. In this case, you can additionally coat their rays with fresh PVA.


Advantages of creating snowflakes from PVA glue
- You can quickly make the decor necessary for windows in any quantity - if only you had glue and files!
- Besides snowflakes, you can draw anything - cats, houses, Christmas trees, bells, Christmas balls...
- we get a completely unobtrusive decor;
- a good option for decorating school classrooms.


Disadvantages of PVA snowflakes on windows
- we immediately move the snowflakes from the file onto the glass for permanent residence - rumors about the reusability of such stickers are greatly exaggerated;
- This is a one-time decor option;
- snowflakes may not attach well to glass;
- some snowflakes may tear and become deformed in the process of unsticking from the file;
- yes, and one more thing: do not paint PVA directly on the window glass: the result will not please you (even the thinnest layer of glue will flow, the design will be deformed; unlike a ready-made PVA sticker, the pattern on the glass will not come off, it will have to be washed off).

Before the New Year, windows are painted in kindergartens. Perhaps the patterns on the glass are not quite your style... Mom has exquisite taste, and it’s not easy to wash all this beauty later. But there are at least two reasons to turn a blind eye to how “beautiful” it is: children simply adore this and Santa Claus certainly won’t fly past your window (well, he likes all that stuff...). One more thing: we bring you original ideas, so painters, dip your brushes and have fun!
Source: Shutterstock
Once upon a time they painted on windows with toothpaste, but here magic happens! So, take gouache (it is also easy to wash) with glitter or special stickers - and go ahead! And, yes, about windows: follow safety precautions! By the way, take a break for tea, and when you return, you will find a gift on the windowsill with the inscription: “Impressive! Keep it up!"
Ideas for gifts that “landed” on the windowsill:
- Can of artificial snow
- Socks with toes
- Glowing plasticine

Source: giphy.com
Assignment for parents:
A child under 3-4 years old will probably want to continue the “banquet” on the walls... The ideal option is to attach sheets of whatman paper around the perimeter of the apartment so that the child can draw plenty of pictures. Isn't there such a possibility? Designate a specific place where you can do this. This “disgrace” from the point of view of the grandmother and clean mother is a very useful thing from the point of view of psychologists. And even necessary for the development of creativity, a sense of the significance of one’s own “I”... Thus, the child tells the world: “I am!” If you already forbid drawing on the walls, then immediately show where you can turn around.
Assignment for the child:
Together with mom and dad, decorate the window so that Santa Claus will never fly past! We have prepared for you 8 best ideas that will help create a fabulous atmosphere in your home. Don’t waste time - start pleasant chores now.
Snowflakes made from PVA glue
For New Year's snowflake stickers you will need:
- stencils for drawing
- transparent files
- PVA glue
- syringe without needle
- tassel
The huge advantage of such snowflakes is that PVA glue is non-toxic, so you can make as many of them as you like. In addition, such stickers turn out to be transparent, which means that during the day they do not block the view from the window, and in the evening they are beautifully illuminated and flicker.
PVA snowflakes can be used several times: they are easily removed and glued back, and do not fall off the window. And if you decorate them with colored sparkles on top, the window will turn out simply fabulous!
How to make snowflake stickers from PVA with your own hands, watch the video instructions:
- After you have drawn the snowflakes, put them to dry in a place where no one will touch them.
- When the stickers are dry, remove them from the sheet and stick them on your New Year's window.
- If the snowflakes become a little blurry during the drying process, don’t worry: this can be corrected with nail scissors, cutting off the uneven edges.
Paper snowflakes
This method of decorating New Year's windows has already been proven over the years, but that doesn't mean it's boring! The pattern of paper snowflakes can always be varied, and to create them you only need scissors, napkins (or white paper), thin tape and imagination.

Source: Instagram @yuli_palna
You don’t have to cut out just snowflakes from paper: you and your child can create a whole fairy-tale composition on the window! Take white A4 sheets and cut out houses, Christmas trees, a month, stars, animals from paper!

Source: Instagram @katagera
Of course, a small child will not be able to cut out very complex patterns and snowflakes of bizarre shapes. Start with simple patterns, and if your little one gets it right, show him how to complicate the drawing!
We offer several of the simplest options for snowflakes for children:
Garland on the window
If you don't like peeling tape off your windows after the holidays, you can decorate it with a beautiful New Year's garland. For example, use the same snowflakes, but string them on a fishing line and attach them to the cornice.

Source: themissidea.blogspot.ru
You can cut out stars or Christmas trees from old newspapers and magazines or colored double-sided paper and hang them on a thread from the curtain rod or curtains.

Source: Instagram @mamavkurse
A more colorful option would be to use a large driftwood on which you can hang various garlands. Such a decoration will look very beautiful in the kitchen and make its interior very festive.

Source: Instagram @all4mammy
You can also use children's New Year's crafts or drawings as decoration. Simply stretch a rope along the window, secure its ends to push pins and hang any decor that fits into your interior on small wooden clothespins.

Source: plus.google.com
Decoupage technique
Window decoration using the decoupage technique looks no less beautiful. To do this, you just need to buy New Year's napkins (you can just use white ones), cut out beautiful patterns and stick them to the window. In this case, you do not need to use decoupage glue; it will be enough to make a thick sugar syrup and apply it with a large brush on top of the napkins. The pattern will last!

Frost patterns
Dawn rises over the city,
And in my room through the curtains
Frosty patterns sparkle
A soft, even light shines.
It is completely light and the night is leaving.
The East is burning from afar,
And the clouds turn pink.
The sun is rising above the horizon.
The night passed without a trace,
Half the sky is pink,
And on the window in the rays of dawn
Ice crystals burn with fire.
A ray of sunshine is shining outside the window,
Sparkling with sparks of fire,
Warmly caressing and beckoning, -
And now the ice on the windows is melting,
And drops of ice water
Flow down the glass like tears
And they disappear like dreams
Leaving wet footprints
And in the sky, clear and high,
From the kingdom of ice and winter storms,
Pure azure shines
And it flows in a blue stream.
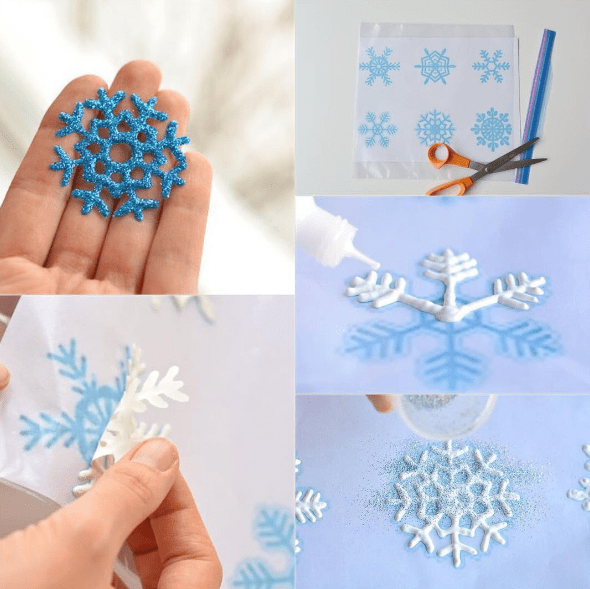
Everything ingenious is simple, and I also would never have thought that using ordinary PVA glue you can create beautiful window stickers. As our dad says, homemade snowflakes made of polyvinyl acetate))))))))) The price of the issue is a little less than two euros, and there will be so many snowflakes that there will be enough of them for all the windows, glass and mirrors in the apartment :) The idea of creating such “stained glass windows” came to me spontaneously, although much later I came across one entry on the Internet that said that something similar can be created using a mixture of glue, talc and paints. But we don’t need any impurities - only your desire to create! The material is blessed: pva is non-toxic, peels off easily, if you apply it sparingly, it is not fragile, and these stickers can be used many times. Of course, there are some nuances here too, which I will mention, but there won’t be a detailed master class, everything is extremely simple and clear, as in all of our crafts with the baby. What else we liked about the implementation of my idea: the stickers are transparent, during the day they do not interfere with the view of the street :), and in the evening they are beautifully illuminated by street lights and flicker “icy”. They are reusable: easy to remove and stick back. They don't peel off on their own. No cutting (after I cut out my daughter’s home theater, I shudder at the scissors at all), no endless paper waste, and, most importantly, fast, easy, pleasant and... beautiful. Very beautiful!
So, to create such stickers we will need:
- transparent files
- medical syringe without a needle (I have 12 ml)
- stencil drawings to suit your taste (pre-printed on A4 sheets)
- brush (which is good for “killing” with glue)
Then everything is done simply: insert the sheet with the stencil into a file, place it on a hard surface, pour PVA glue into a syringe (or any other container convenient for you, the main thing is that the “nose” leaves a fairly thin mark. For kids, it’s better to find a soft bottle, like drop dispensers for the nose and eyes) and apply a pattern over the file. Make sure that the glue is not applied flatly, but rather in a thick enough layer: even a very thin pattern can be removed from the film without breaking, but if desired, it will be more difficult to remove it from the window. That is, the thicker the layer of pva, the more convenient it is to use such a “sticker”. Next, we put our drawing in a safe place to dry for 24 hours (overnight was often enough for us if we made snowflakes in the evening), and after they dry (the glue will become completely transparent), we remove our sticker from the film - it comes off very easily. Apply it carefully to the glass and smooth it out.
Nuances:
- it is better to take drawings without many small “internal” details and rather large ones, since the glue spreads a little and you can get a solid transparent spot instead of an elegant pattern. Ideally, these should be completely filled in shapes, like Christmas trees, balls, etc. This is especially true when working with children: Masha painted simple large figures, as in the color photograph above, herself without any problems.
- if the picture is large enough and requires a “solid” filling of glue, it is more convenient to use a brush to smear it, and squeeze the glue directly from the bottle. Faster and easier.
- if you leave the glue in the syringe overnight, after covering the nozzle with a needle cap, then in the morning it will be a little denser and the glue will spread less. That is, you can draw more subtle patterns.
- if necessary, the stained glass window can be easily removed from the window, you just need to slightly pick it up with your fingernail and carefully separate it from the glass, BUT, if you have previously ventilated the room or the window is very frozen, the thin pictures will break. In this case, you need to wait for the window to warm up)) The same thing happens if you added glitter glue to the PVA or painted over the sticker on top - it becomes more fragile. It happens that the sticker sticks well to the window: try moistening it with a damp cloth and wait a few minutes. PVA is made on a water basis, so it is easiest to “soak” it with water.
- if the sticker begins to stick poorly to the glass, just moisten it a little from the inside (pass it over a wet cloth), and it will stick perfectly again.
- it doesn’t matter if the picture is “blurred” in some place, after drying it is easy to “correct” with scissors - pva is easily cut in a dried state. For the same reason, it’s not scary if the baby goes beyond the edges of the picture when coloring the sticker or smearing the glue - all the excess will be cut off.
Options- there are many of them, ideas come to me every day, while I will describe those that have been verified by personal experience and those that I managed to photograph :)
1. Directly by “improving” the glue itself.

- You can pre-mix glue and small glitter. I haven’t yet come up with anything better than removing the plunger from the syringe, pouring glue inside, then pouring glitter or paint and stirring the contents until smooth with a thin stick (I used a hairpin). Thus, you can pour glitter into the next syringe or pour paint of a different color... If you use several syringes with different colors of PVA, then what is not a set of stained glass paints?)))))) (by the way, they are made on the basis of PVA, how much I know). I like stained glass without any impurities, transparent and “icy”, but in artificial light the sparkles also shimmer beautifully, so make different options.
- You can sprinkle glitter on the picture you just drew, or later, when the glue has dried, apply a thin layer of glue and sprinkle it again with glitter or stick on sequins, etc. This method is not convenient if the drawing contains many finely drawn details - it will take a lot of time to go over them carefully with a brush without going beyond the edges. By the way, I didn’t notice too noticeable external difference in the final version when glitter was pre-mixed into the glue or sprinkled on the finished drawing.
- You can apply a gold or silver or other colored outline along the edge of the drawings. Also an interesting option.
- Paints can also be used in two ways, even three:
- drop a few drops onto the drawing you just applied and apply stains with a brush (painting evenly in this case will not work)
- apply paint over the dried craft. In this case, be prepared for the sticker to become more fragile and less flexible.
Conclusion: if you want to achieve relative transparency of the sticker, then mix the paint first, add a little of it, but when applying paint to a dried sticker, the stained glass window will turn out opaque. As far as I understand, gel from gel pens was previously added to homemade stained glass paints; apparently, the gel-like structure of the paint gives greater transparency.
And now for a variety of crafts where you can still use the miracle pva.
2. Take large eyes for toys (I bought a whole bag of different sizes at a craft store for 1.5 euros), apply thick, even glue to the back side and leave to dry for 12 hours. Voila! We glue the eyes on a window, mirror, refrigerator, and, depending on the material of the “backing,” we give the child either pencil-markers for glass (I wrote about similar ones) or erasable markers for magnetic boards, if you draw on the board. Let the child draw various characters around these eyes, be it monsters or fluffy bunnies. In the photo there are my doodles as an example; Masha’s drawing is more abstract so far. The young ladies who visited Masha know what our window in the living room looks like)))))))

3. If you have leftover leaves, grass, flowers or plant branches dried from autumn, you can make amazing “frozen” things from them)))) After making holes, you can hang them like a garland, stick them on glass or use them as key chains. We are going to decorate New Year's gifts with small “ice pieces”.
If you wish, you can use scissors to give the edges of the sticker a jagged appearance that imitates the contours of a leaf, or even come up with some interesting shape of your own. Only then you need to spread the glue on the leaf, going far beyond the edges.


 4. These stickers can also be used in the bathroom. Masha made the snowflake in the photo entirely herself and glued it to the tile. When we have a little more time (freed from the pre-New Year bustle), she and I will draw funny colorful animals. The paint here, by the way, was applied to glue that had not dried and streaks and dots were made with a brush. These snowflake blots have been hanging in our bathroom for three weeks now and show no desire to come off :)
 5. You can make a whole garland of their snowflakes, for example, and decorate your house or Christmas tree with them.
And another photo...
In this photo you can see that in daylight the snowflakes with sparkles look a little darker.
________________________________________ ________________________________________ ____
The public has had questions about the glue we use. I answer - this is pva from Eskaro (330 ml), there is no other product sold in Estonia. At least I took what was on the shelf at the hardware store. For small and ornamental works we use Bikovsky (118 ml). Both become transparent as they dry, but the Bikovsky one was not tested for a thick layer and transparency. Since I published the master class (on my blog), I have received two “complaints”: for one girl, the glue curled and shrunk after drying, for the second, it did not become transparent. Conclusion - choose high-quality glue.
P.S. I came across a very good review of Escaro from craftsmen who make cold porcelain.
In this review, you can go into more detail on how to make PVA glue using the easiest technologies.
These decorations will be an excellent option both for the Christmas tree and as a window design. All ideas are developed by masters and do not require specific skills. In general you will need:
High-quality PVA glue (better than foreign production)
Stationery (pen, pencil, ruler)
Scissors, needle, thread or tape
Brush
Glitter (can be replaced with finely chopped rain for the Christmas tree)
Semolina (needed for the second version of snowflakes)

All materials are available at every home and you won’t need to waste time going to the store. By and large, production costs are minimal. Therefore, many people practice such techniques.
Advantages of PVA snowflakes
Making snowflakes from glue is quite simple, especially if you do it yourself. After drying, the material has a dense structure that does not interact with moisture in any way. When you glue paper snowflakes to windows, they instantly become wet from condensation that accumulates on the surface of the glass. If you watch the video on how to properly make jewelry from PVA, you will succeed.

High-quality PVA snowflakes have a dense structure and you can make holes in them to allow special fasteners to pass through: threads or wire. You can store your jewelry for more than a year, but it will not lose its original appearance and will delight you every year.

First of all, PVA glue has a hypoallergenic structure and is harmless to the child. When you stay in a warm room for a long time, no unpleasant odor comes out. Therefore, the use of this material as a basis for is very popular.
Making stencils
At the initial stage, we will need to make stencils. In this case, it all depends on what types of snowflakes you will make. Using a pencil, draw a sketch on paper. You don't even need to cut it. Show all your imagination and make original models that everyone will like. You can also instruct your child to make such stencils, he will do a great job.


The most important thing is that the resulting snowflakes are symmetrical. You will also need a transparent oilcloth or document file. Currently, these types of elements can be found in any stationery store. First, go and buy everything.
Instructions for making snowflakes from PVA
New Year's decorations made from PVA glue must fully comply with the manufacturing rules. There is no need to rush, the most important thing is to let the glue dry and take a dense shape. The following describes the main stages of making snowflakes from PVA.

1. After we have prepared the stencils, we proceed to the production of snowflakes. We place transparent oilcloth on the stencils, which should create excellent conditions for peeling off the dried workpiece. PVA glue has an optimal structure and when dry it forms a soft consistency.
2. Using a stencil, using a brush, lay an even layer of glue on the surface. Next, we proceed to using and applying decorations. It is necessary to lightly cover the snowflakes with glitter or finely chopped rain. Then leave it for a day until it dries completely.
3. There is another effective method - replacing glitter with semolina or any other solid fine particles; metal shavings are also suitable. Using a brush, shake off or sprinkle the snowflake with a light movement. After drying, these decorative elements will dry and be securely fixed.
4. To make the fastening, you will need to pierce a small hole with a needle and thread it through. You can apply additional decorative elements in the form of ribbons or bright small details. In general, whatever comes to your mind, you can use. In this case, there are no restrictions.

Crafts can be glued to the window using a wide variety of methods. It all depends on your imagination. The most important thing is that the fastening is reliable and effective.
Mounting snowflakes
On the Christmas tree, snowflakes are fixed in the standard way. You just need to tie a ribbon and hang it on a branch. This way you will get a bright and creative decoration.
In order to install snowflakes on windows you will need tape and thread. It all depends on how you are comfortable fixing it. You can use a thin strip of tape and secure the snowflake across it directly on the glass.
The second effective option is to attach it to the top of the window opening. You will need to secure a thread to each snowflake. Next, we additionally cut off the tape or use a button to secure it above the window. This will create a three-dimensional look.


Snowflakes made from liquid glue are our theme today. In fact, everything is very simple, because if you look at it, glue does not exist in a solid state. No, it happens, but it still needs to be brought to a liquid state in order to glue something together.
New Year is a holiday when the whole family expects a miracle. This is a kind of one-day fairy tale that not only children, but also adults enjoy. Parents begin to think about the New Year's table a few weeks in advance, stock up on gifts, and children, in turn, rush to decorate their room or apartment as a whole.
It is not necessary to buy expensive toys and decorations to decorate a room; you can make them yourself at minimal cost. For example, everyone knows colored paper, you can do anything with it, and if you add glue to the work, you can make a three-dimensional snowflake.
Below you can see several options for New Year's snowflakes and more. In the meantime, I’m returning to my new ones, today there are two of them at once. There is no need to spend money on such snowflakes, unless you buy PVA glue. Although if you have children, then you also have PVA glue.
Friends, everything is extremely simple, but there are secrets and difficulties that you may encounter, like me. Therefore, so that you do not have any bad moments, I will tell you everything in order and honestly.
All work should start with templates. It’s good for those who have a printer at home to print out the snowflake templates, but for those who don’t, difficulties will arise, although this should not be called difficulties.
Well, agree with me that the most ordinary snowflake is not so difficult to draw.
Therefore, if you do not have a printer at home, do not despair, you can make templates for snowflakes from PVA glue yourself. We take a pencil and a sheet of paper in our hands. Here is a sheet of paper, you can take any, even draw on a newspaper. We need a template not for drawing a picture on it, but for a stencil, so to speak.
Once you have printed out the template for the snowflake or drawn it, put the film on it. To make a snowflake from liquid glue we will need:
Sample
PVA glue
Sequins
Yeah, our snowflake today will not have one, but one of them with sparkles.
Snowflake made of glue and glitter
Many people will now be wondering where to get glitter, but don’t worry, you can replace it with anything glittery. Previously, we cut tinsel into small pieces and used it to strew snowflakes or crafts, even sometimes glass New Year's toys that had outlived their usefulness, crushed them with a glass bottle and sprinkled these pieces of glass not only on snowflakes, but also on wall newspapers. Do you remember this?
Now, if you don’t have glitter, you can use sparkles and many other options.
In this case I have glitter, so I will have a snowflake made of glue and glitter.
Let's get started and get down to business! I have glitter and I decided to use it. We take a snowflake template, put a paper file or just a film on top of it. Instead of a file, I use a notebook cover. We bought a lot of them this year, so we put them into use.
You can simply cut a simple transparent bag and attach it to the template, this is also one of the options.

Once we have painted the snowflake with PVA glue, we take our glitter and dip a watercolor brush into it. After which, we tap a little at the base of the brush with the index finger of our second hand, using this method, the glitter scatters evenly.

We leave our New Year's snowflake made of glue for a while. Everywhere they write that it takes a couple of hours to dry completely. Guys, if you applied the glue in a thick layer, it will take almost a day. And I advise you to apply it in a thick layer, because the first time I trusted advice from the Internet and was disappointed, everything just collapsed.
Make the lines thicker, they will be much stronger. Then your New Year's glue snowflakes will be simply irresistible.
But as soon as your liquid glue snowflakes have dried, you can safely attach them to any surface. Before doing this, the surface needs to be moistened a little with water, and after that we glue it to the surface. Look how I learned.

Snowflakes made of glue on glass
Snowflakes can be glued to glass using tape, but in my case these are snowflakes made from glue on glass. I have already shared one option just above, and you don’t have to glue the template to the glass, you just need to make a snowflake from it.
My second option, and not the last, is a snowflake made from glue and semolina. Semolina or semolina is an excellent material for many jobs.
Snowflake made from glue and semolina
For work, we will need everything the same as above, only this time we will replace the sparkles with semolina, namely the most common semolina.
We print out a template for a snowflake or simply draw it, then we put a film on the stencil and draw a snowflake on top with glue.

Here, hot on our heels, I sprinkle semolina on our snowflake, well, my snowflake made from glue and semolina is almost ready.

I leave it for a while, or rather for 10 hours, and then slowly and leisurely I remove the snowflake pattern with semolina and attach it to the window.

This is how I made a snowflake from semolina glue.
What do you think about my works and snowflakes made from liquid glue?
Nina Kuzmenko was with you and “ Snowflakes made from liquid glue«
New articles
- How to make a snowflake from glue seconds
- Newspapers for weddings in Bashkir language
- Unusual newspapers for the New Year
- Happy New Year greetings New Year greetings show
- How do we see, see and perceive the world around us?
- Birthday gift for son
- Penguin made from plastic bottles
- Once upon a time there was a button. Lesson summary for senior children on the topic
- Knitted children's sandboxes - selection Knit a sandbox for a baby
- How to crochet a carrot
Popular articles
- What procedures can be done in a sauna?
- “Topographic anatomy and operative surgery of the chest walls, breast
- What to do with your child: the most useful ideas for the whole year and for the weekend Your child will have even more fun
- Studying the features of fingerprints 13 letters
- Age makeup makeup after 45 years
- Methodology for primary diagnosis and identification of children at risk (M
- What's written on your forehead?
- What should parents do if their child has a high fever?
- How to understand that it's time to break up
- Health day scenario with parents "fun starts"